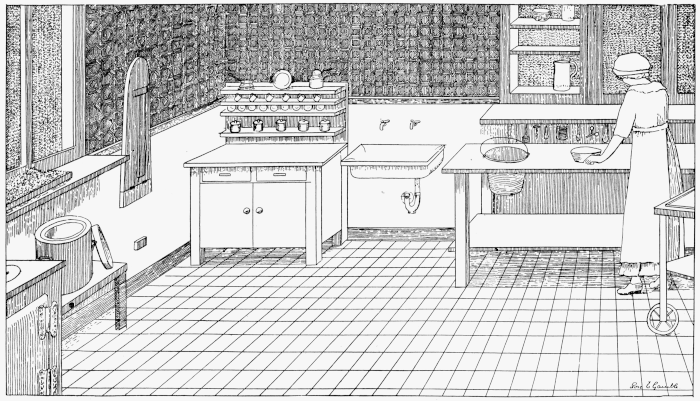
CONVENIENT ARRANGEMENT FOR KITCHEN DEVICES
BY
INSTRUCTOR IN HOME DEMONSTRATION WORK AT GEORGE PEABODY COLLEGE FOR TEACHERS.
NASHVILLE, TENN.; FORMERLY ASSISTANT STATE DEMONSTRATION AGENT IN LOUISIANA.
ILLUSTRATED BY
MRS. R. E. GAMBLE
SECOND EDITION, REVISED.

PHILADELPHIA AND LONDON
J. B. LIPPINCOTT COMPANY
COPYRIGHT, 1917, BY J. B. LIPPINCOTT COMPANY
COPYRIGHT, 1918, BY J. B. LIPPINCOTT COMPANY
Electrotyped and Printed by J. B. Lippincott Company
At the Washington Square Press, Philadelphia, U. S. A.
TO THE WOMEN AND GIRLS OF THE FARM, LOVERS OF THE FIELDS, AND FRIENDS OF THE FLOWERS, WHOSE HEARTS HEAR THE CALL AND WHOSE HANDS SEEK THE SKILL TO MAKE THE RURAL HOME A PLACE OF LIGHT, OF HEALTH, OF BEAUTY, THIS LITTLE VOLUME IS AFFECTIONATELY DEDICATED
[Pg 5]
The point of view from which this manual was written is indicated in the introduction.
The aims are to increase efficiency in the farm home and to satisfy the growing demand for useful information in the country schools.
This is done by giving suggestions and directions for practical work to be done in the home and at school.
Throughout the country to-day many rural schools are expressing a desire to add to their present school curricula courses which are practical. The ideal kept in mind during the preparation of this manual has been to supply that need and at the same time to make it possible for any woman to use the book in her own home.
The limitations in the size have caused many omissions. It is the intention of the author to enlarge upon this material as the demand increases. Ideas and suggestions from other States have been dominant throughout, thus carrying out the true demonstration point of view.
The Author.
January, 1917.
Acknowledgment and thanks are gratefully given to the following persons for suggestions, use of material, and corrections:
Miss Ola Powell, United States Department of Agriculture, Washington, D. C., for making this little volume possible by inspirational suggestions furnished throughout the preparation of the manual and especially for the use of her two models of jelly strainers and illustrations on cheese making.
Mr. O. B. Martin, United States Department of Agriculture, Washington, D. C., for his most valuable suggestions and sympathetic interest during the entire preparation of the material.
The United States Department of Agriculture, Washington, D. C., for photographs of roller tray wagon, water works system, and ideas obtained from circular letter prepared by Miss Mary E. Creswell and Miss Ola Powell, of the States Relations Service, Office of Extension Work in the South.
Mr. Harry M. Lamon, Poultry Division of the Bureau of Animal Industry, United States Department of Agriculture, Washington, D. C., for illustrations of poultry house, dry mash hopper and chicken coop, and the use of information in Farmers’ Bulletin, No. 574.
Mr. B. H. Rawl, Chief of the Dairy Division, Bureau of Animal Industry; United States Department of Agriculture, Washington, D. C., and Mr. J. H. McClain and other specialists in the Dairy Division for assistance in taking the pictures and for criticisms and corrections of the material.
Mr. N. E. D. Talcott, State Agent in Poultry Club Work in Virginia, for the use of his dry mash hopper and oat-sprouting rack.
Dr. John W. Wayland, State Normal School, Harrisonburg, Va., for his appropriate dedication.
[Pg 8] Miss Elizabeth C. Cleveland, Head of the English Department, State Normal School, Harrisonburg, Va., for reading and correcting manuscript.
Mrs. K. C. Blythe, Leesburg, Va., for permission to use a dish drainer.
Mr. C. E. Hanson, A. & M. College, College Station, Texas, for his interest and helpful suggestions.
Miss Emma Chandler, State Agent in Home Demonstration Work, Stillwater, Okla., for the use of iceless refrigerator No. 2 and directions for making same.
Mr. Thos. H. Fullan, Alabama Polytechnic Institute, Auburn, Ala., for the use of his milking stool and suggestions for making the shower bath.
Mrs. Helen Brown Wolcott, State Agent in Home Demonstration Work, Lexington, Ky., for ideas for making the dish rack.
To “The Country Gentleman” for illustrations of cheese making.
Also others who have contributed to this volume.
| PAGE | |
| Introduction | 13-14 |
| CHAPTER I | |
| Kitchen Conveniences | 15 |
| Vegetable Paring Table, Wall Cabinet for the Kitchen, Ironing Board, Jelly Strainer, No. 1 and No. 2, Dish Drainer, Dish Rack, Coal Box, Wood Box, Fireless Cooker, Home-made Cook Stove Drier. | |
| CHAPTER II | |
| Dining Room Conveniences | 43 |
| Roller Tray Wagon, Sideboard, Screen. | |
| CHAPTER III | |
| Porch Equipment | 51 |
| Iceless Refrigerator, No. 1 and No. 2, Umbrella Stand, Blacking Box, Towel Roller, Porch Swing. | |
| CHAPTER IV | |
| Miscellaneous Equipment | 67 |
| Dustless Mop, Folding Canning Table, Fly Trap, Garbage Barrel, Scrubbing Chariot, Sewing Screen, Shower Bath, Practical Waterworks System. | |
| CHAPTER V | |
| Poultry Devices | 84 |
| Poultry House, Nests, Egg Tester, Dry Mash Hopper, No. 1 and No. 2, Rack for Oat-Sprouting Trays, Dust Boxes, Drinking Vessel, Chicken Brooder. | |
| CHAPTER VI | |
| Dairy Devices | 99 |
| Butter-making, Butter Worker, Milking Stool, Cheese-making Equipment. | |
| APPENDIX | |
| Fundamentals in Woodworking, Suggested List of Tools, List of Publications for Supplementary Reading. | |
| Index | 117 |
| Page | |
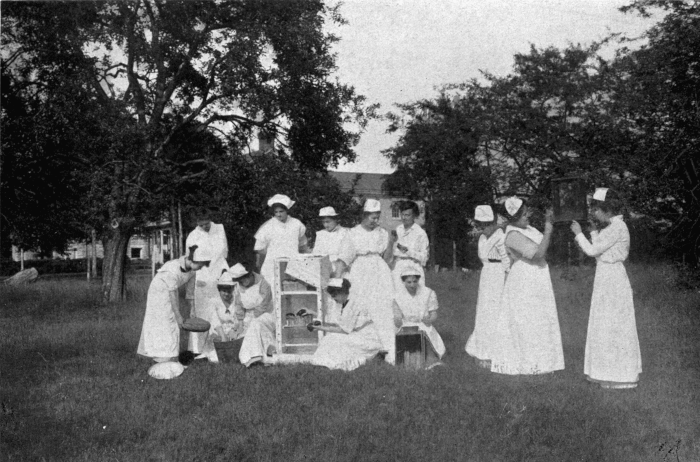
| Convenient Arrangement for Kitchen Devices | Frontispiece |
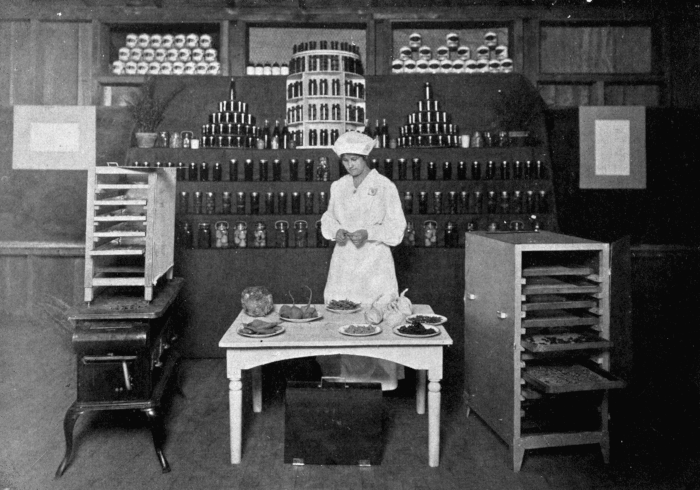
| An Exhibit of Home-made Labor Saving Devices | 14 |
| Home-made Driers Ready for Use | 36 |
| Assembled Material for Building a Fireless Cooker | 40 |
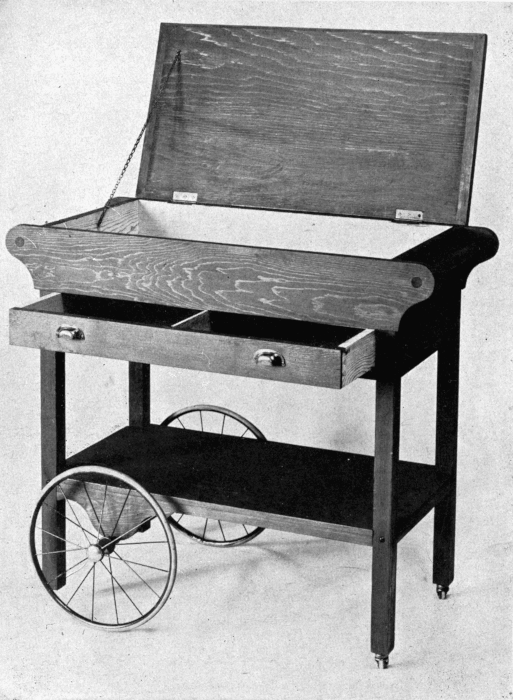
| Roller Tray Wagon, Including Compartment for China and a Drawer for Silver and Linen | 44 |
| Iceless Refrigerator | 54 |
| Sewing Screen | 78 |
| A Portable Poultry House, Showing the Exterior and Interior | 84 |
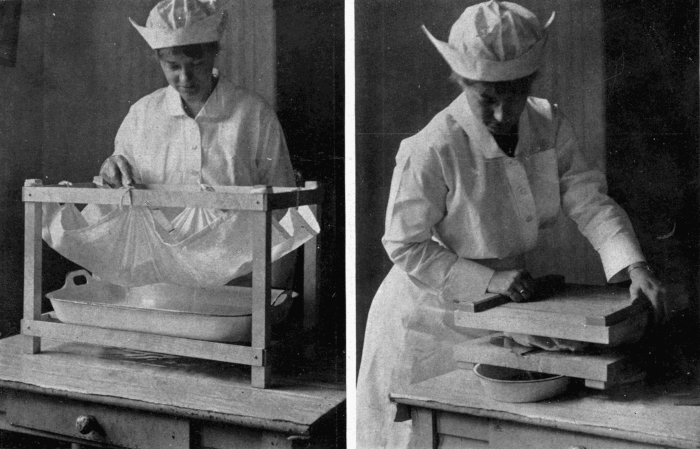
| Churning Operations | 104 |
| Drawing the Curd | 108 |
| Pressing the Curd | 108 |
| Moulding the Cheese | 109 |
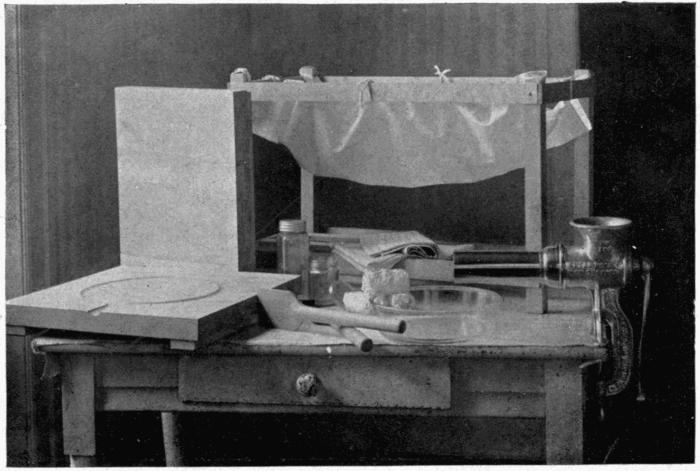
| Necessary Equipment Used in Cheese-making | 109 |
By President Julian A. Burruss
State Normal School for Women, Harrisonburg, Va.
No phase of modern social development has received more attention in recent years than that of our rural population. Advances have been striking along all lines of country life. It would, however, be too much to say that the interests of women and their work in the home have received the attention properly due them. Frequently farmers of the highest type will equip their farms with the latest and best implements and machinery for their work and yet will fail to provide their homes with equipment equally as essential and desirable for the work of the women members of their households. Women’s organizations and the agents of the Home Demonstration Work, together with other agencies, have done much to direct attention along this very important line and in many communities labor-saving devices of a most ingenious character have been developed.
What is good for one busy housewife is not too good for another, and it is a good rule to push a good thing along for the benefit of others. With this in view the author has gathered together numerous inventions of home-made devices of a labor-saving and efficiency-increasing kind, and describes them in this little volume so that all to whom it may come may have the opportunity to make such contrivances, or modifications of them, for their own use. In doing this, the author has not merely had in her mind her own State, but has sought to recognize the viewpoints of women in as many other States as possible.
The author is peculiarly fitted for the task she has set herself. As Assistant State Agent for Home Demonstration Work in Virginia, under the direction of the United States Department of Agriculture, and as supervisor and community worker for a number of years in various rural districts before assuming the [Pg 14] duties of her present position, she has had abundant facilities for becoming familiar with the conditions prevailing in country homes. Having maintained sympathetic relationships with country women for many years, she knows their problems and their needs, and she is also familiar with the sources from which help may be drawn.
There can be no real improvement in social life in the country unless there is leisure time to be devoted to uplifting, cultural, and recreational purposes. The only way in which this may be obtained is by means of labor-saving and time-saving appliances. The articles here described are intensely practical and may be readily made in any home at a nominal cost. To make two blades of grass grow where one formerly grew is certainly a very valuable achievement; but to save muscles and nerves, and to give time and energy for mental and social and spiritual development, is far more valuable and desirable. If the information given in this book serves to lighten the burden and shorten the daily drudgery of a single housewife, its publication will be justified; and it should find a cordial reception in a multitude of homes.
HOME LABOR SAVING
DEVICES
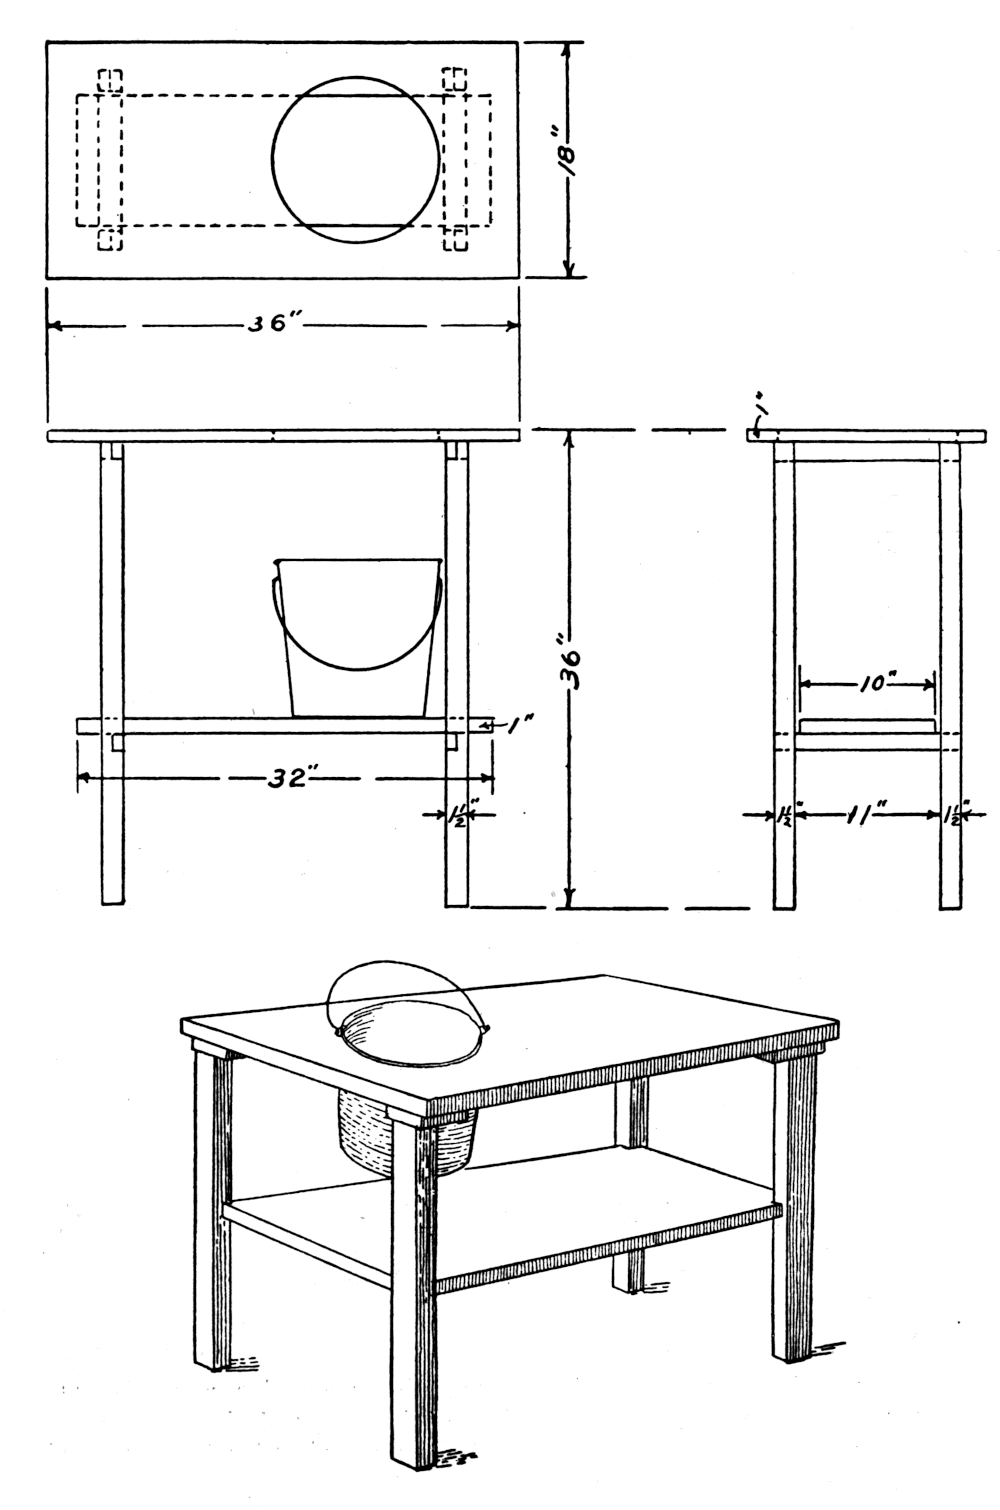
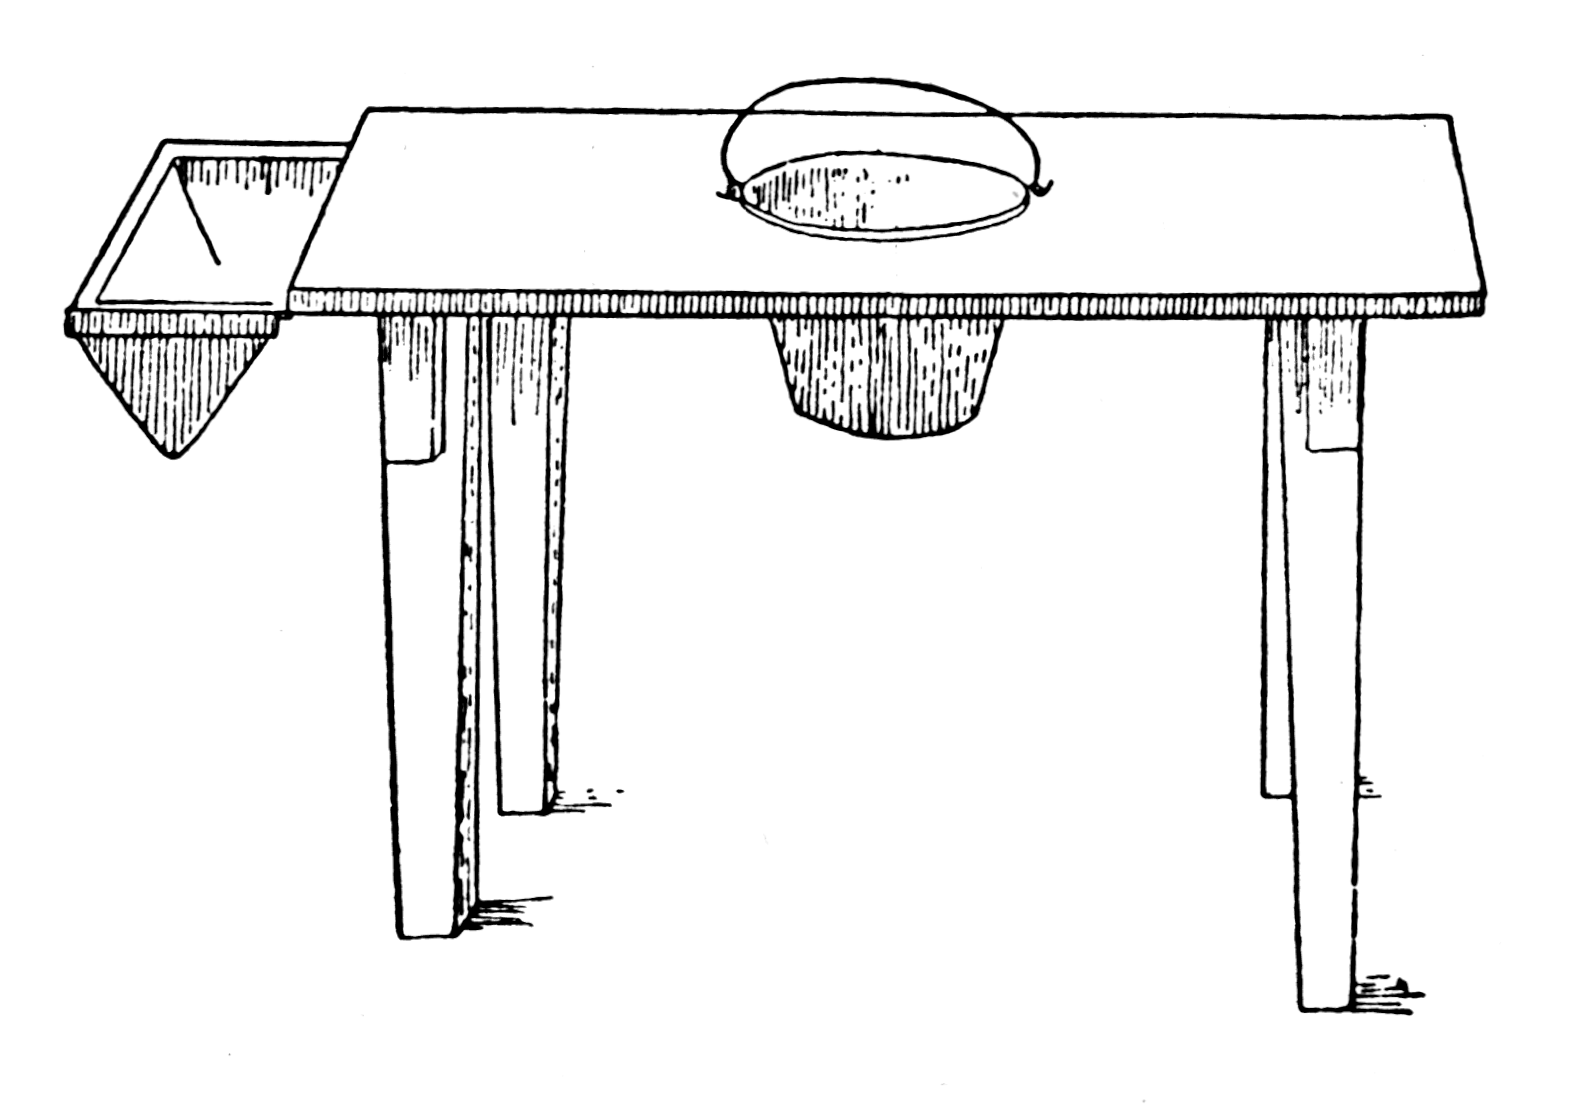
VEGETABLE PARING TABLE
A convenient kitchen table made of poplar and covered with zinc with an opening in the center through which the parings of vegetables or the scraping of dishes may be put into a pail sitting on the lower shelf. This saves soiling the floor and many steps while preparing the vegetables for cooking. It should be remembered that the pail underneath must be removed and the contents emptied into the garbage barrel after each using. It is not a garbage pail and should in no sense be used as such. Above the table hooks on which hang many smaller cooking utensils, such as paring knives, graters, spoons, scissors, or can openers, are all arranged to accommodate the housekeeper.
Materials:
Dimensions:
Directions:
After cutting legs, nail on cleats even with the top edge, measuring 14” for the bottom cleat. Measure 2” from the ends and sides of the top and nail on the legs. Measure 7¾” from the right-hand end and 9” from the side and make a hole 8” in diameter. Nail the bottom shelf at an equal distance from the bottom of the legs.
[Pg 17]
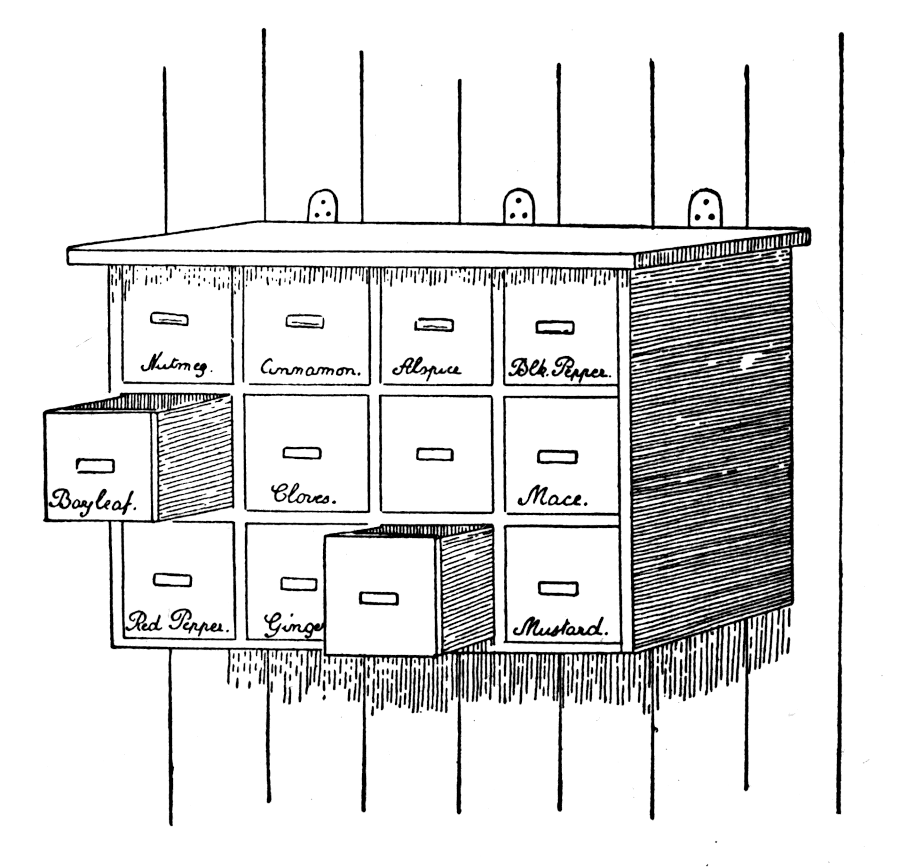
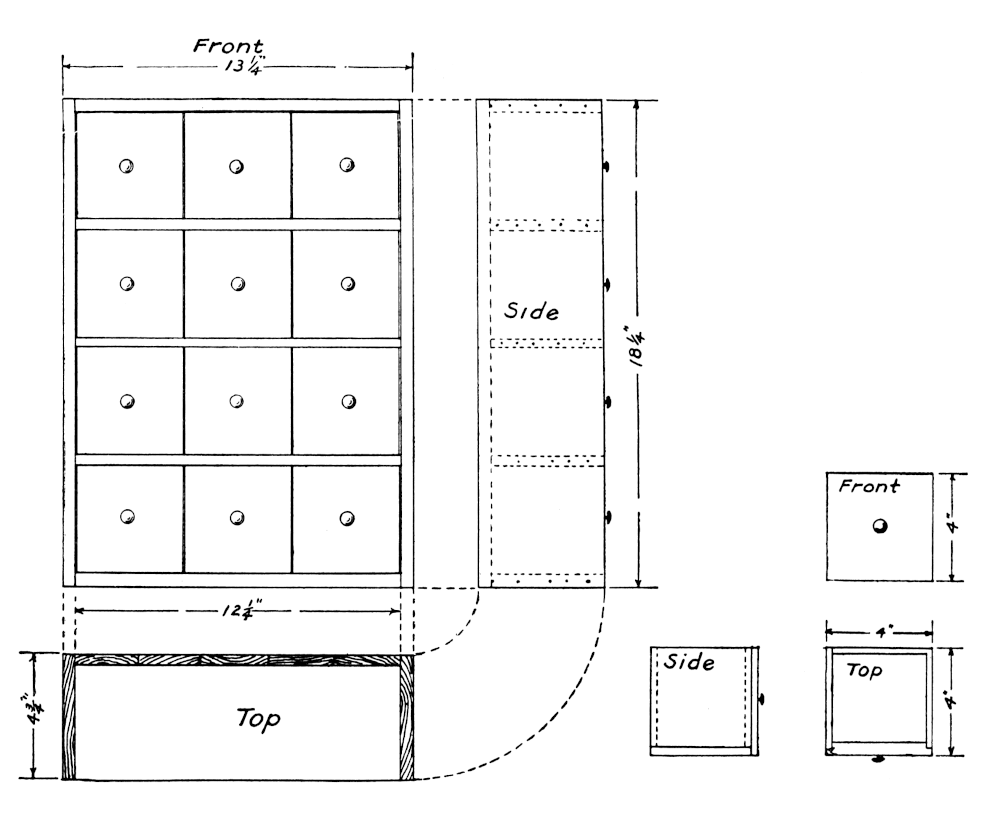
WALL CABINET FOR THE KITCHEN
(Made from Dry Goods Boxes)
A comfort to the housewife is a kitchen cabinet, containing different compartments for spices and such accessories necessary in cooking. It is made of boxes and should be put at some place convenient to the work table so the woman will not have to move to get these things when preparing a meal. It surely fulfils the old adage, “A place for everything and everything in its place.”
Materials:
Dimensions:
Directions:
Remove the sides from the box, making them the exact length of the inside of the box. Draw a line across the bottom and the ends of the box about 2” from the edge of the sides. Nail the sides to the bottom and the ends of the box about 2” from the edge of the sides, with outside faces on pencil line. Plane and sandpaper the edges until they are smooth. Nail the shelves in at equal distances apart to make four compartments of equal size. Place three of the salt boxes in each compartment. Sandpaper, stain, and polish.
[Pg 19]
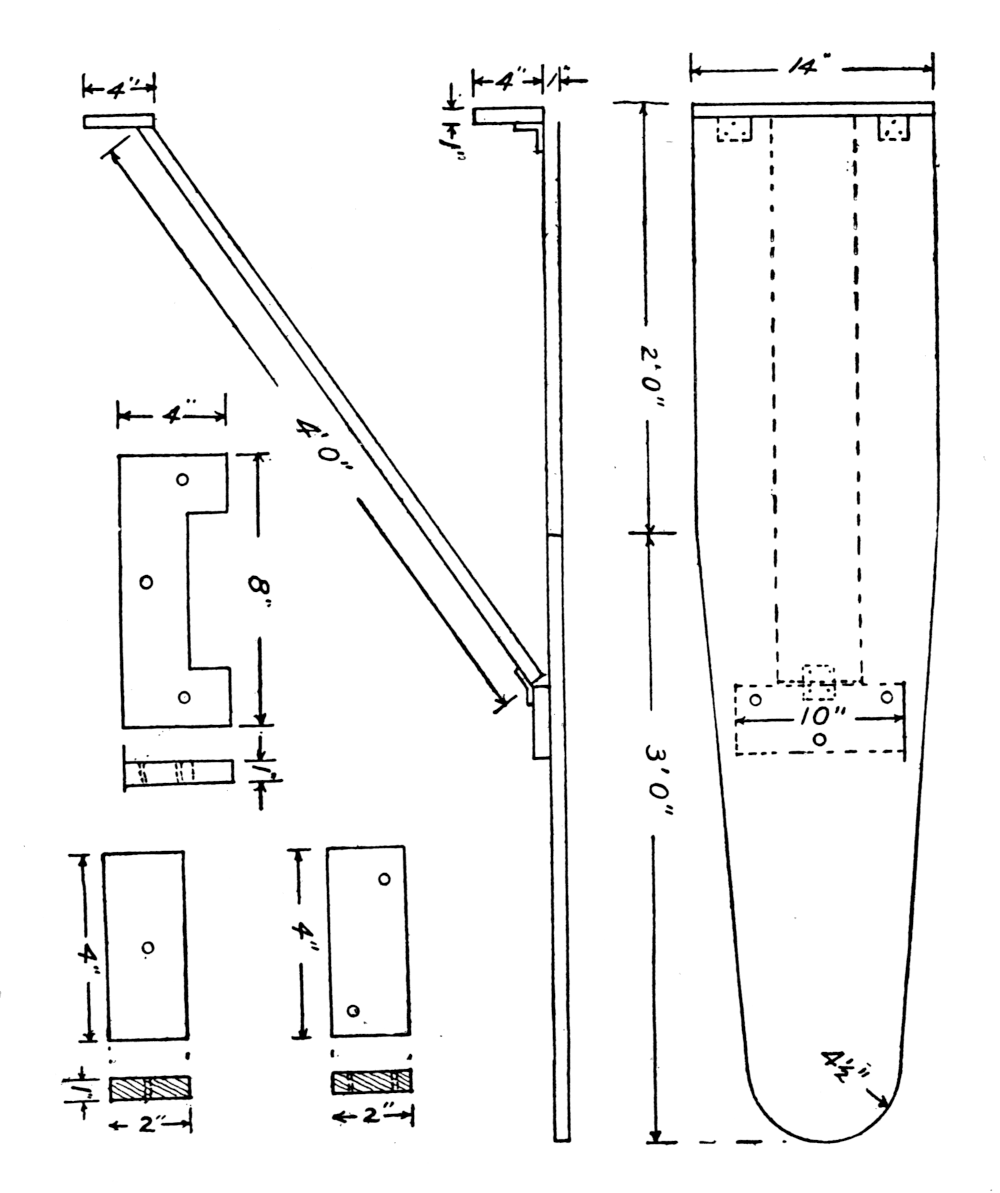
IRONING BOARD
This ironing board is a very great step saver. It is always ready and in place. It is fastened to the wall at the most convenient place and adjusted to suit the one who is to use it. When not in use it can be folded up and hinged against the wall out of the way. The leg is hinged to the ironing board and falls into position when the board is lifted. Skirts may be easily ironed without changing the position of the leg.
Materials:
Dimensions:
Directions:
Plane the top of the board (1” × 14” × 3’) on the smoothest side. With a radius of 4½” lay out a semi-circle at the middle of one end of the board as shown in illustration. This may be done with a compass or with a string and pencil. Make the other end of the board square with one edge. Two feet from each end make a mark on each edge and draw a straight line from each of these marks tangent to the semi-circle. Saw along these lines, smoothing the edges with the plane. Fasten the wall strip (1” × 4” × 14”) to this top with 2 No. 3 (butt) hinges. Bore 3 ¼” holes through the board strip (1” × 4” × 10”) and fasten it to the bottom of the top at a distance of 34” from the wall strip. The brace (1” × 4” × 4’) is fastened to the board strip with one No. 3 (butt) hinge. ¾” holes are bored through the wall strip and it is fastened at a convenient height to the wall with 3 flat-head screws. After boring 3 ½” holes through the brace support (1” × 4” × 8”) it is screwed to the wall with 3 flat-head screws. Place this support directly below the wall strip and at such a distance from it to make the board level when the brace is in position. Bore 2 ¼” holes in one of the pieces measuring 1” × 2” × 4”, and one hole through the other piece. Fold the board up against the wall and fasten [Pg 20] the piece with the two holes to the wall just a little to one side of the board and 2’ above the wall strip. The other piece with one hole is fastened to this piece to hold the ironing board in position.
The covering may be made of cotton flannel or an old blanket. Allow 2” on the sides and the end to be turned under after it has been cut the shape of the board. This must be tacked firmly and smoothly on the board. The ironing sheet may be made of unbleached muslin or an old sheet. This is also cut the shape of the board, allowing 4” on the sides and end for the hem. Attach pieces of tape to the opposite sides about 10” apart to tie the sheet on the board.
[Pg 21]
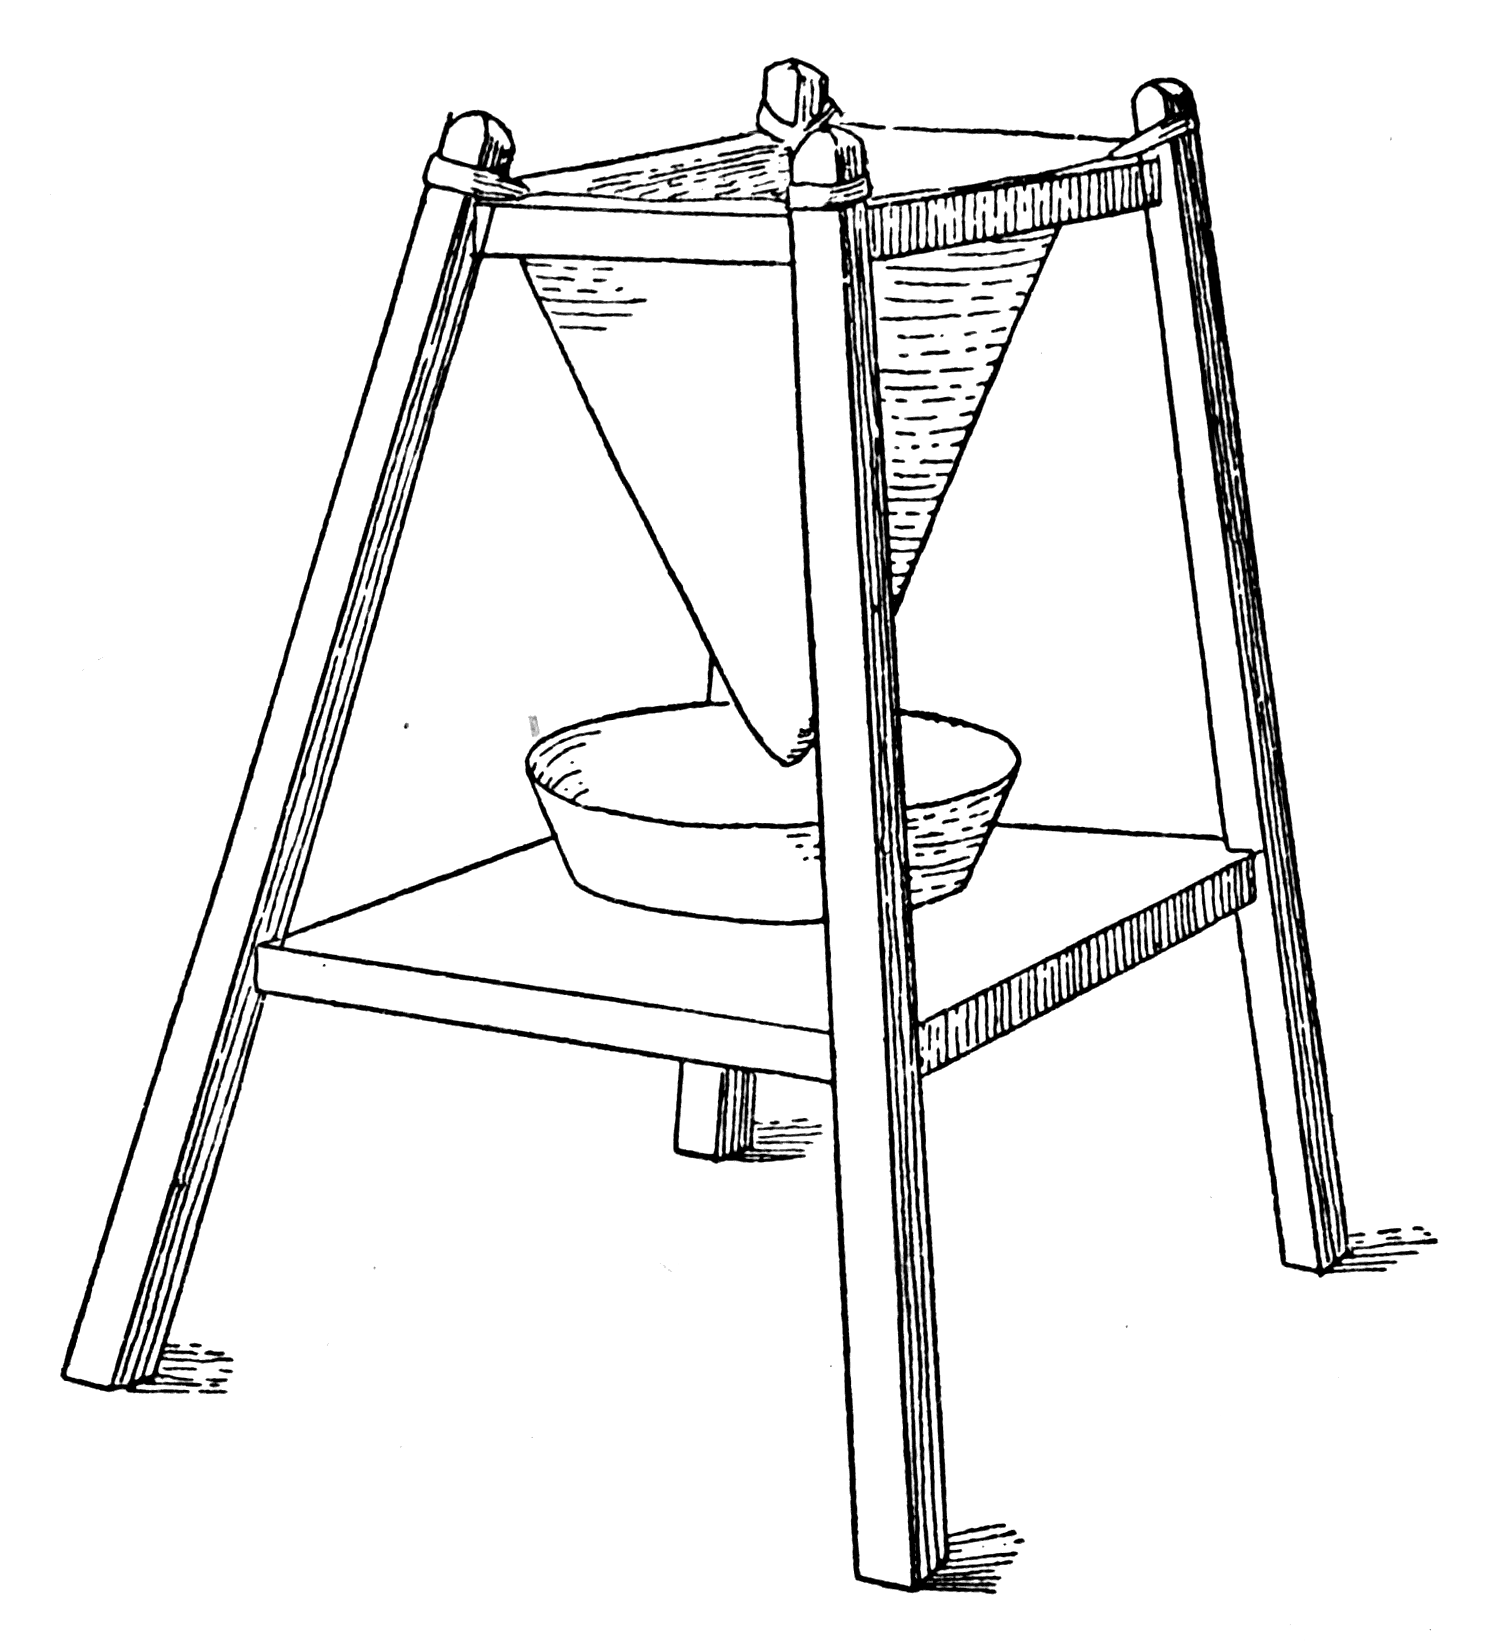
JELLY STRAINER NO. 1
An old chair is generally used to hang the jelly bag over while the juice is dripping. As a substitute the device shown in the following illustration is suggested as being more convenient and sanitary in every way. It not only provides a place for the bag to hang, but it also has a shelf on which the pan sits to catch the drippings from the bag. The legs are adjustable; hence it is easily taken apart and kept in a small space. This makes the strainer especially convenient to the Canning Club Agent as she goes her daily rounds teaching the housekeepers the art of jelly-making. It can be easily made at home and at a little cost.
Materials:
[Pg 22]

[Pg 23] Dimensions:
Directions:
Bevel the tops of all 4 of the legs at an angle of 45°. Make the upper shelf of the 4 pieces measuring 1” × 1½” × 7”. Measure 2¼” from the tops of the 4 legs and screw the upper shelf to the legs at these points. A solid piece of wood with a hole in the center may be used in making this shelf. Support this upper shelf by screwing the four triangular braces (1” × 2½” × 3”) in the corners of the shelf. Use the 8 1-inch No. 9 screws for this purpose. Saw the lower shelf out 1½” on each corner and screw it on the legs at a distance of 9” from the bottom of the legs. Sandpaper but do not stain. Take a piece of flannel of the desired size and make the jelly bag in the shape of a triangle. Sew a loop of tape at each corner to hang the bag over the posts.
JELLY STRAINER, NO. 2
While this jelly strainer is unique and useful in its construction it is not adjustable. It is made of poplar at a minimum cost. Around the top edge are arranged little brass hooks. These are put at equal distances apart. At the lower end of the trough two plugs are put, one above the other, through which the jelly juice flows out into a pan placed beneath the plugs.
The jelly bag is made of an oblong piece of flannel with ivory rings sewed around the edges so as to hang the bag on the brass hooks around the top of the frame.
Materials:
[Pg 25]
Dimensions:
Directions:
Saw the two end pieces according to the illustration. Measure 6½” from the bottom of each end and cut them out ¼” to fit sides (1” thick) placing the sides ¾” from the outer side of the end pieces. Measure equal spaces from each side of the ends and put the handles 1½” from the top edge. Bore two holes ¾” in diameter near the bottom of the end to fit the plugs. Bevel the two sides (1” × 12” × 15½”) at the bottom so as to make a tight and neat joint. Screw the end pieces to the sides. Screw the brass cup hooks at equal distances apart around the top edge of the strainer.

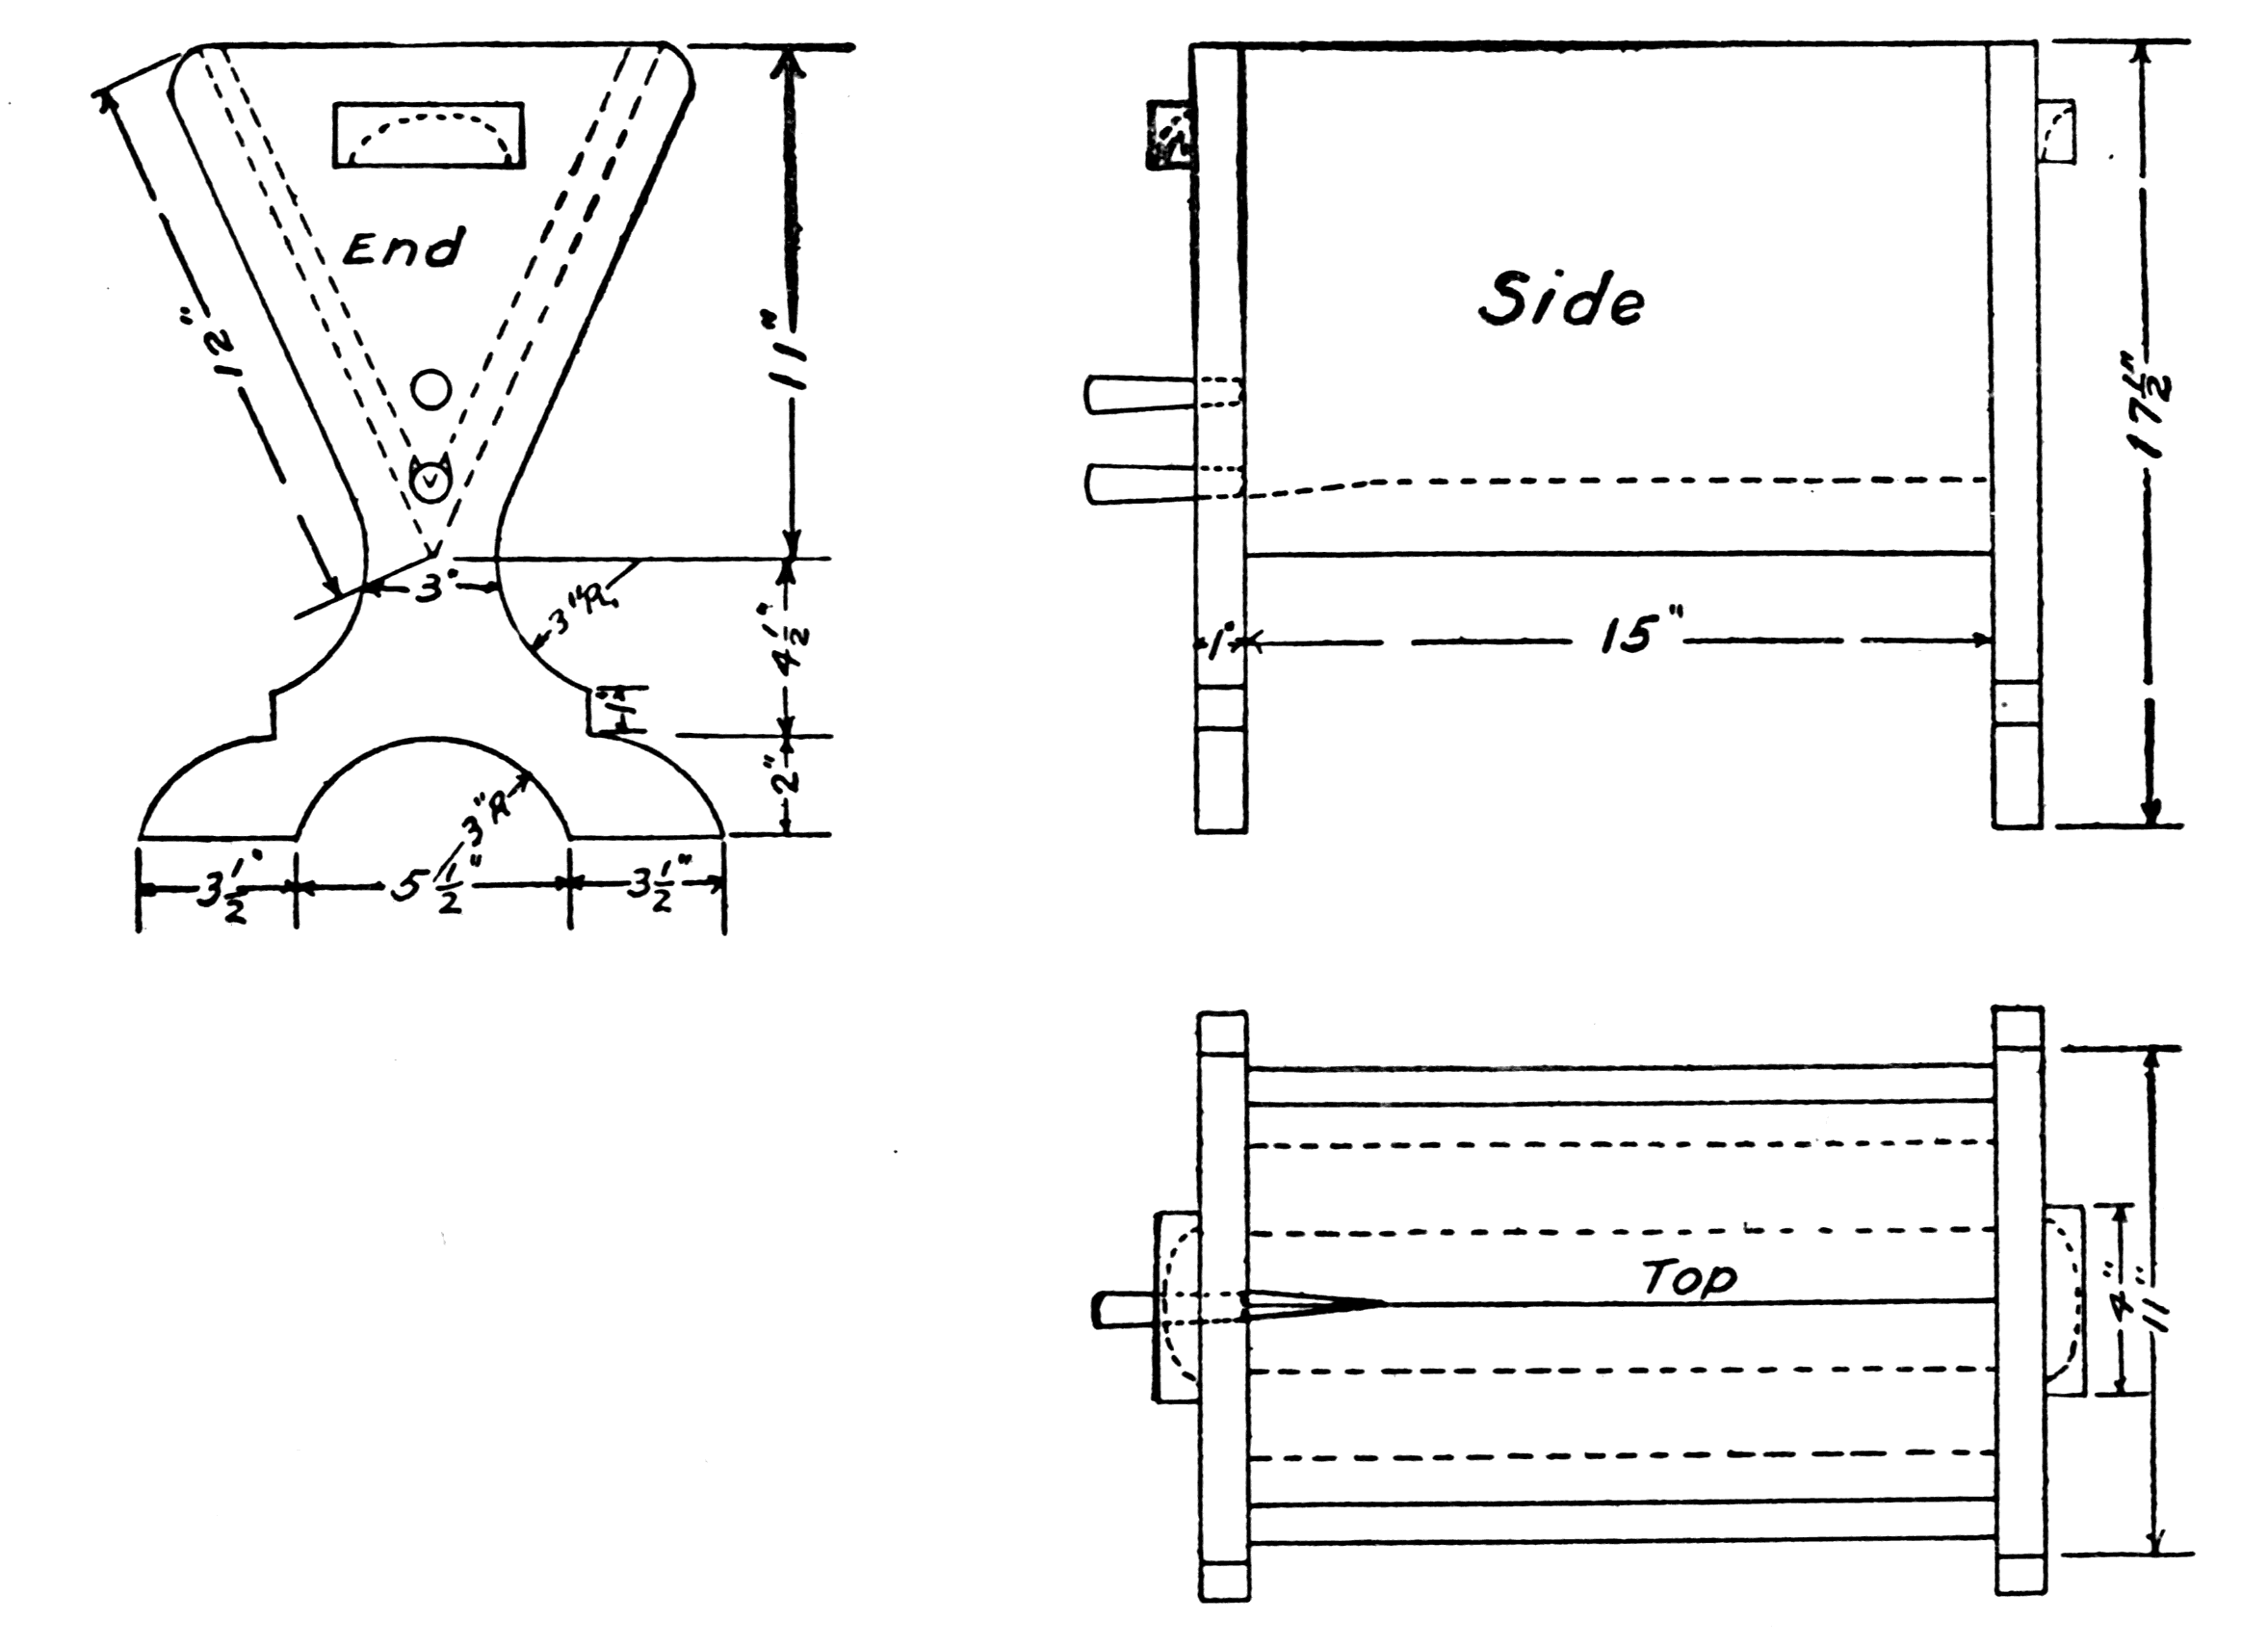
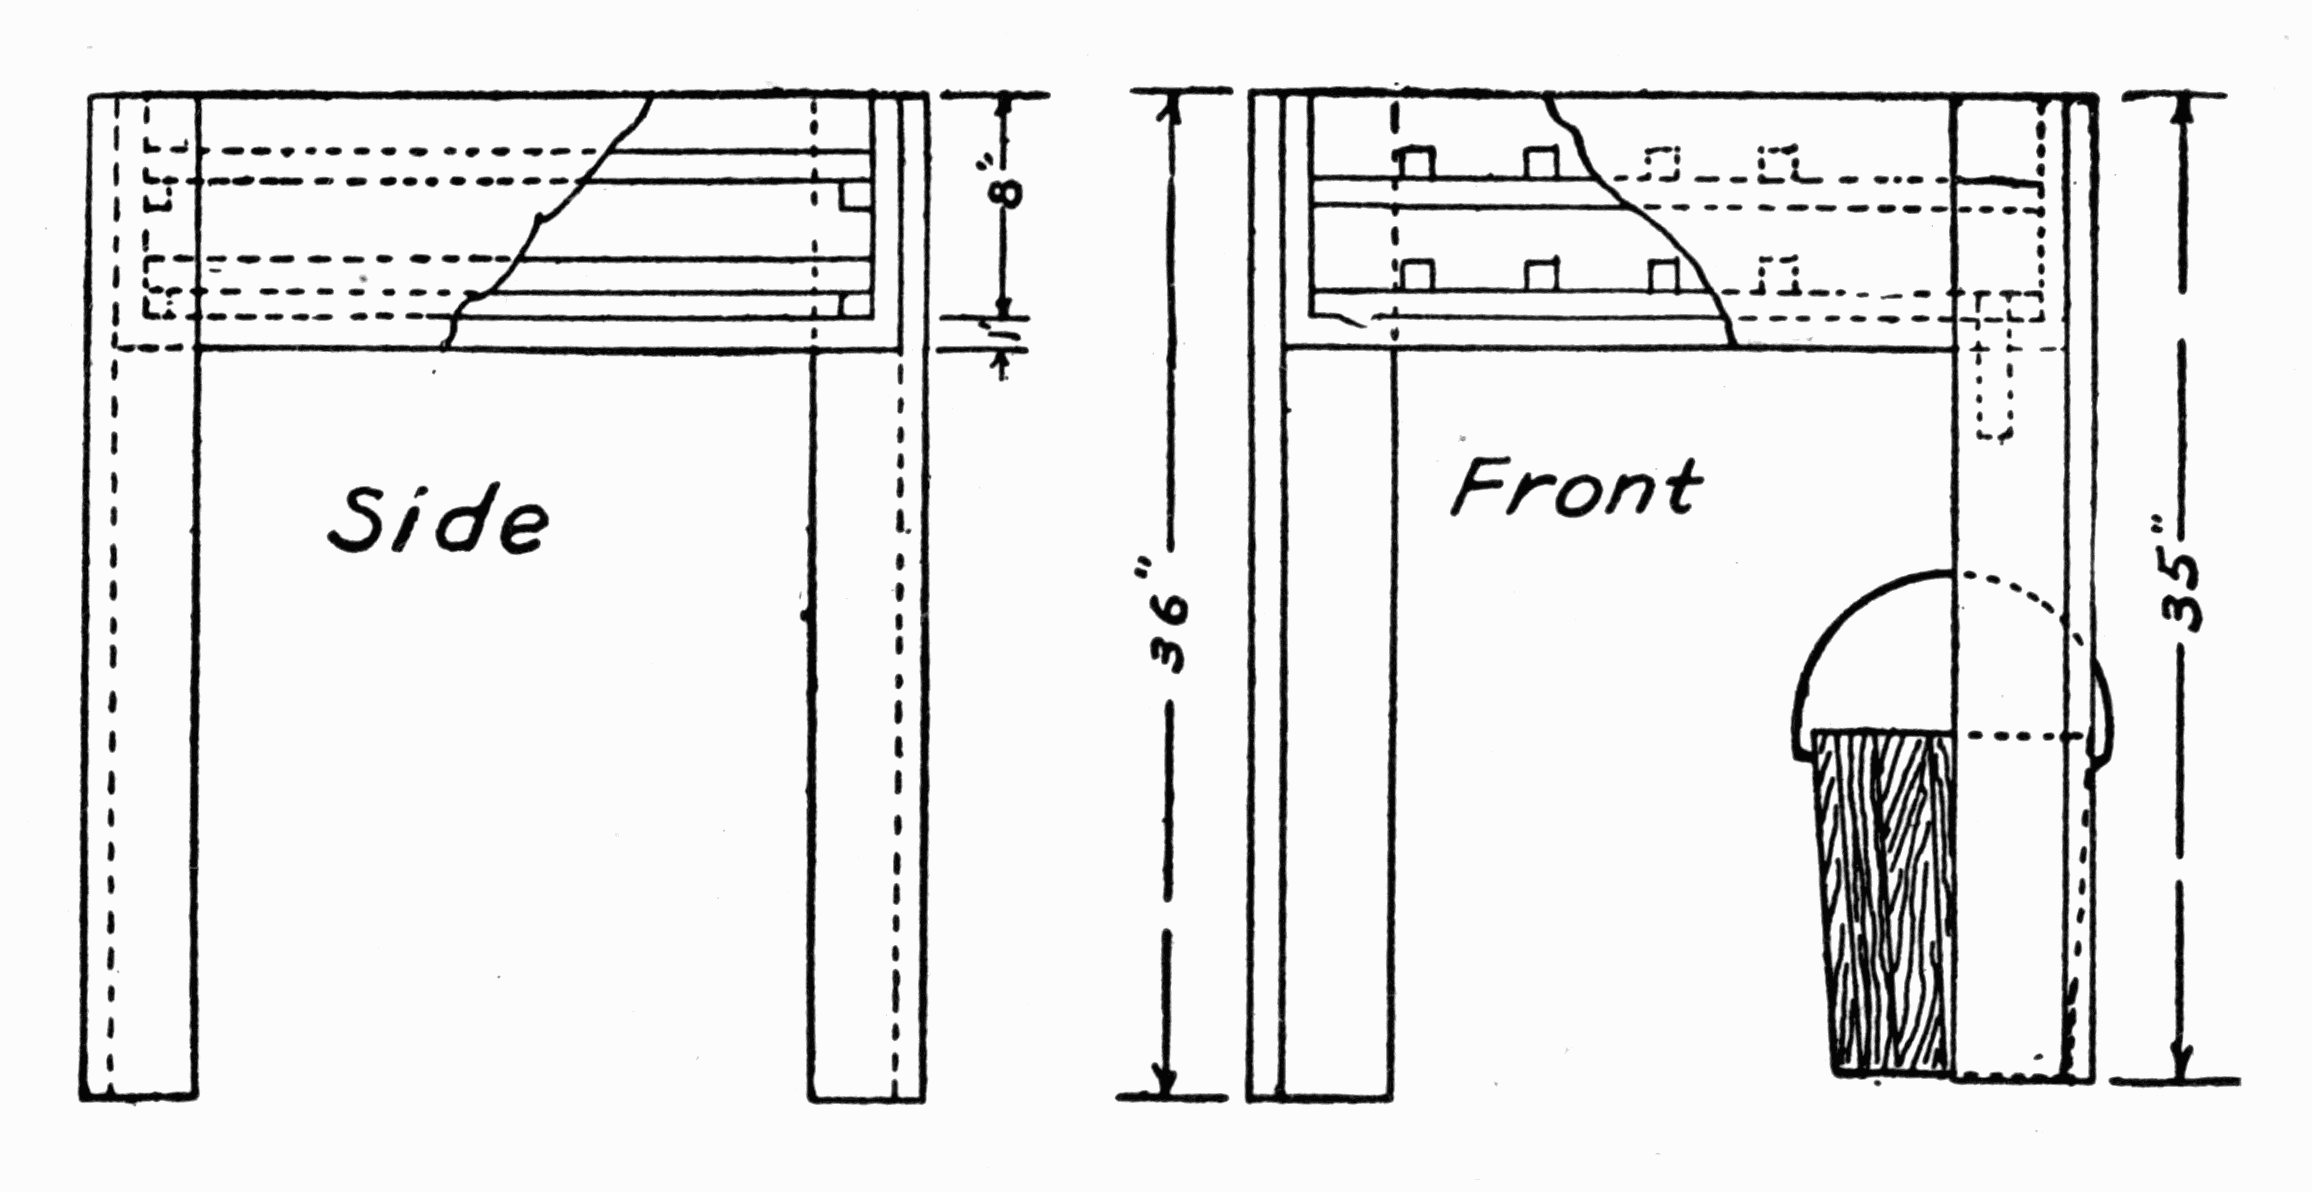
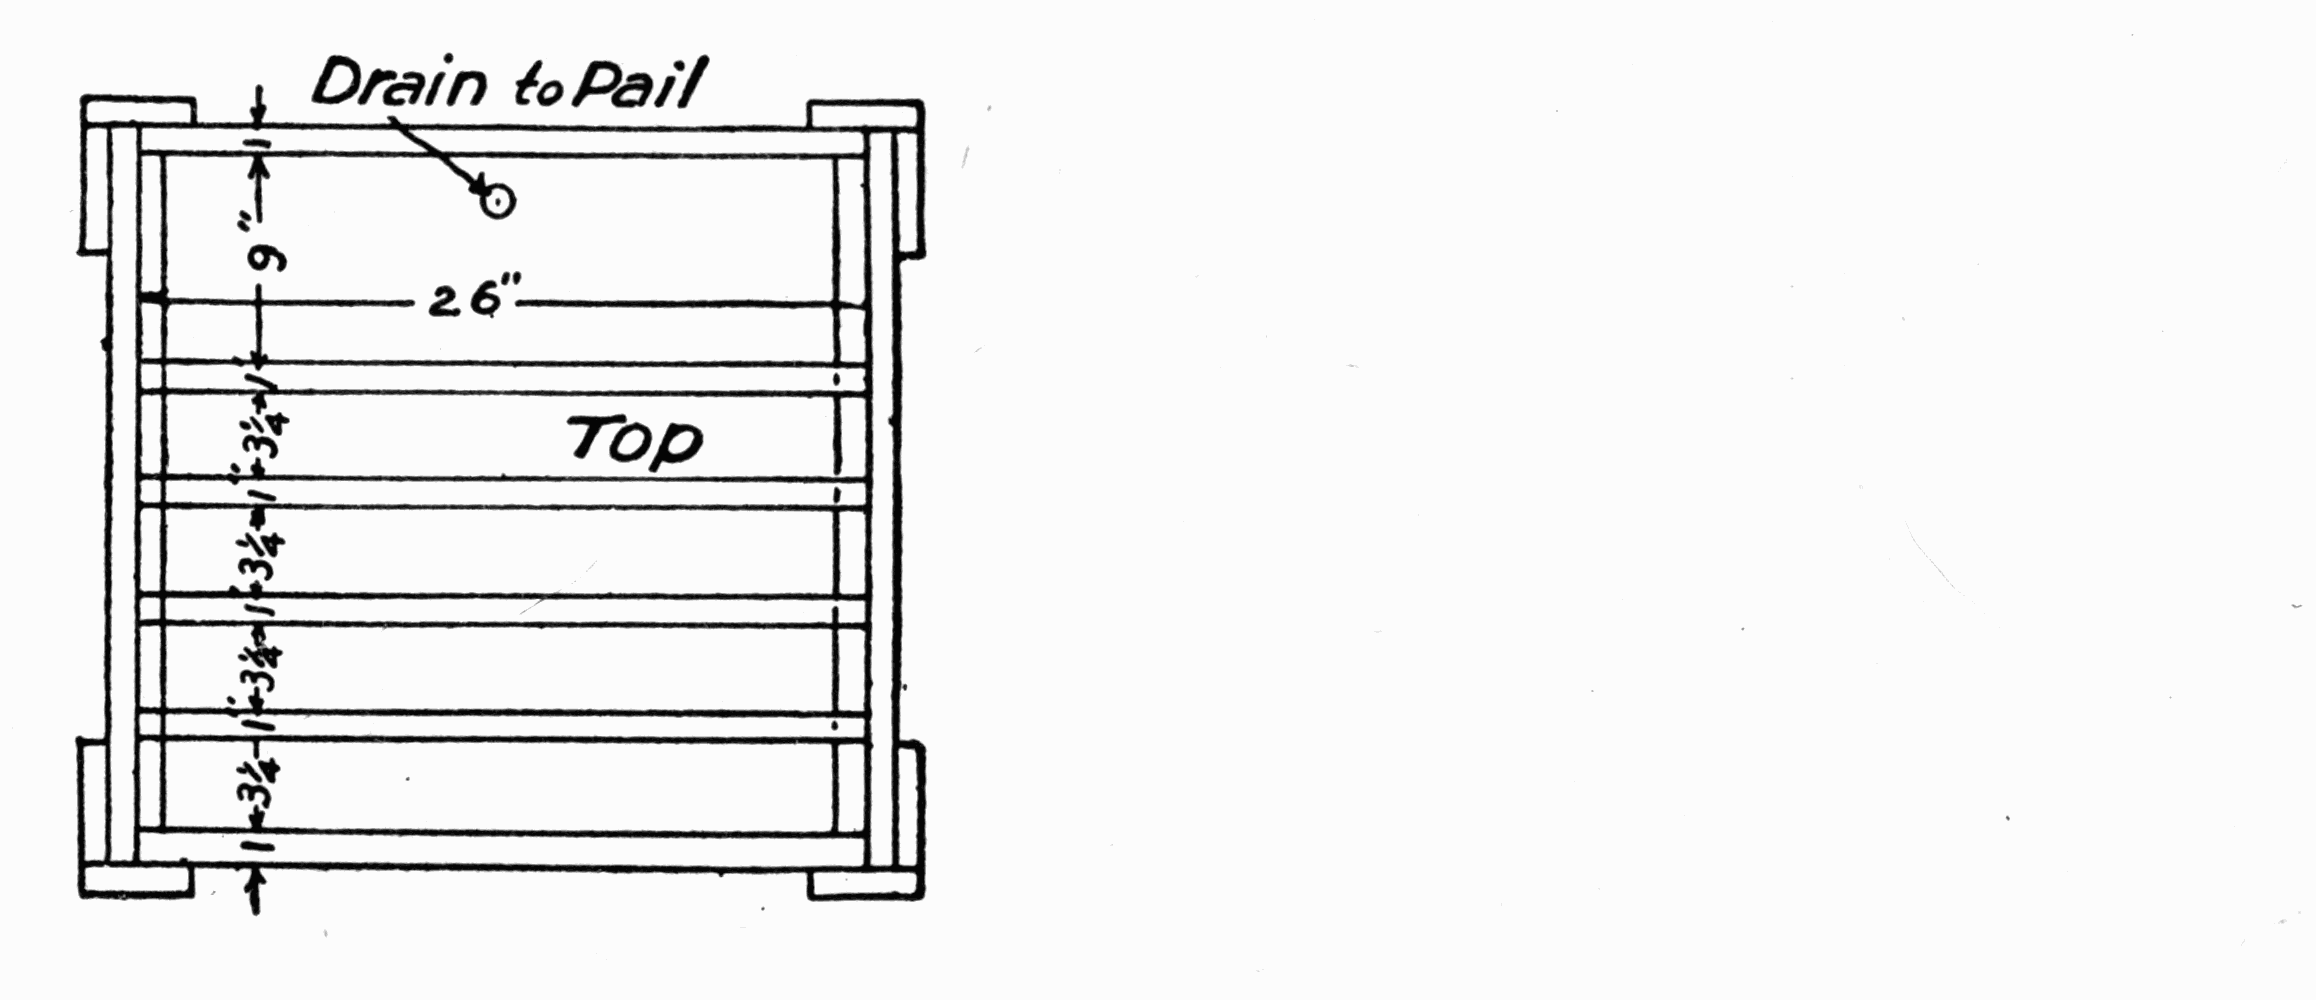
DISH DRAINER
The work of dish-washing is greatly reduced by the use of a dish drainer. The dishes are carefully washed and arranged in the drainer, and boiling water poured over them. When they are dry, they can be put away or allowed to stand with a clean cloth thrown over them until ready to use.
This dish drainer resembles a box in shape, put on legs, with slats placed inside at equal distances apart, making the compartments to hold the dishes. The space in front is made a little larger to accommodate the irregular dishes. An experienced housewife will know that glassware and silverware cannot be dried by this method. A hole is made in one corner of the drainer through which the water drains off into a pail which is kept under the corner.
Materials:
Dimensions:
Directions:
Make a pine box which is 8” deep and 24” × 26” long. The joints must be laid in white lead in order to make the drainer water tight. Nail 2 slats ¼” thick × 1” wide × 24” long down flat from the front to the back of the box at the outer edge. These are used as supports for the other crosswise slats and also allow the water to run under the slats. [Pg 27] Nail 4 slats on these supports, beginning 3¼” from the back of the box and making a distance of 3¼” between each slat. This will leave a 9” space in front of the box for the irregular dishes. The front legs are made of the four pieces 1” thick × 4” wide × 35” long, and the back legs are 1” thick × 4” wide × 36” deep. This slant provides for the drainage. The drainer should be tipped a little to the corner in which the drain pipe is placed. If zinc is to be used for lining, it must be done before the slats are put into the box.
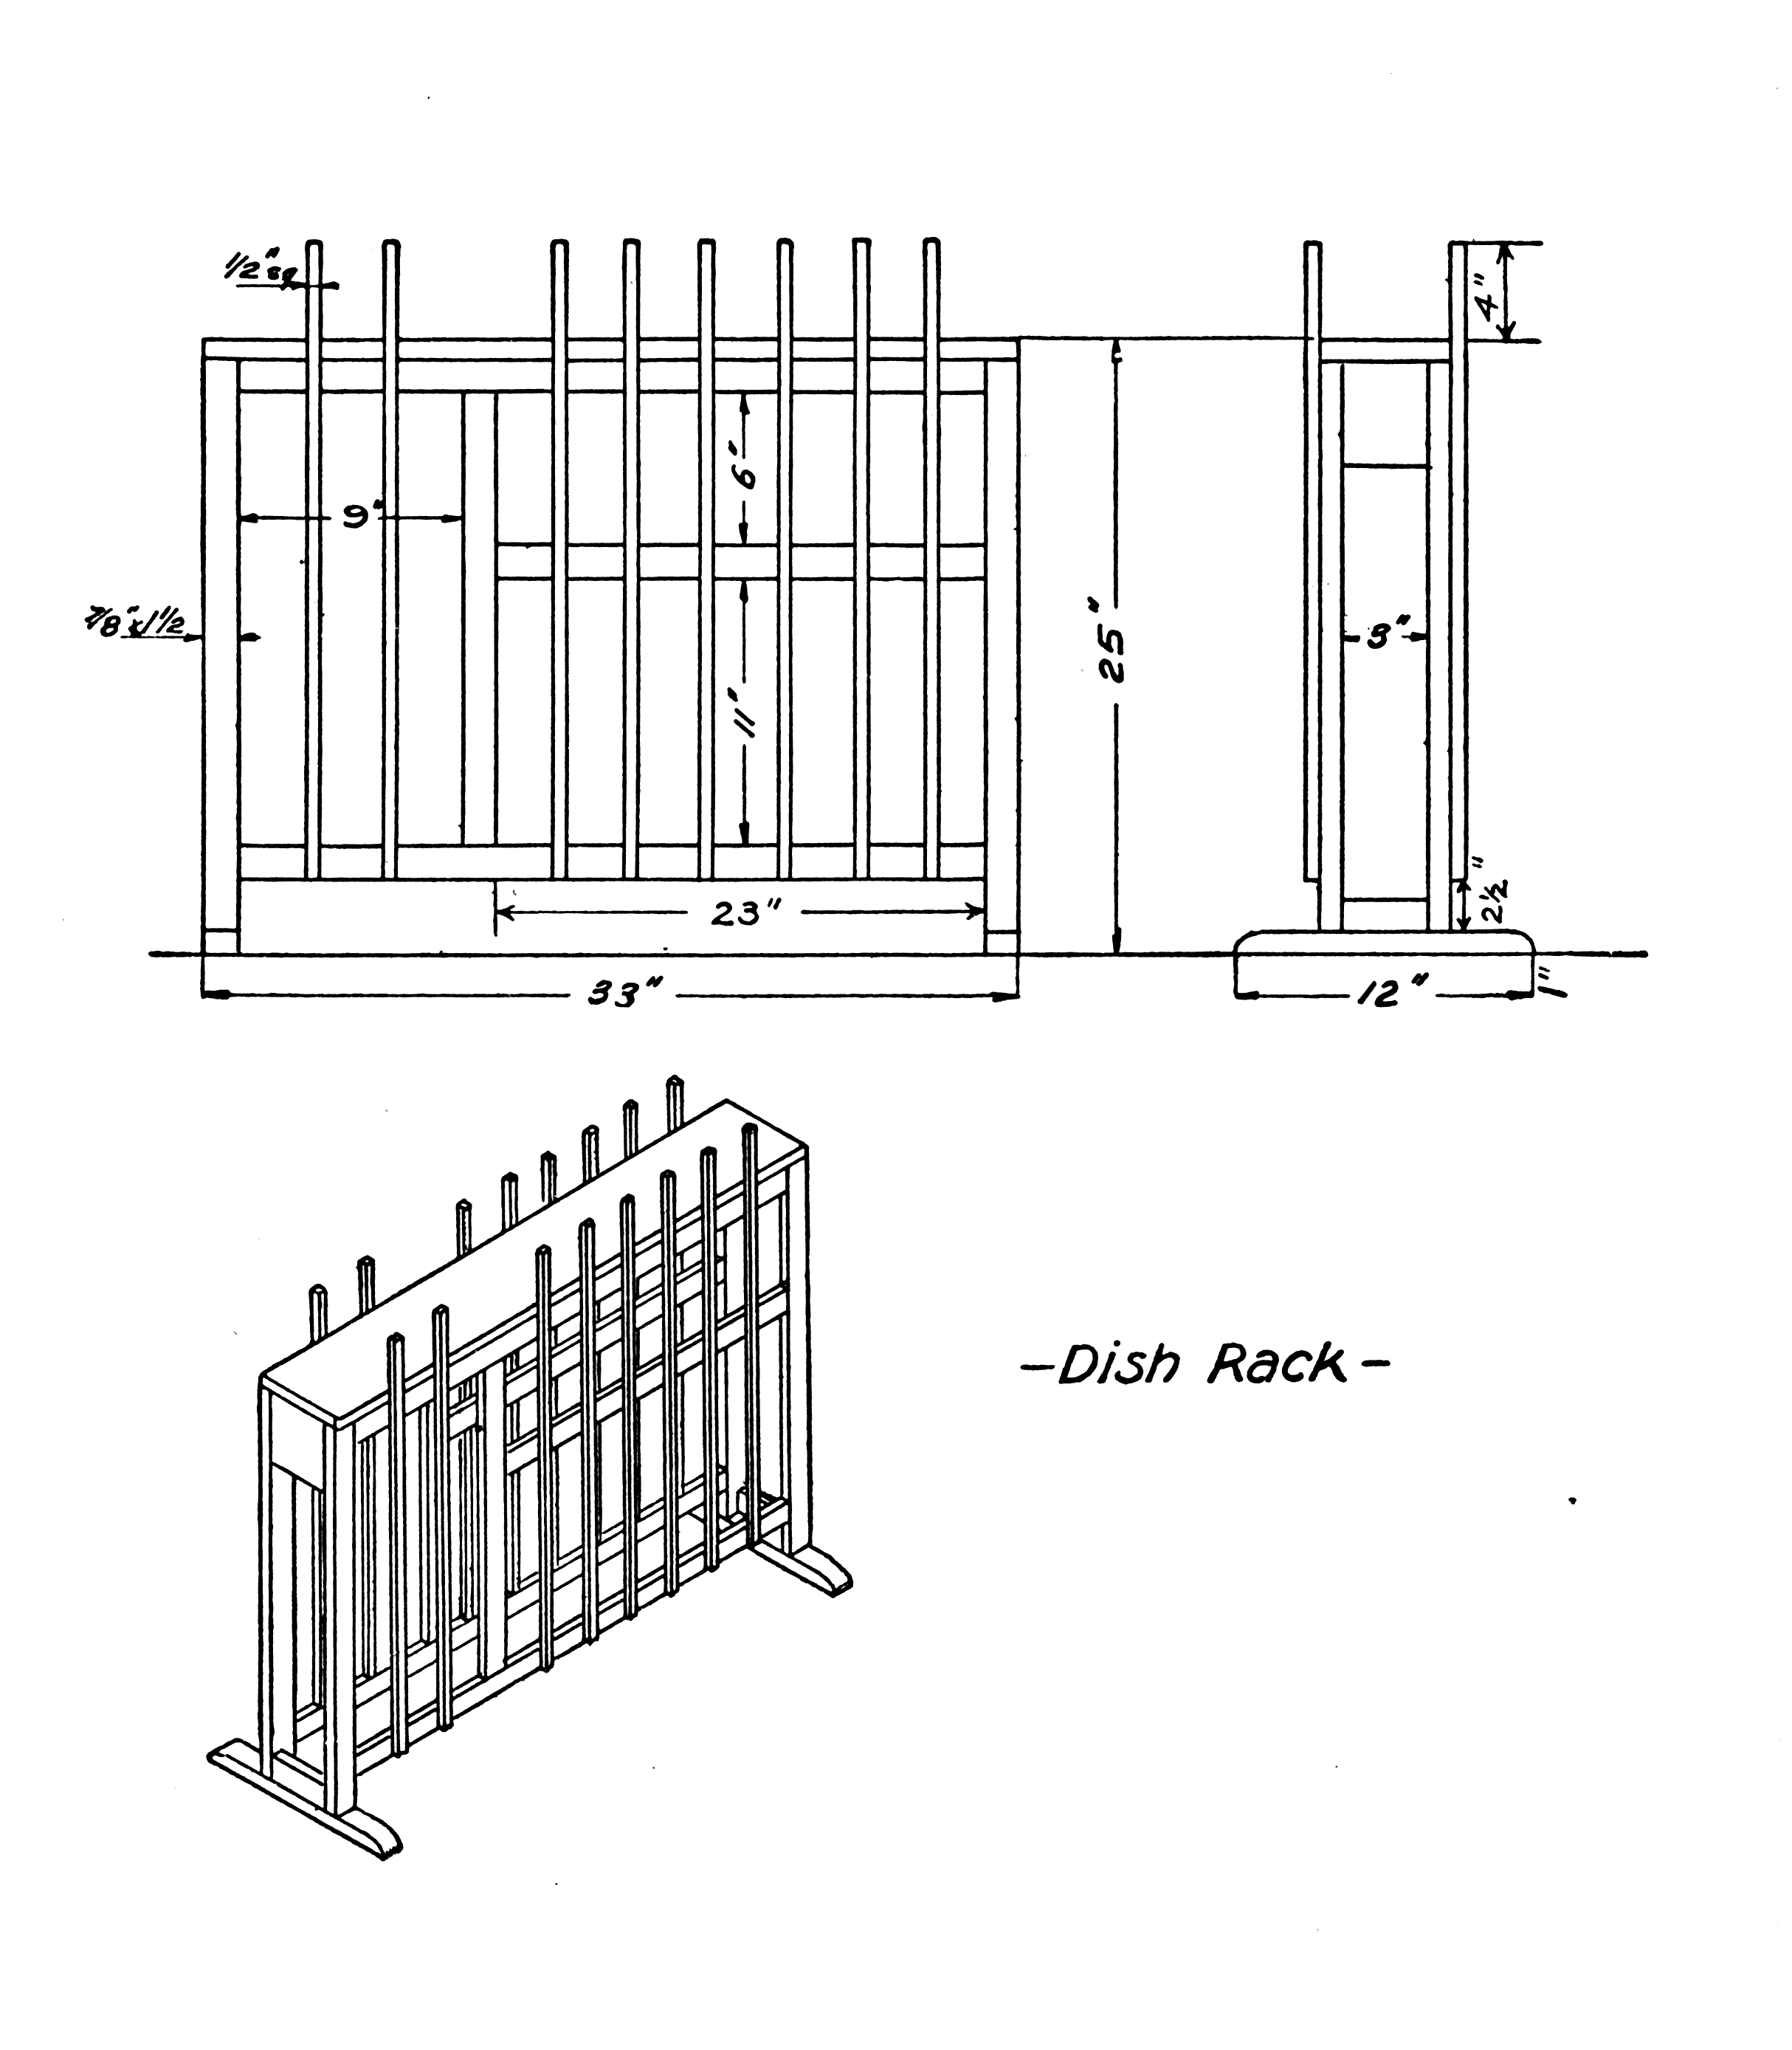
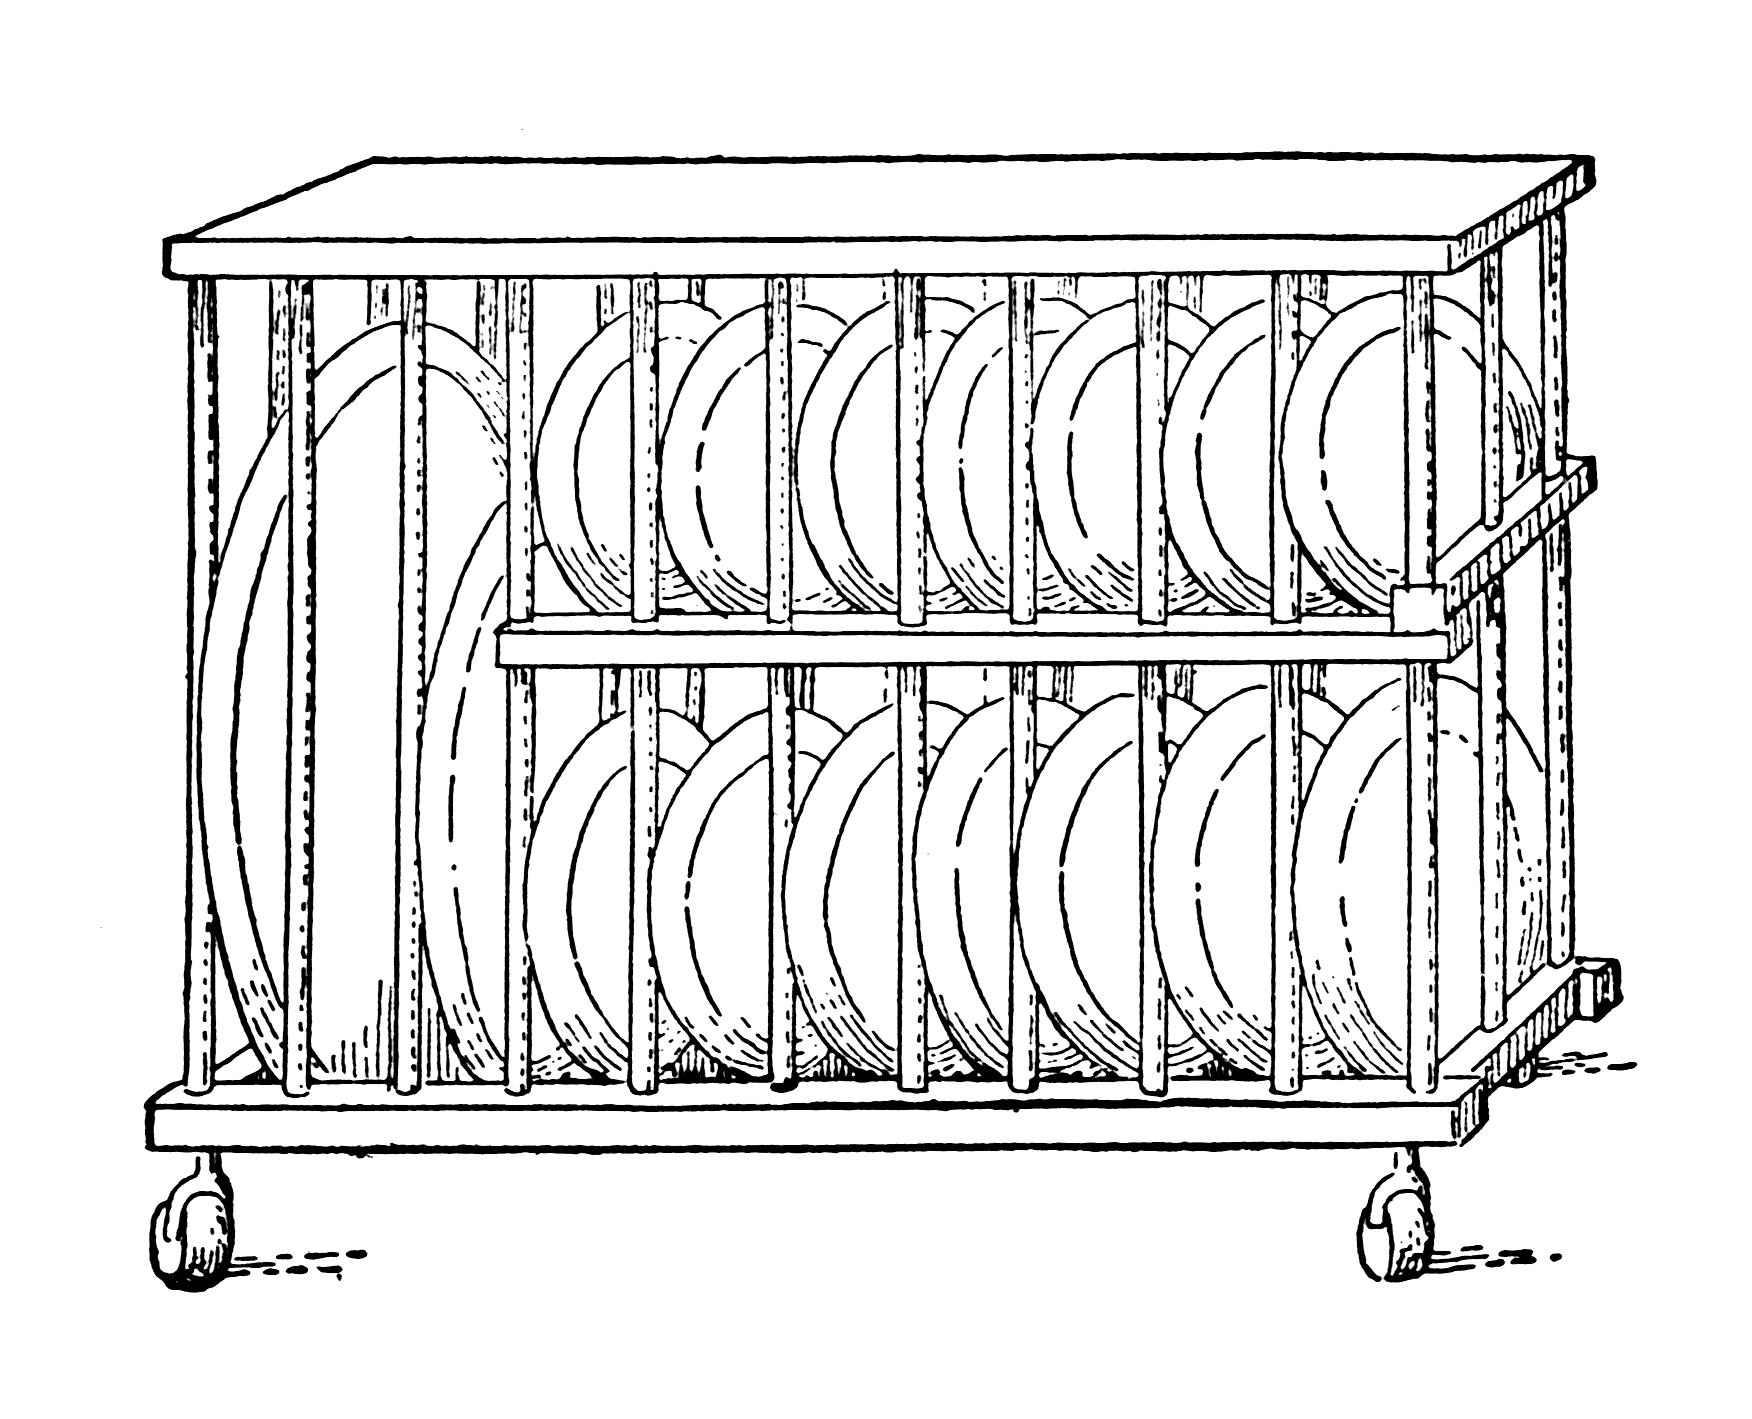
DISH RACK
A rack made of poplar, with several compartments to accommodate dishes of different sizes.
The large platters are put in the largest upright spaces, the dinner plates being arranged in the middle-sized spaces, with the smaller plates and saucers in the top spaces. It may be placed at a convenient place in the kitchen or dining room so as to save the housekeeper unnecessary steps. Mortise and tenon joints will make a more substantial rack but these are not necessary. The parts may be nailed together. After joining the parts together, sandpaper, paint white and enamel.
Materials:
Dimensions:
Dish Rack
[Pg 30] Directions:
Mortise the two end pieces ¼”, to fit tenon. Nail the two crosspieces, measuring (¾” × 1½” × 3”) to them. Make ¼” mortises on the two top pieces (¾” × 3” × 3”). These mortises are made 3” from the end and the two pieces nailed to crosspieces. Screw on the bottom board (1” × 2½” × 12”) with 1½” No. 9 screws. Mortise the 4 top and bottom pieces (¾” × 1½” × 30”) ½” from the top and bottom and nail them lengthwise on the rack. The two middle pieces (¾” × 1½” × 21”) are mortised and nailed 11” from the top edge of the bottom piece. The upright pieces (¾” × 1½” × 20½”) are nailed 9” from the left side. Nail the eight upright pieces (½” × ½” × 26”) on each side with No. 4 box nails. The top piece (¾” × 4½” × 33”) is nailed on the top of the rack. Sandpaper, paint and enamel.
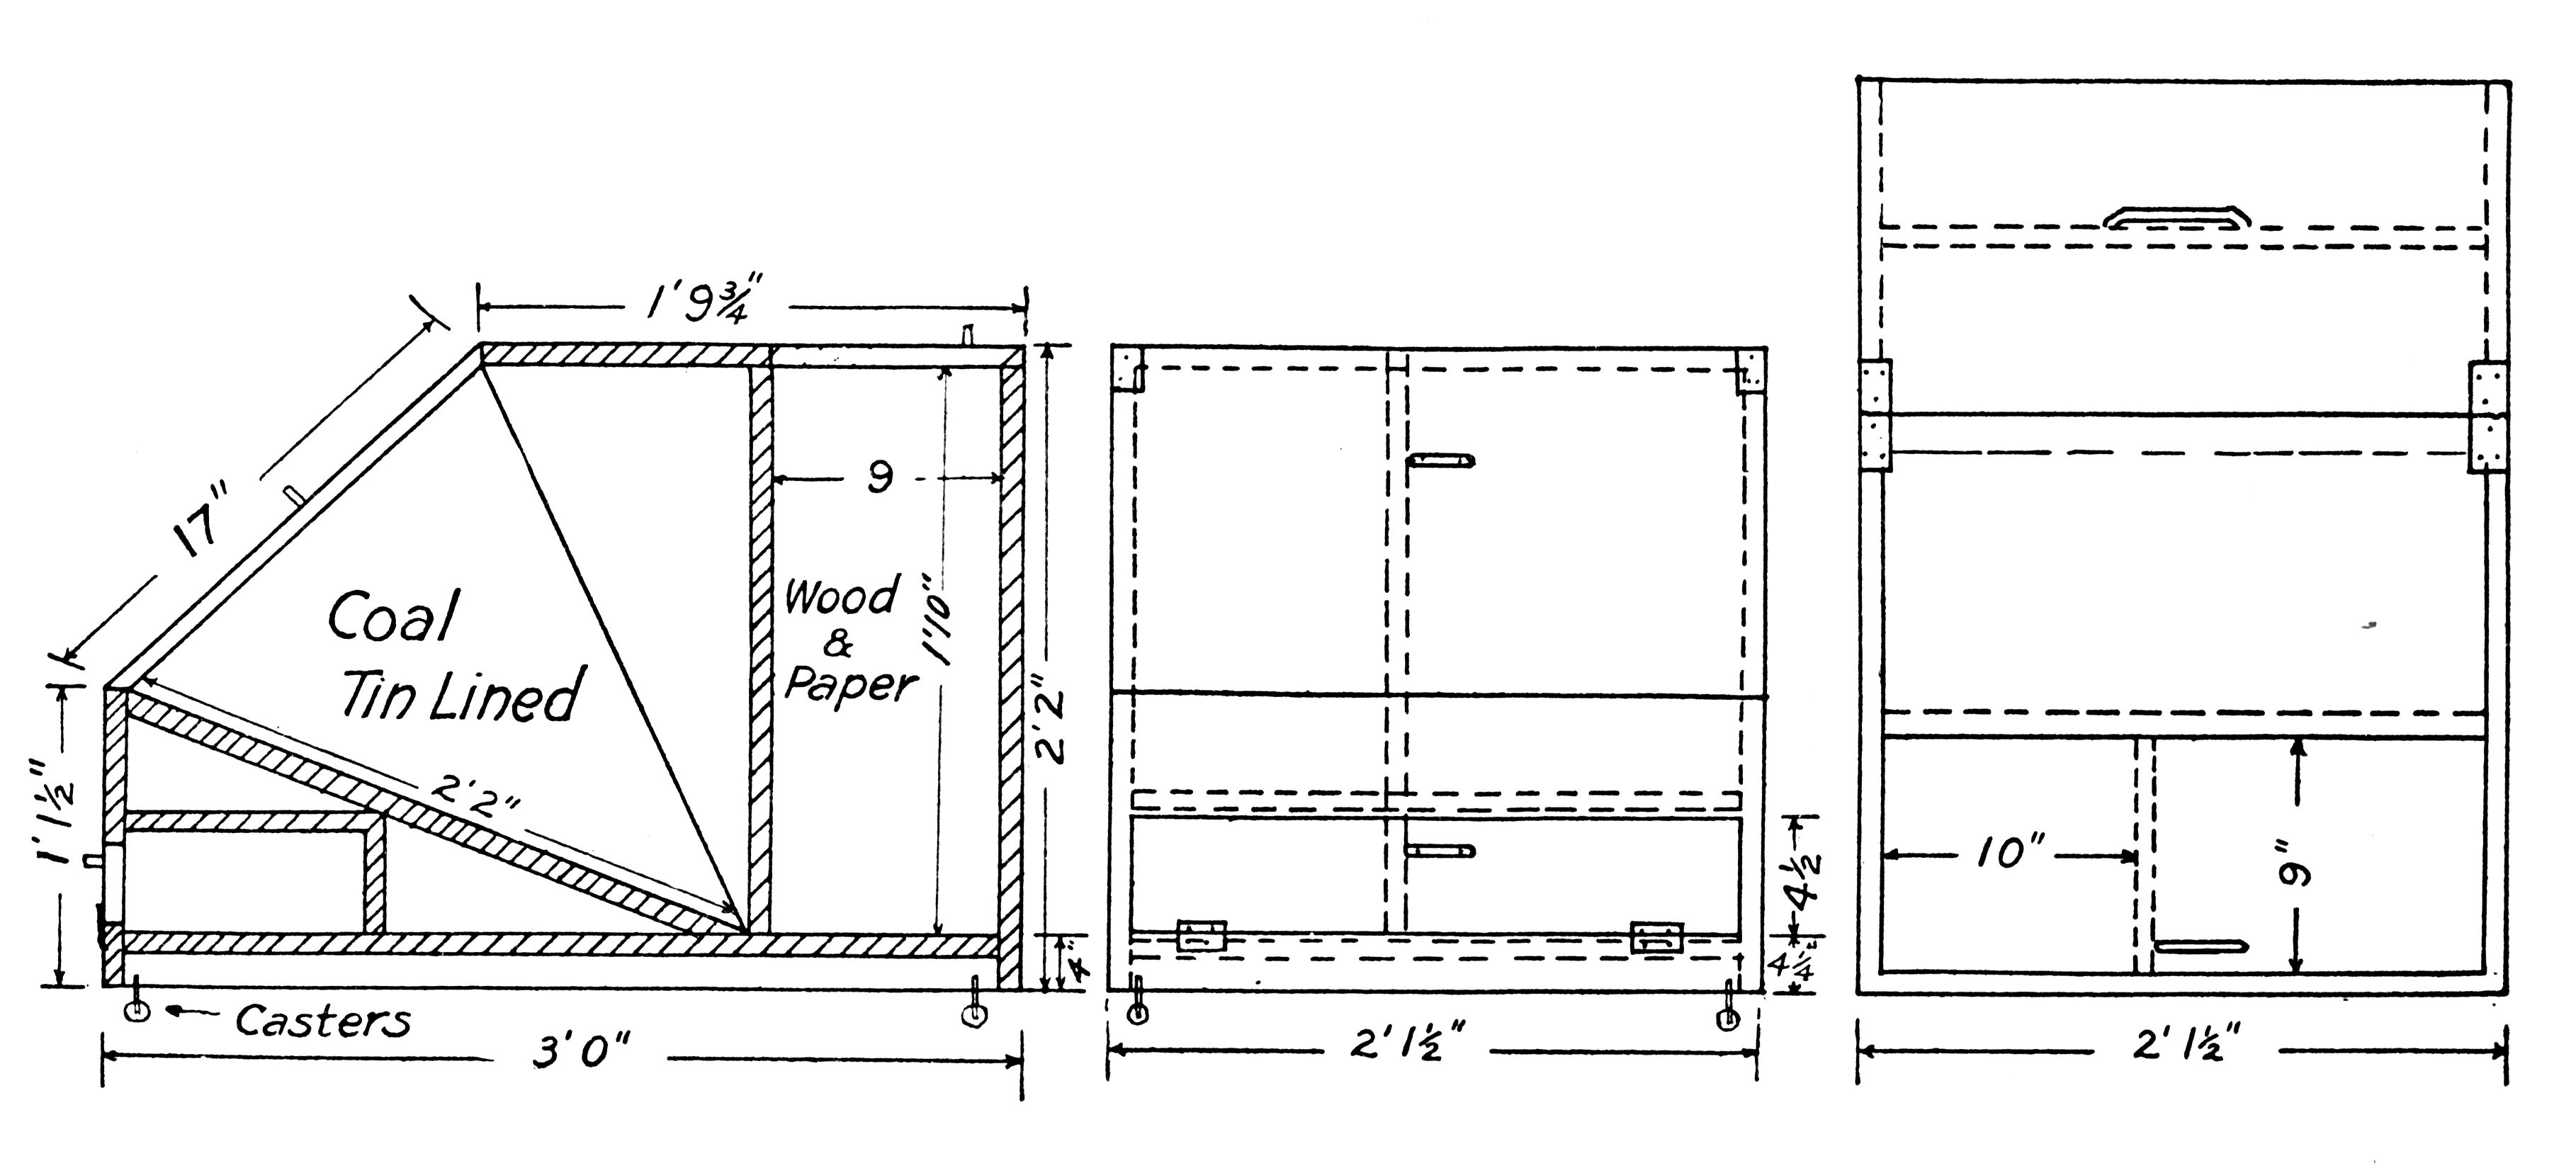
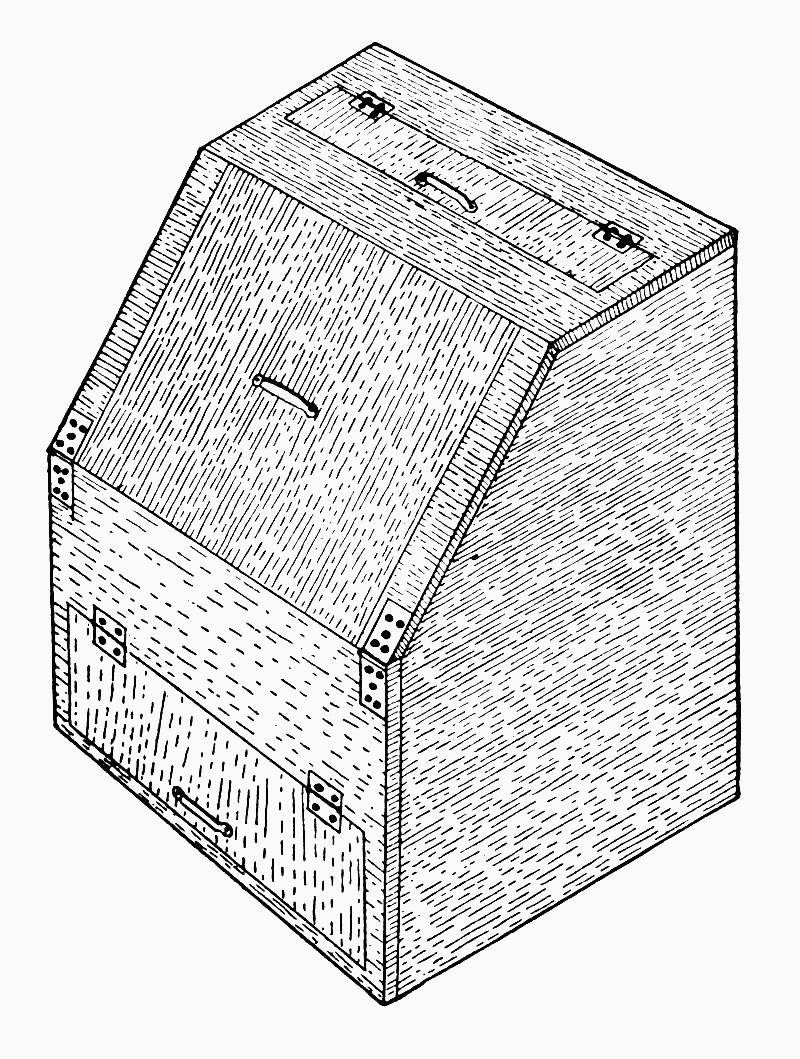
COAL BOX
The construction of this box is both simple and convenient, and it requires little space in the room to accommodate it. There are four compartments in it. The back is divided equally to provide places for the kindling and paper; the front space is used for coal, and while it makes it more durable to line it with metal, this is not necessary. There is a narrow opening in the front in which the cleaning materials are kept—polish, brush, and stove rags. Stain or paint will make the coal box more attractive.
Materials:
Dimensions:
Directions:
Measure 1’ 9¾” from the back of the two end pieces (1” × 2’ 2” × 3’). Cut the corners off from this point to make a slant which will fit the door 1’ 7” long. Nail the back (1” × 1’ 11½” × 2’ 1”) to the two end pieces at [Pg 33] the straight edge. The bottom piece (1” × 1’ 11½” × 2’ 10”) is then nailed to the back and sides. Cut out a 4” × 1’ 11½” opening in the front piece (1” × 1’ 11½” × 2’ 1½”) for the drawer and then nail the front to the sides and bottom. Take the piece which has been cut out and hinge it to the opening as shown in the illustration. Nail the back and top partitions in this opening before the slanting partition which divides this division from the coal bin is put in. Measure 9” from the back of the coal box and put the straight partition (1” × 21” × 1’ 11½”) in by nailing it to the bottom and sides of the coal box. Then the slanting partition (1” × 2’ 2” × 1’ 11½”) is nailed to the bottom and front edge of the box as shown in the illustration. Cut an opening (9” × 1’ 11½”) in the top (1” × 1’ 9¾” × 2’ 1½”) and then nail top on the box, using the piece which is cut out for the door to the opening. Hinge this piece on with one pair of 1½” (butt) hinges. The door support (½” × ½” × 1’ 11½”) is nailed on the inside of the back of the box. Bevel the piece (1” × 1’ 7” × 2’ 1½”) for the slanting door. It must fit each edge as shown in the illustration. Hinge this door at the upper edge of the top with one pair of 1½” (butt) hinges. One screen door handle is put on each opening to lift them. The four castors are placed on the bottom of each corner of the box to make it more easily moved about. Stain or paint the coal box.
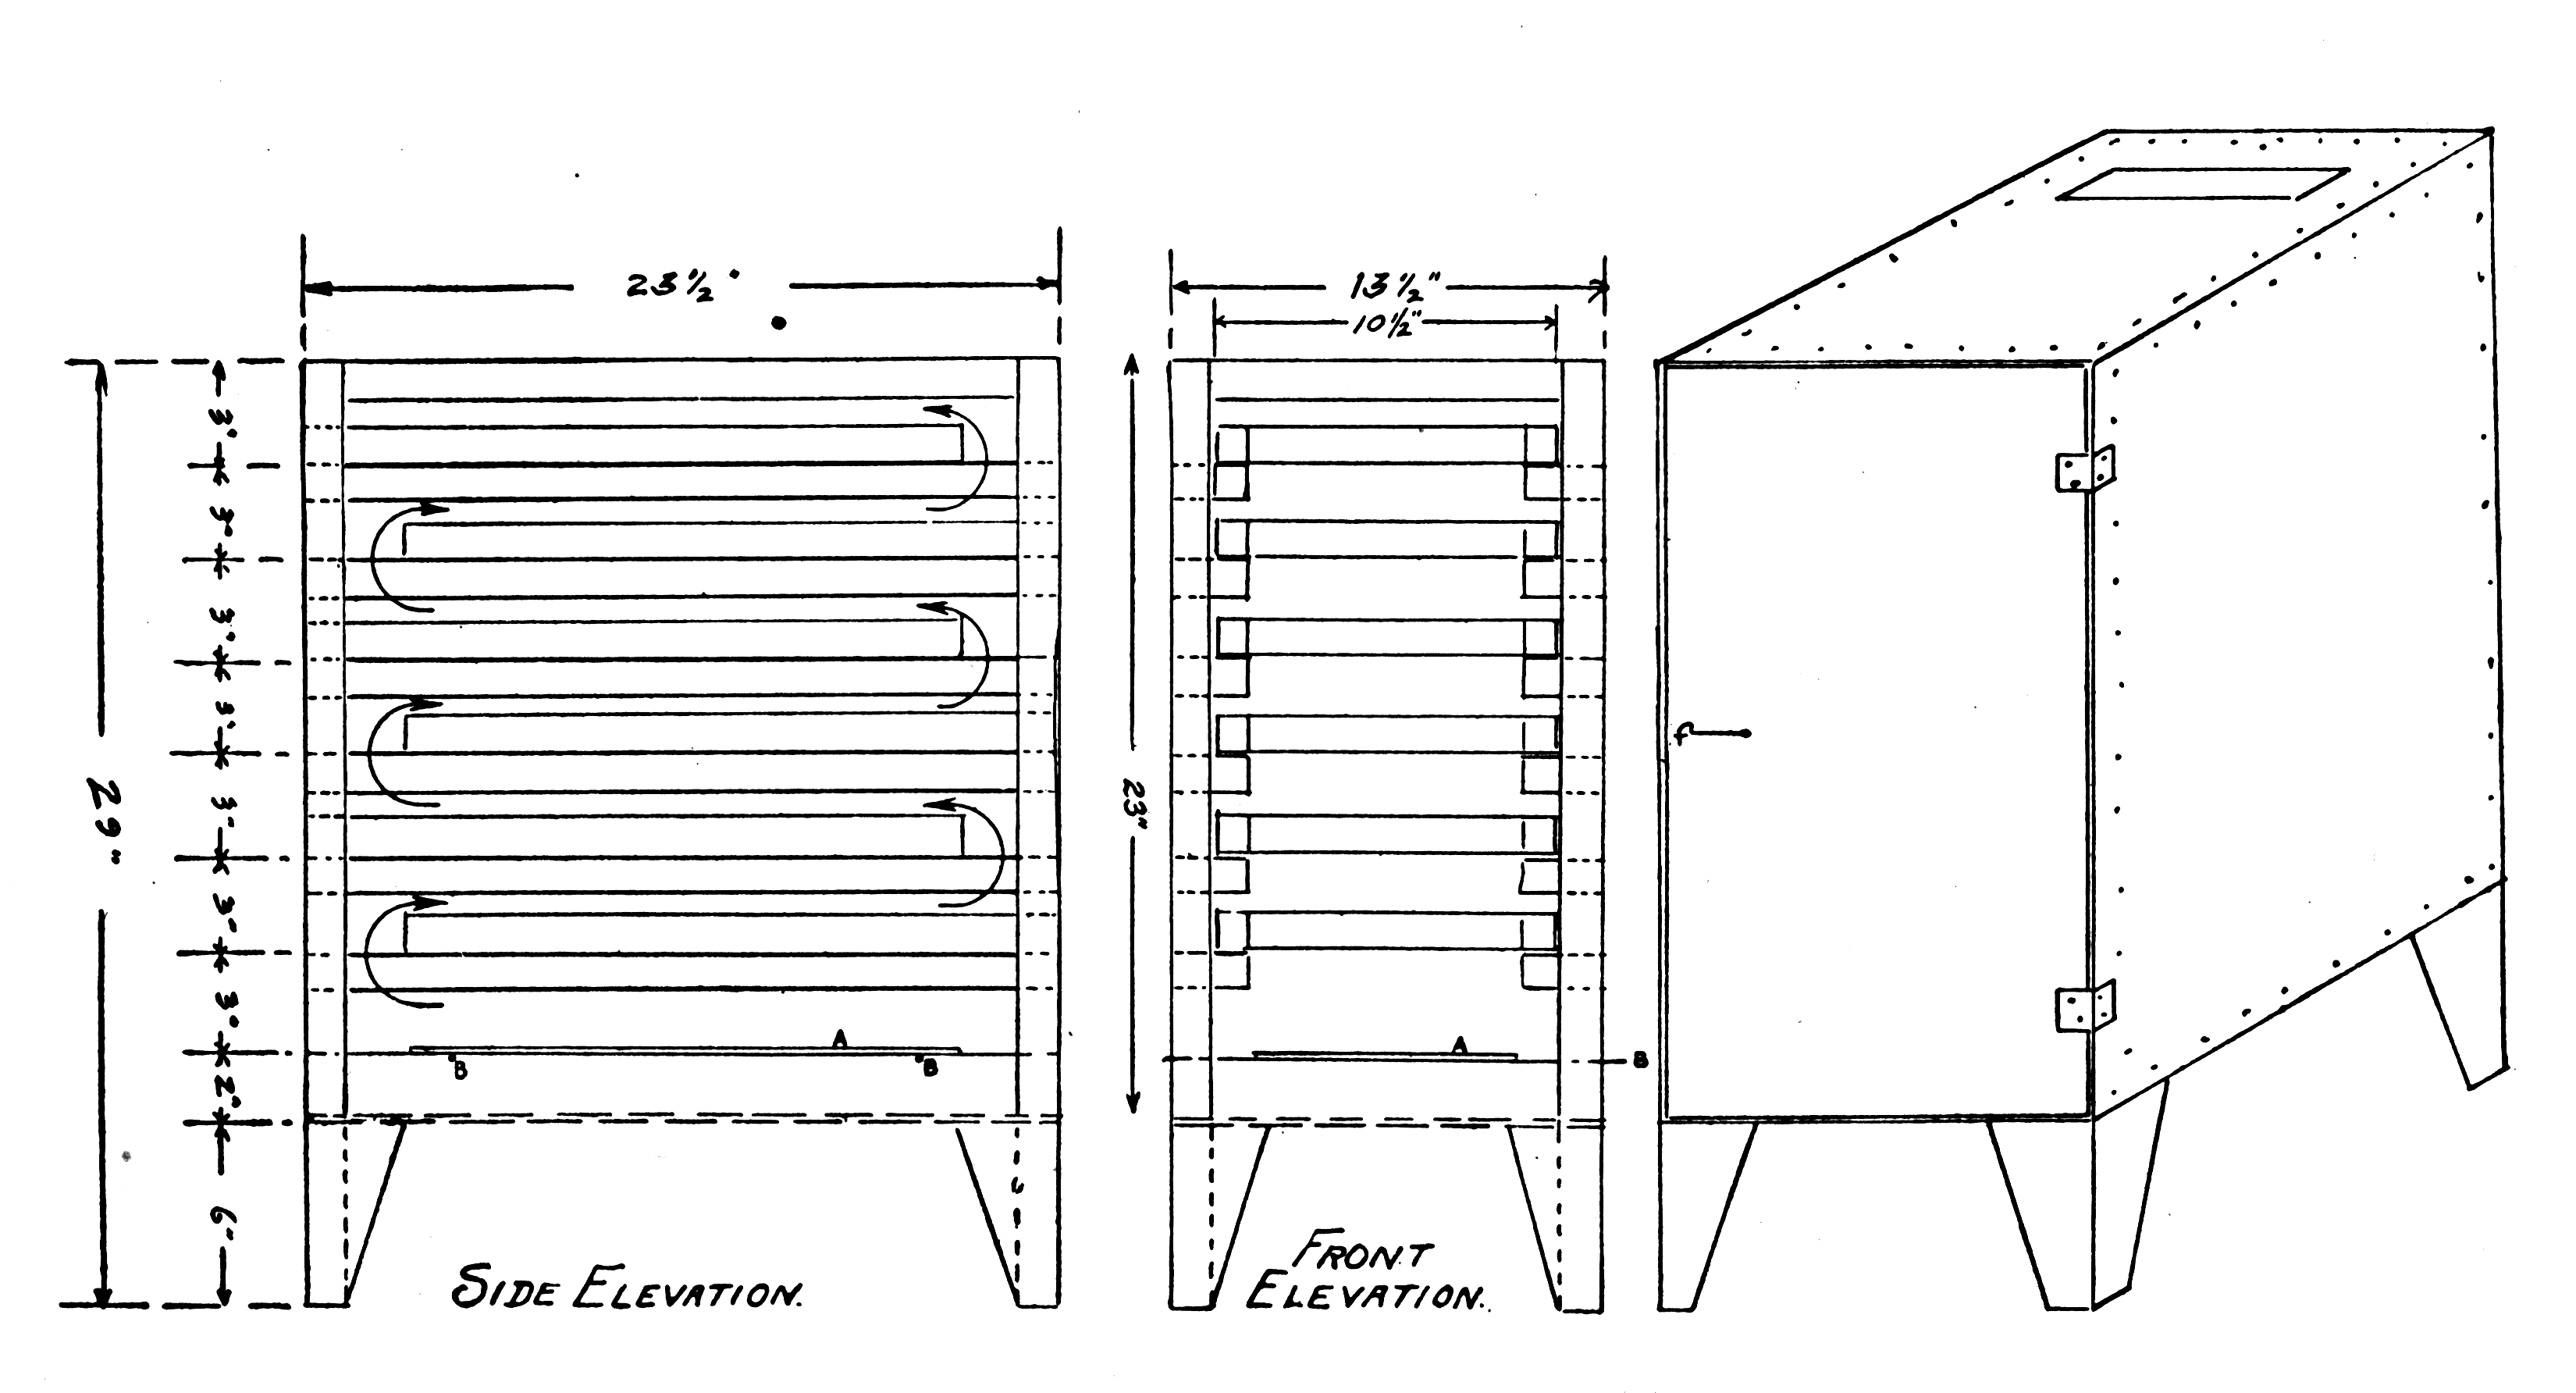
A HOME-MADE COOK STOVE DRIER
This apparatus is designed to use on a wood or coal stove, an oil stove, or a gas range. It can be easily and inexpensively made at home.
Materials:
Dimensions:
Directions:
The frame consists of four wooden posts (1¼” × 1¼” × 23”); four side pieces (1¼” × 1¼” × 21”); two front pieces (1¼” × 1¼” × 11”); and two back pieces (1¼” × 1¼” × 11”). To the posts are lightly nailed on each side six strips (1” × 2¼” × 23½”). These pieces serve as supports for the drying racks. The corners are notched out as indicated in the drawing to allow the strips to extend out to the outer wall of the drier.
For each side use a sheet of light weight sheet steel (23½” × 23”); for the back a sheet (13½” × 23”); for the top a sheet (13½” × 23½”). In the top piece an opening about 3” × 10” is cut about four inches from the back edge to permit the escape of moist air. It may be found at times that this ventilating opening is too large. Then it may be partially closed by placing over it a tin pan or other vessel.
For the bottom a sheet 13½” × 23½” is used. This sheet is thoroughly perforated with holes to admit the warm air. Another piece of sheet steel (A on the drawing) (7½” × 17½”) is provided to make the heat spread more evenly. This piece rests on wires above the bottom of the drier. These wires are put through small holes punched in the side sheets (see B on drawing).
The door is made of heavier gauge sheet steel (13½” × 23”).
The legs are made of four pieces of sheet steel bent on an angle as indicated in the drawing.
[Pg 35] All the sheet steel parts may be tacked on the frame but the door, which is secured by hinges.
The frames of the six trays are made of ¾” wood 10½” wide and 20½” long.
Make the bottom of the trays of wire cloth (20½” × 10½”). This is tacked on the underside of the frame of the trays.
By referring to the drawing it will be observed that the bottom tray is shoved back as far as it will go; the next tray above is pulled as far front as the door will admit; the next tray is shoved back and so on with each tray shoving one to the back and pulling the other to the front. The object of this arrangement is to allow the heat to pass over and around the ends which causes a more rapid movement of the air current. This is more important in drying than the heat.
It may be necessary to shift the trays by putting the top one on the bottom and the bottom one on the top during the drying process so as to dry the products more uniformly.
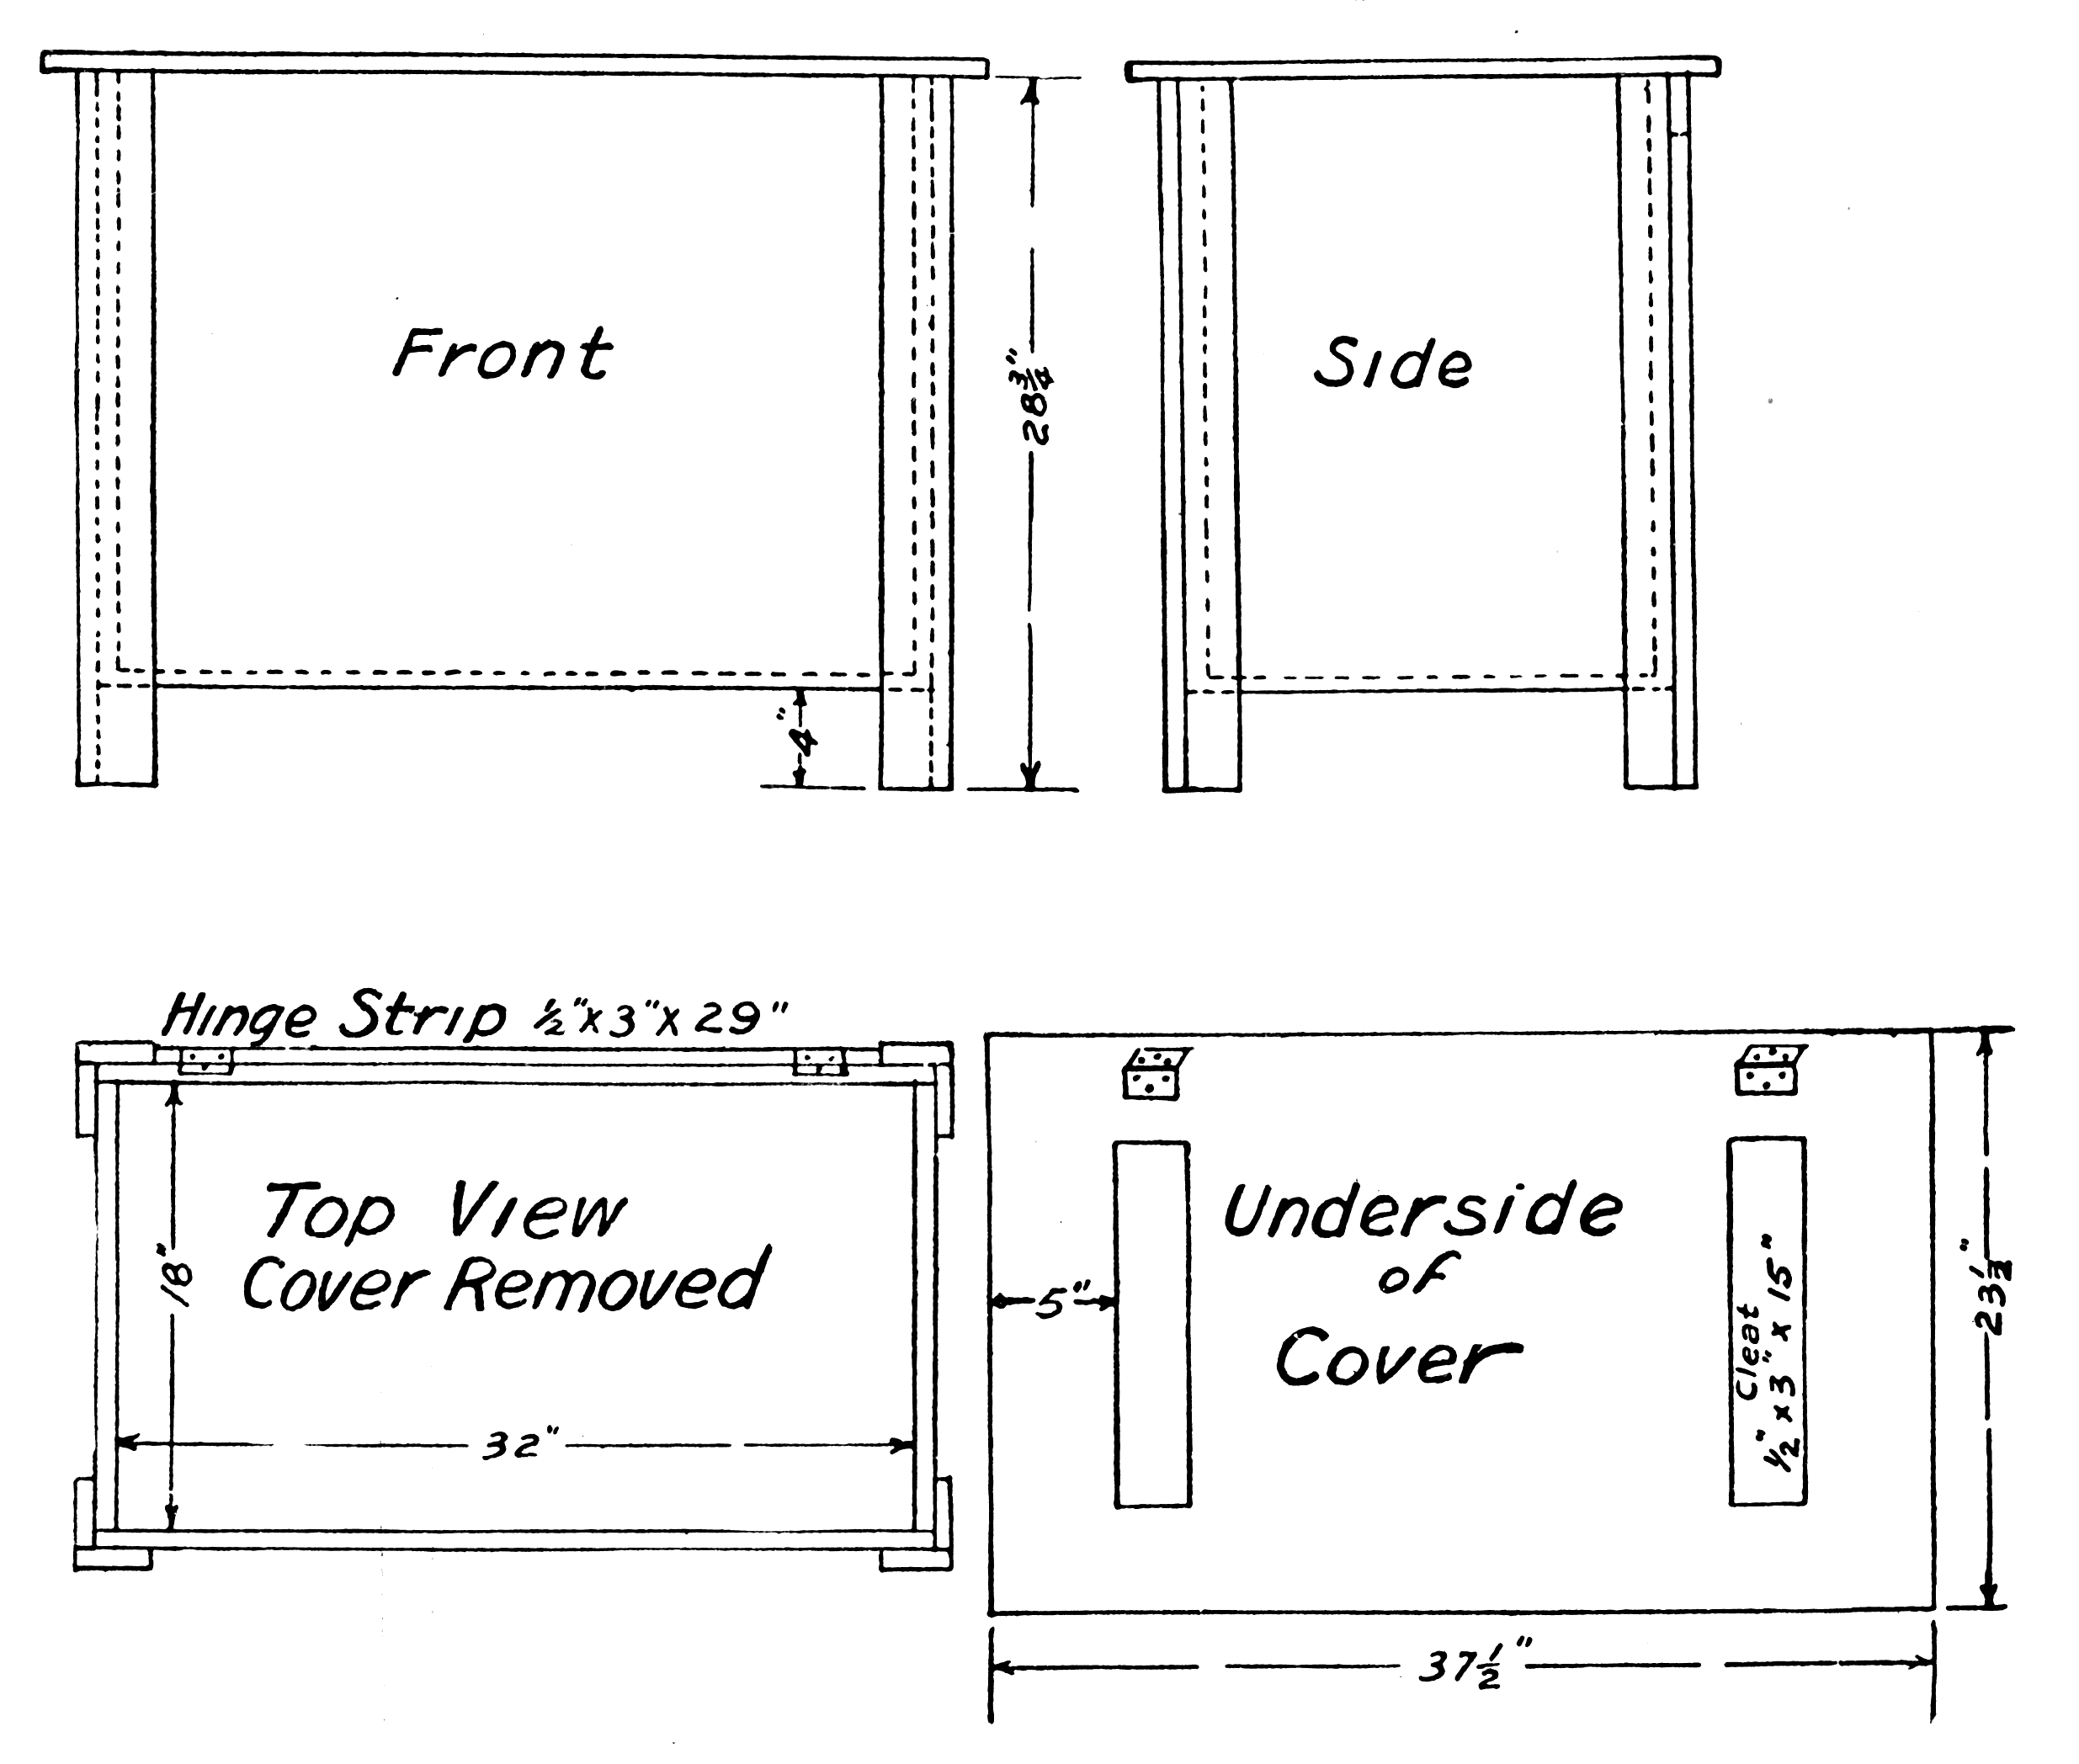
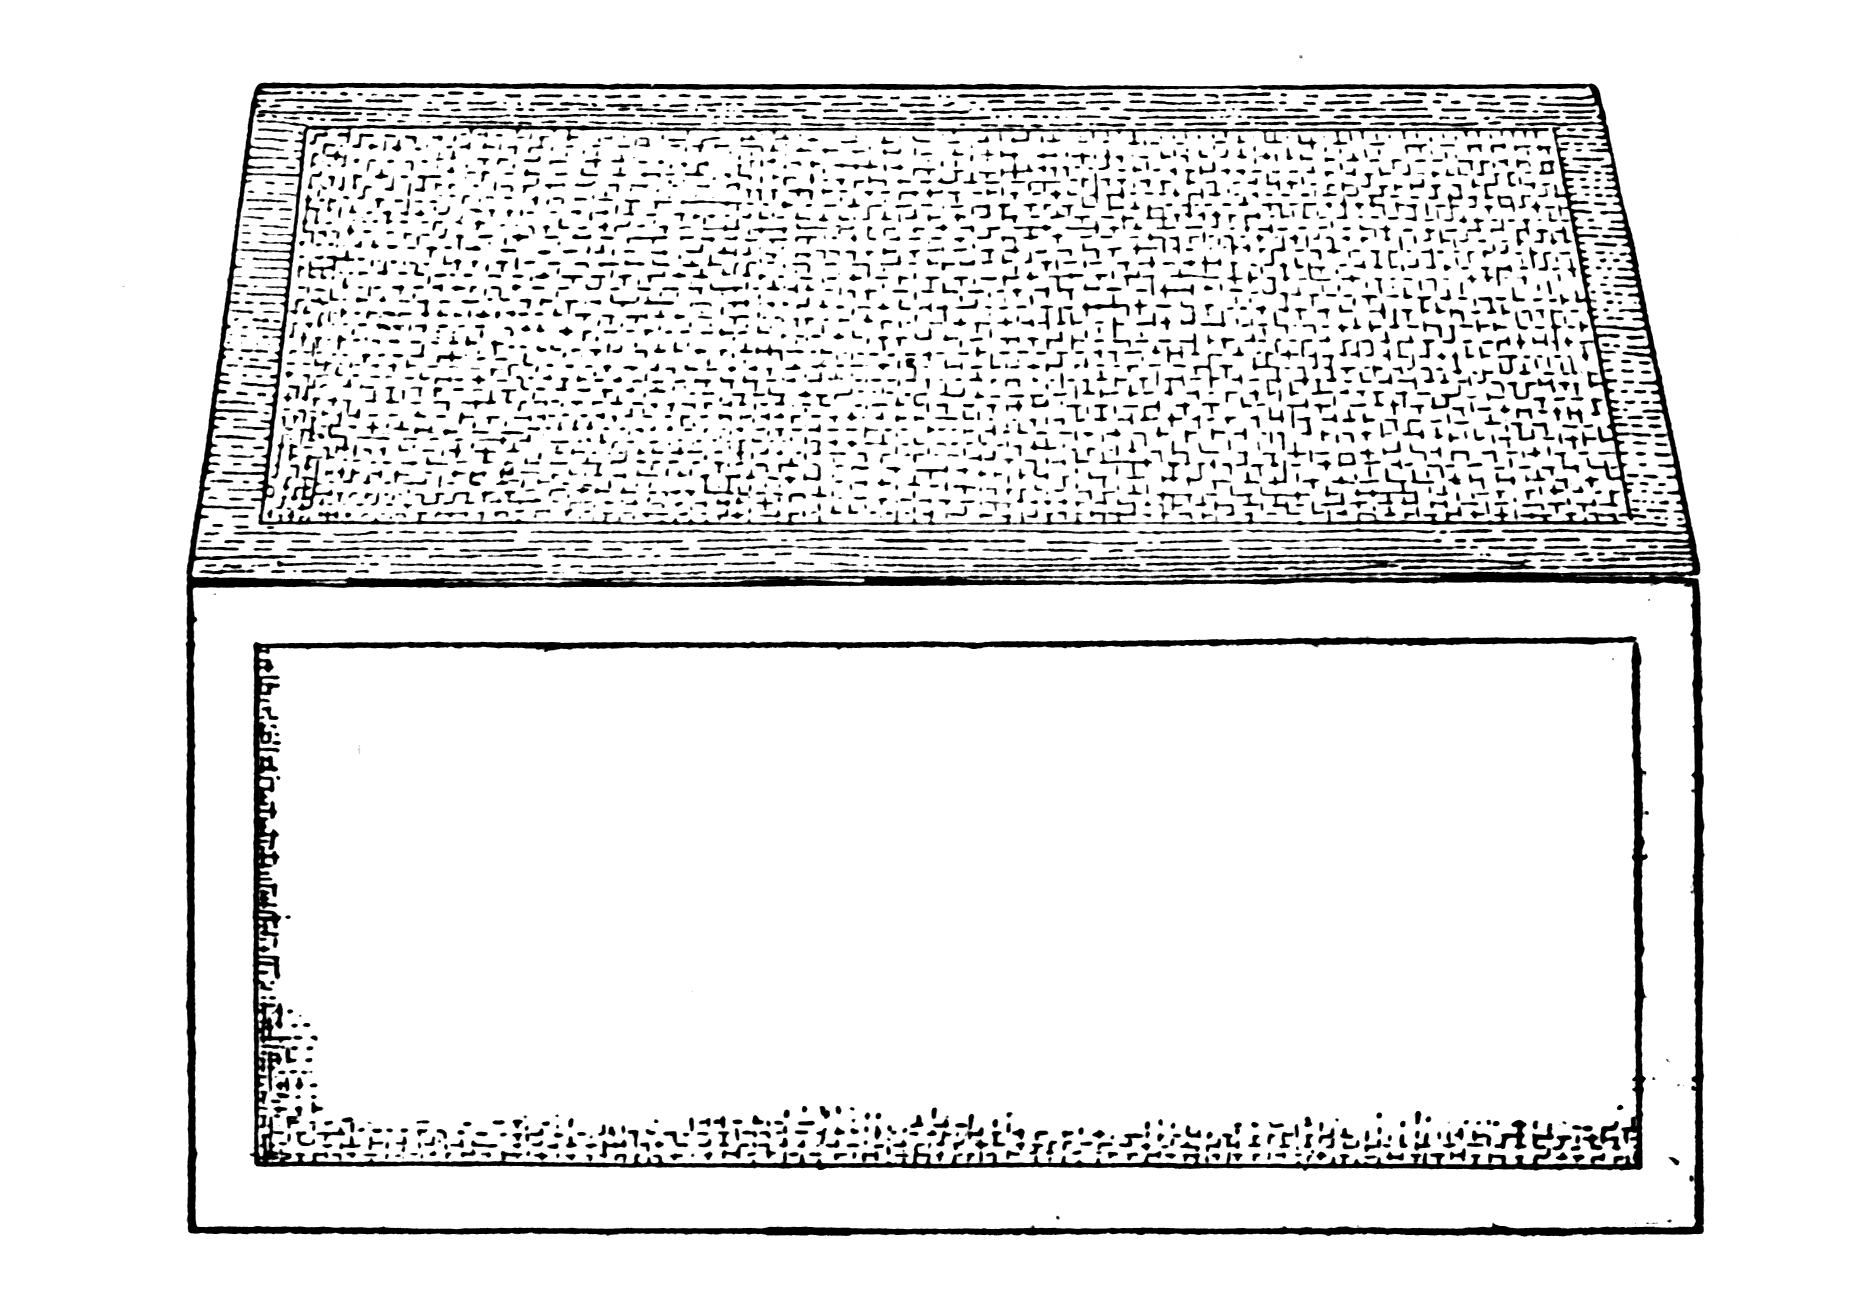
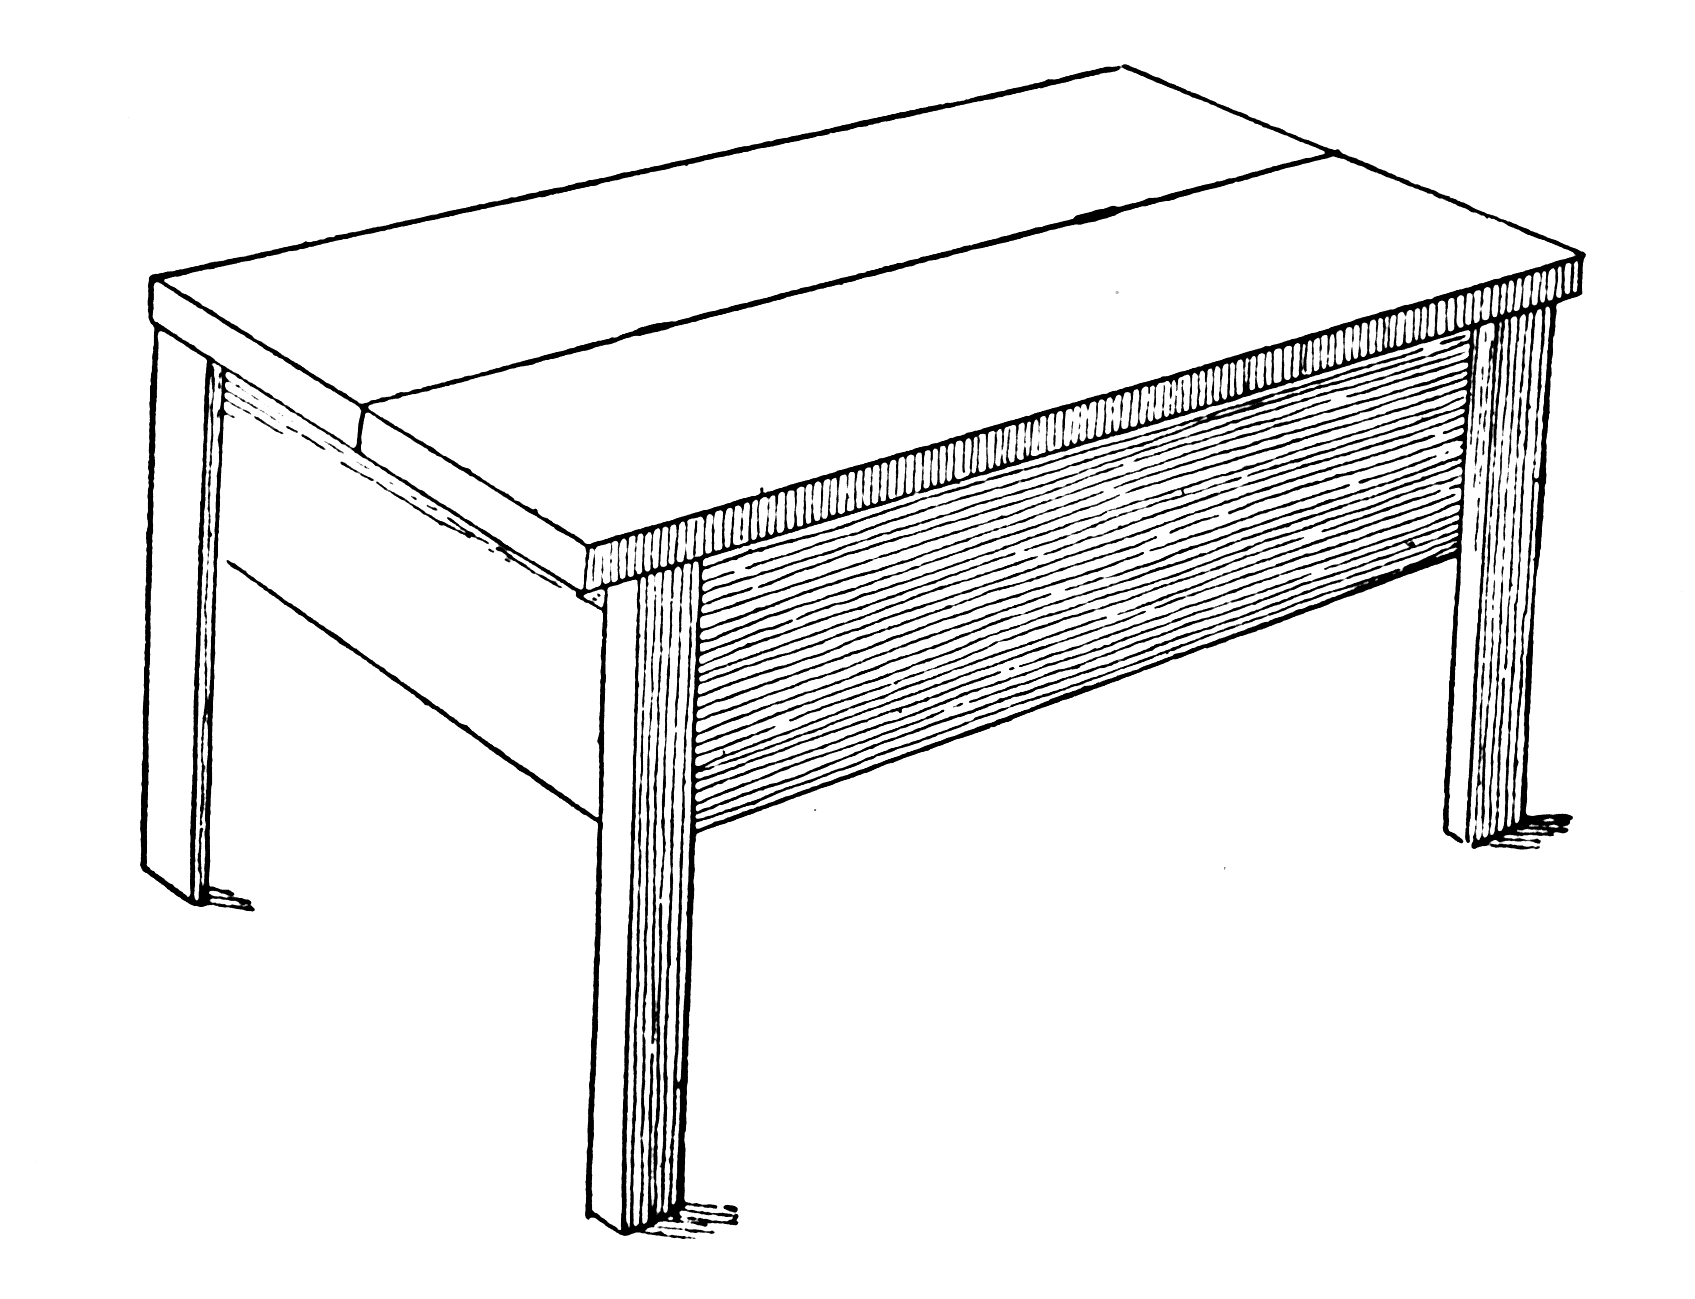
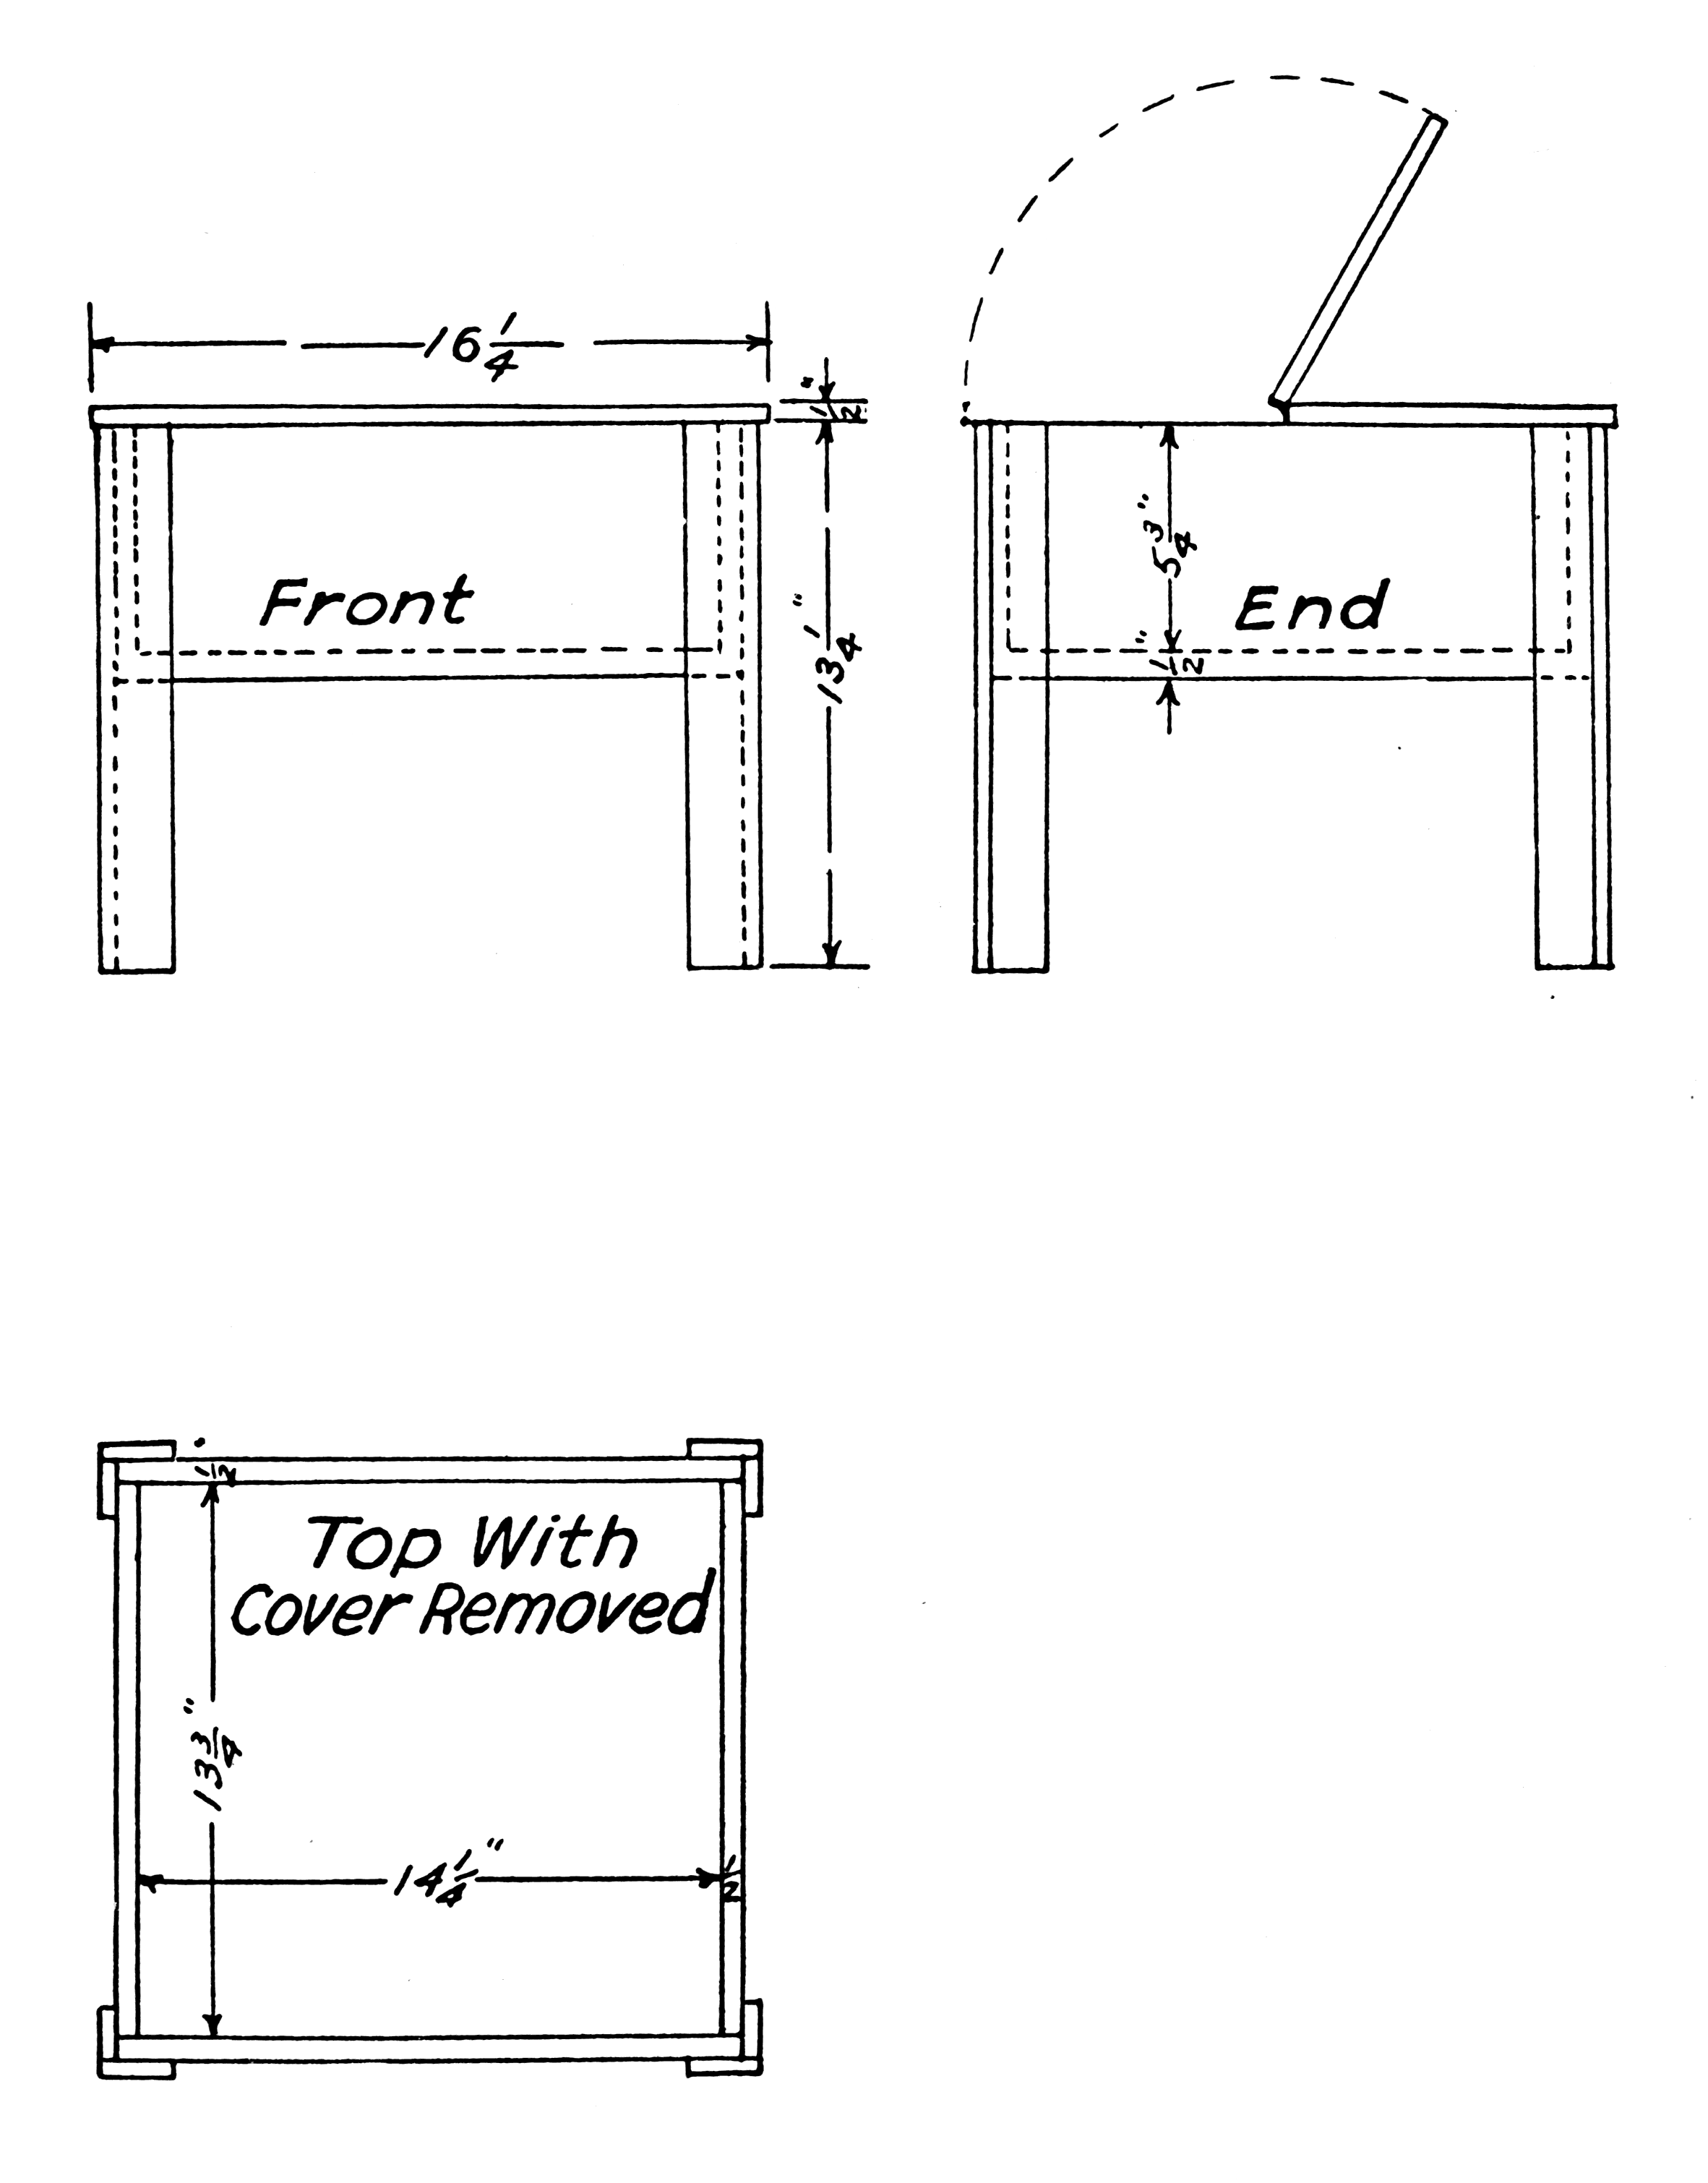
WOOD BOX
(Made From Dry Goods Boxes)
What an unsightly spectacle does a wood pile by the stove, on the porch, or in the corner of the room present! It is a place of refuge for all trash, such as old papers and rags. This not only adds to the untidiness of the room or porch, but it makes extra work for the already overworked woman. The wood box made of old dry goods boxes should appeal strongly to the home. It can be kept by the stove or on the porch or in some convenient place to be reached, and to be filled by the man before he goes to his daily work. A lid will not only cover up the contents of the box, but it will serve as a comfortable seat to be used while preparing the meal.
Materials:
Dimensions:
Directions:
Make the legs 4” longer than the depth of the box after the cover has been removed, and nail them on the box. Make the cover 2” wider and 2” longer than the outside length and width of the box. Place each cleat about 3” from the end of the cover and nail on the cover. Hinges are put 5” from each end of the box. Sandpaper, stain and polish.
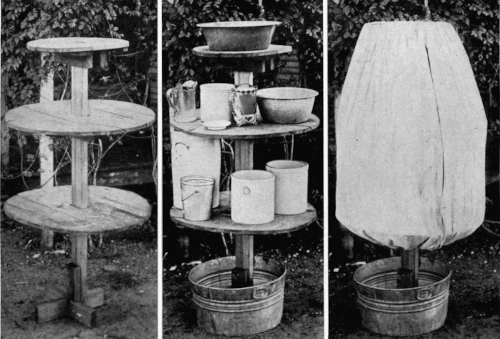
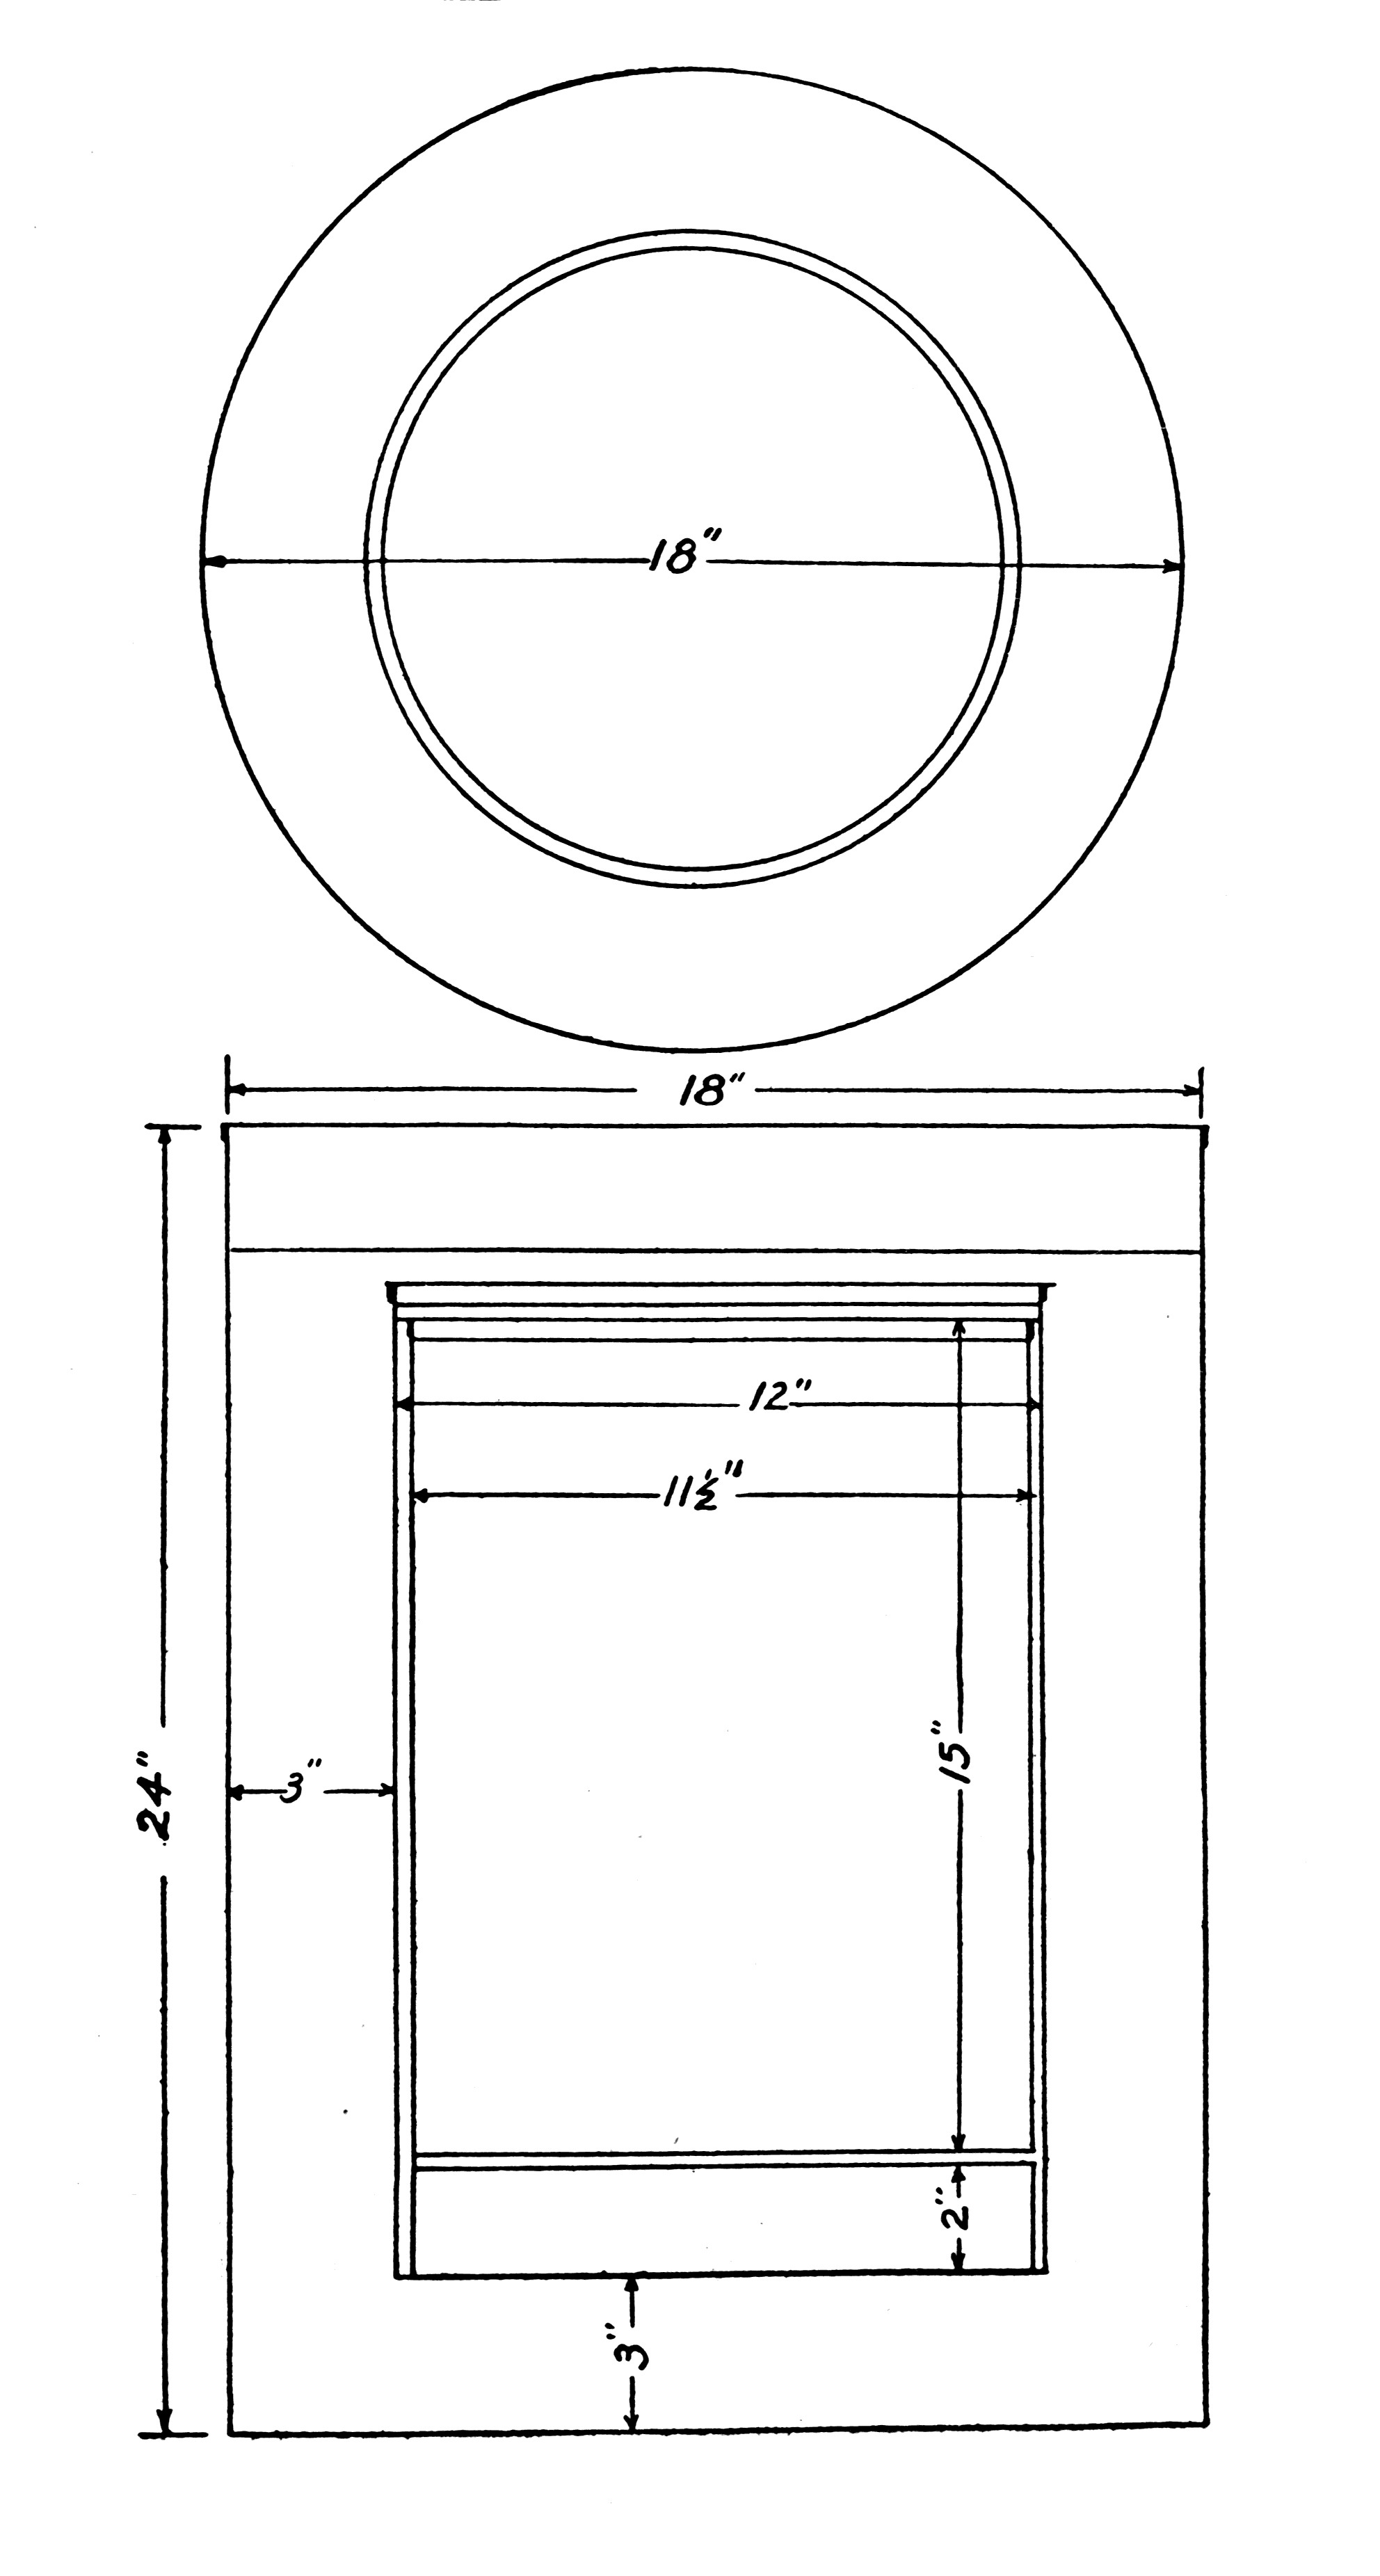
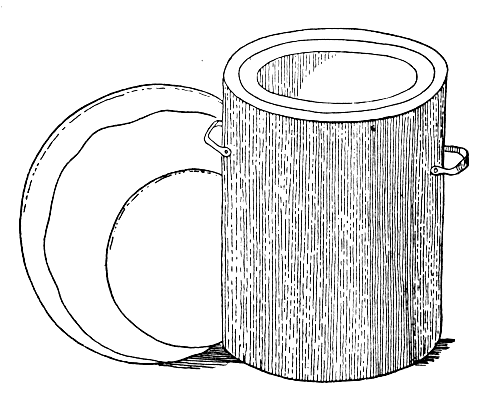
FIRELESS COOKER
There are many advantages in having a fireless cooker in the home. It not only saves time and fuel but keeps the woman from standing over the hot fire, and there are many foods that are better when cooked at a lower temperature. The principle of the fireless cooker is to retain the heat by boiling the food in a vessel with a tight cover and placing it in the cooker in the same vessel, thus keeping the heat from escaping. An outside container may be made to accommodate one or more cooking vessels. A cheap but efficient fireless cooker may be made of a tightly built wooden box, a barrel, or a tin lard can as shown in the illustration. If the outside container is of wood it must be lined on the inside with asbestos or heavy paper to keep out the air.
The nest may be a galvanized or tin bucket of a size which will admit of three inches of packing between the outside container and the nest. The sides and bottom of the nest are covered with asbestos to prevent the scorching or the burning of the packing.
The packing must be of some material through which the heat cannot easily escape. Cork, sawdust, excelsior, hay, or shredded newspaper may be used to an advantage. Three inches of this packing is put tightly in the bottom of the outside container and around the sides to fill in the space between the outside container and the nest.
A four-inch space is left at the top of the fireless cooker in which a cushion made of unbleached cotton or some other material is stuffed with the packing and placed to make the cooker air-tight. Cut two circles out of the unbleached cotton and a three-inch straight piece to join the circles together. A hot soapstone, stove plate or brick is placed in the bottom of the nest before the food vessel is placed in the fireless cooker. The food vessel may be any cooking utensil with a top that will fit in the nest after the soapstone has been put in. Cut a circle of tin or cardboard to fit top of inside of cooker with an opening the size of the nest. This gives a good finish to the top of the fireless cooker and preserves the packing.
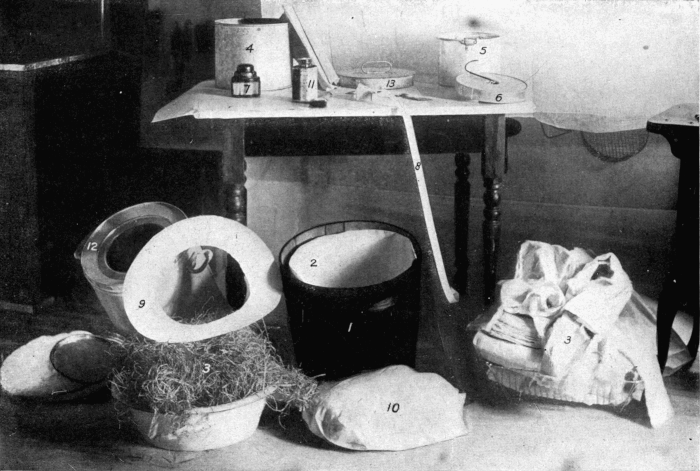
Assembled material for building a fireless cooker. 1, Outside container; 2, paper for lining; 3, material for packing; 4, inside nest; 5, cooker vessel; 6, soapstone; 7, paste; 8, tape; 9, cardboard; 10 muslin for cushion; 11, stain; 12, a finished cooker; 13, top to inside nest
Materials:
Dimensions:
Directions:
Place 3” of excelsior in the bottom of the outside container (18” × 24”) and pack it down tightly. Cover the bottom and sides of the nest (12” × 15”) with asbestos. Then place nest in the outside container holding it in place while 3” of packing is put tightly between the outside container and nest. Cut the cardboard circle to fit inside of the top of outside container with an opening to fit the top of the nest and put on top to give a good finish and to preserve the packing. Make the cushion for the top of the unbleached cotton by cutting two circles with 3” strip to join them together. Then pack the cushion tightly with the same packing. Enamel the cooker.
Any convenient box may be used and any can of convenient size, such as a lard can, etc. The cans should be wrapped with about 4 or 5 layers of asbestos paper. The space around the cans should be at least 2 inches, and filled with straw or wood shavings, etc. The top of the cans should be covered with a pad filled with straw or shavings, etc.
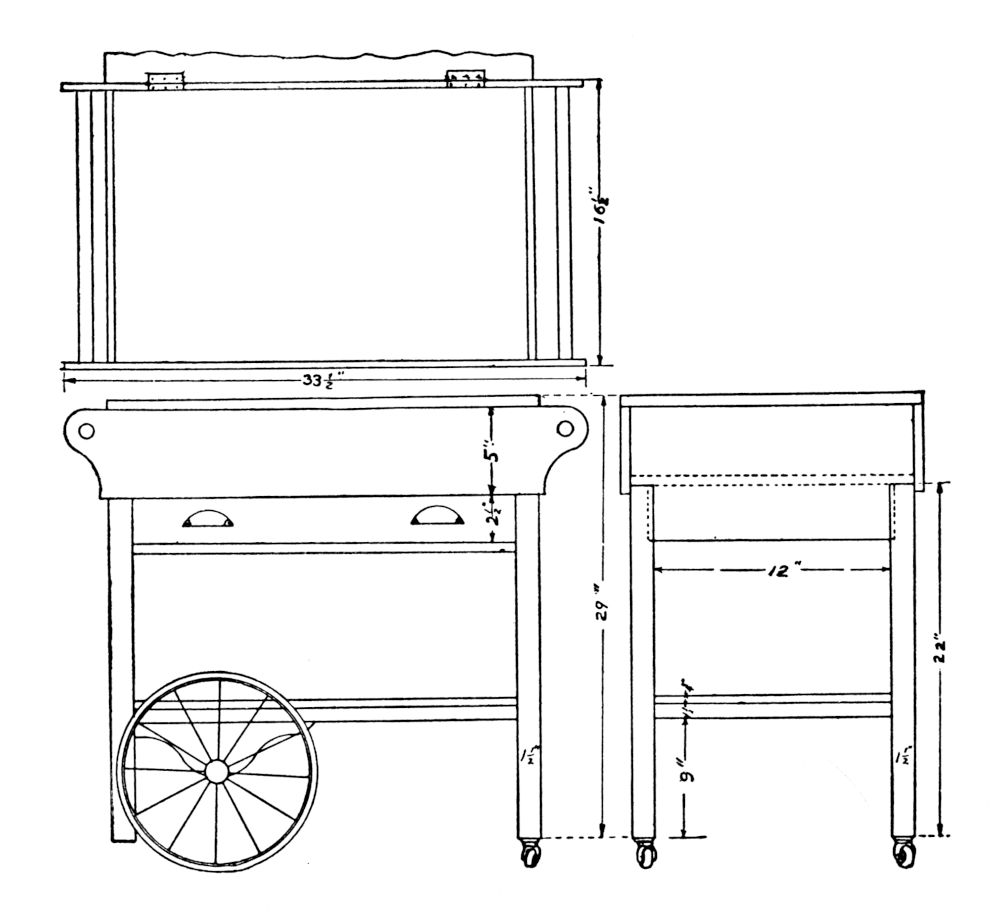
ROLLER TRAY WAGON
An efficient and convenient table placed on casters and wheels and comprising a china closet, drawer for silverware, serving table, and roller tray all in one. This device is invaluable to the housekeeper who does her own work. It saves her many steps in the preparation and the serving of her meals. While she is entertaining at a luncheon, it takes the place of a maid, since the refreshments can be prepared, arranged on the wagon, and rolled out at the appointed time. The prices of a tea wagon made in wicker or some expensive wood are very high, but one like the following illustration can be made at a nominal cost, or it can be made of dry goods boxes for even less.
Materials:
Dimensions:
Directions:
Take the 2 sides (1” × 5” × 33½”) and round each end in the shape of a half circle, boring a 1” hole in each end of side piece to hold handles (1” × 1” × 15”). Fit bottom on inside of box and nail it. Mortise 3½” from the top of the legs to fit cross pieces, 1” × 3½” × 12”. Make a ¼” mortise on the legs 9” from the bottom for the support of the bottom shelf. Measure 2½” from the top of the leg to put tenon for the front drawer support. Construct the opposite end of the table in the same way. The upper top of table, showing the lid and handle, should be fastened to top after the table is made. In making the frame for the drawer, 2½” deep × 13½” wide × 23½” long, nail the front and back to the sides. Then nail the bottom of the drawer to the inside of this frame with one partition nailed crosswise the center of the drawer. Place handles on the front of the drawer about 3” from each end. Screw on the 2 pieces placed 9” from bottom of the leg, with 2½” No. 10 screws. Cut the bottom shelf out 1½” at each corner, fit to the legs, and screw. This shelf must be stationary. Brackets, 1” × 8” × 8”, are screwed on at one end of the shelf to be used as supports to which the wheels are fastened. The drawer may be used for silverware and to keep the linen. The side used for silverware should be lined with felt or outing. The table should be well dressed by sandpapering, staining, and polishing it. Do not varnish it because this does not make so attractive a table as the mission stain.
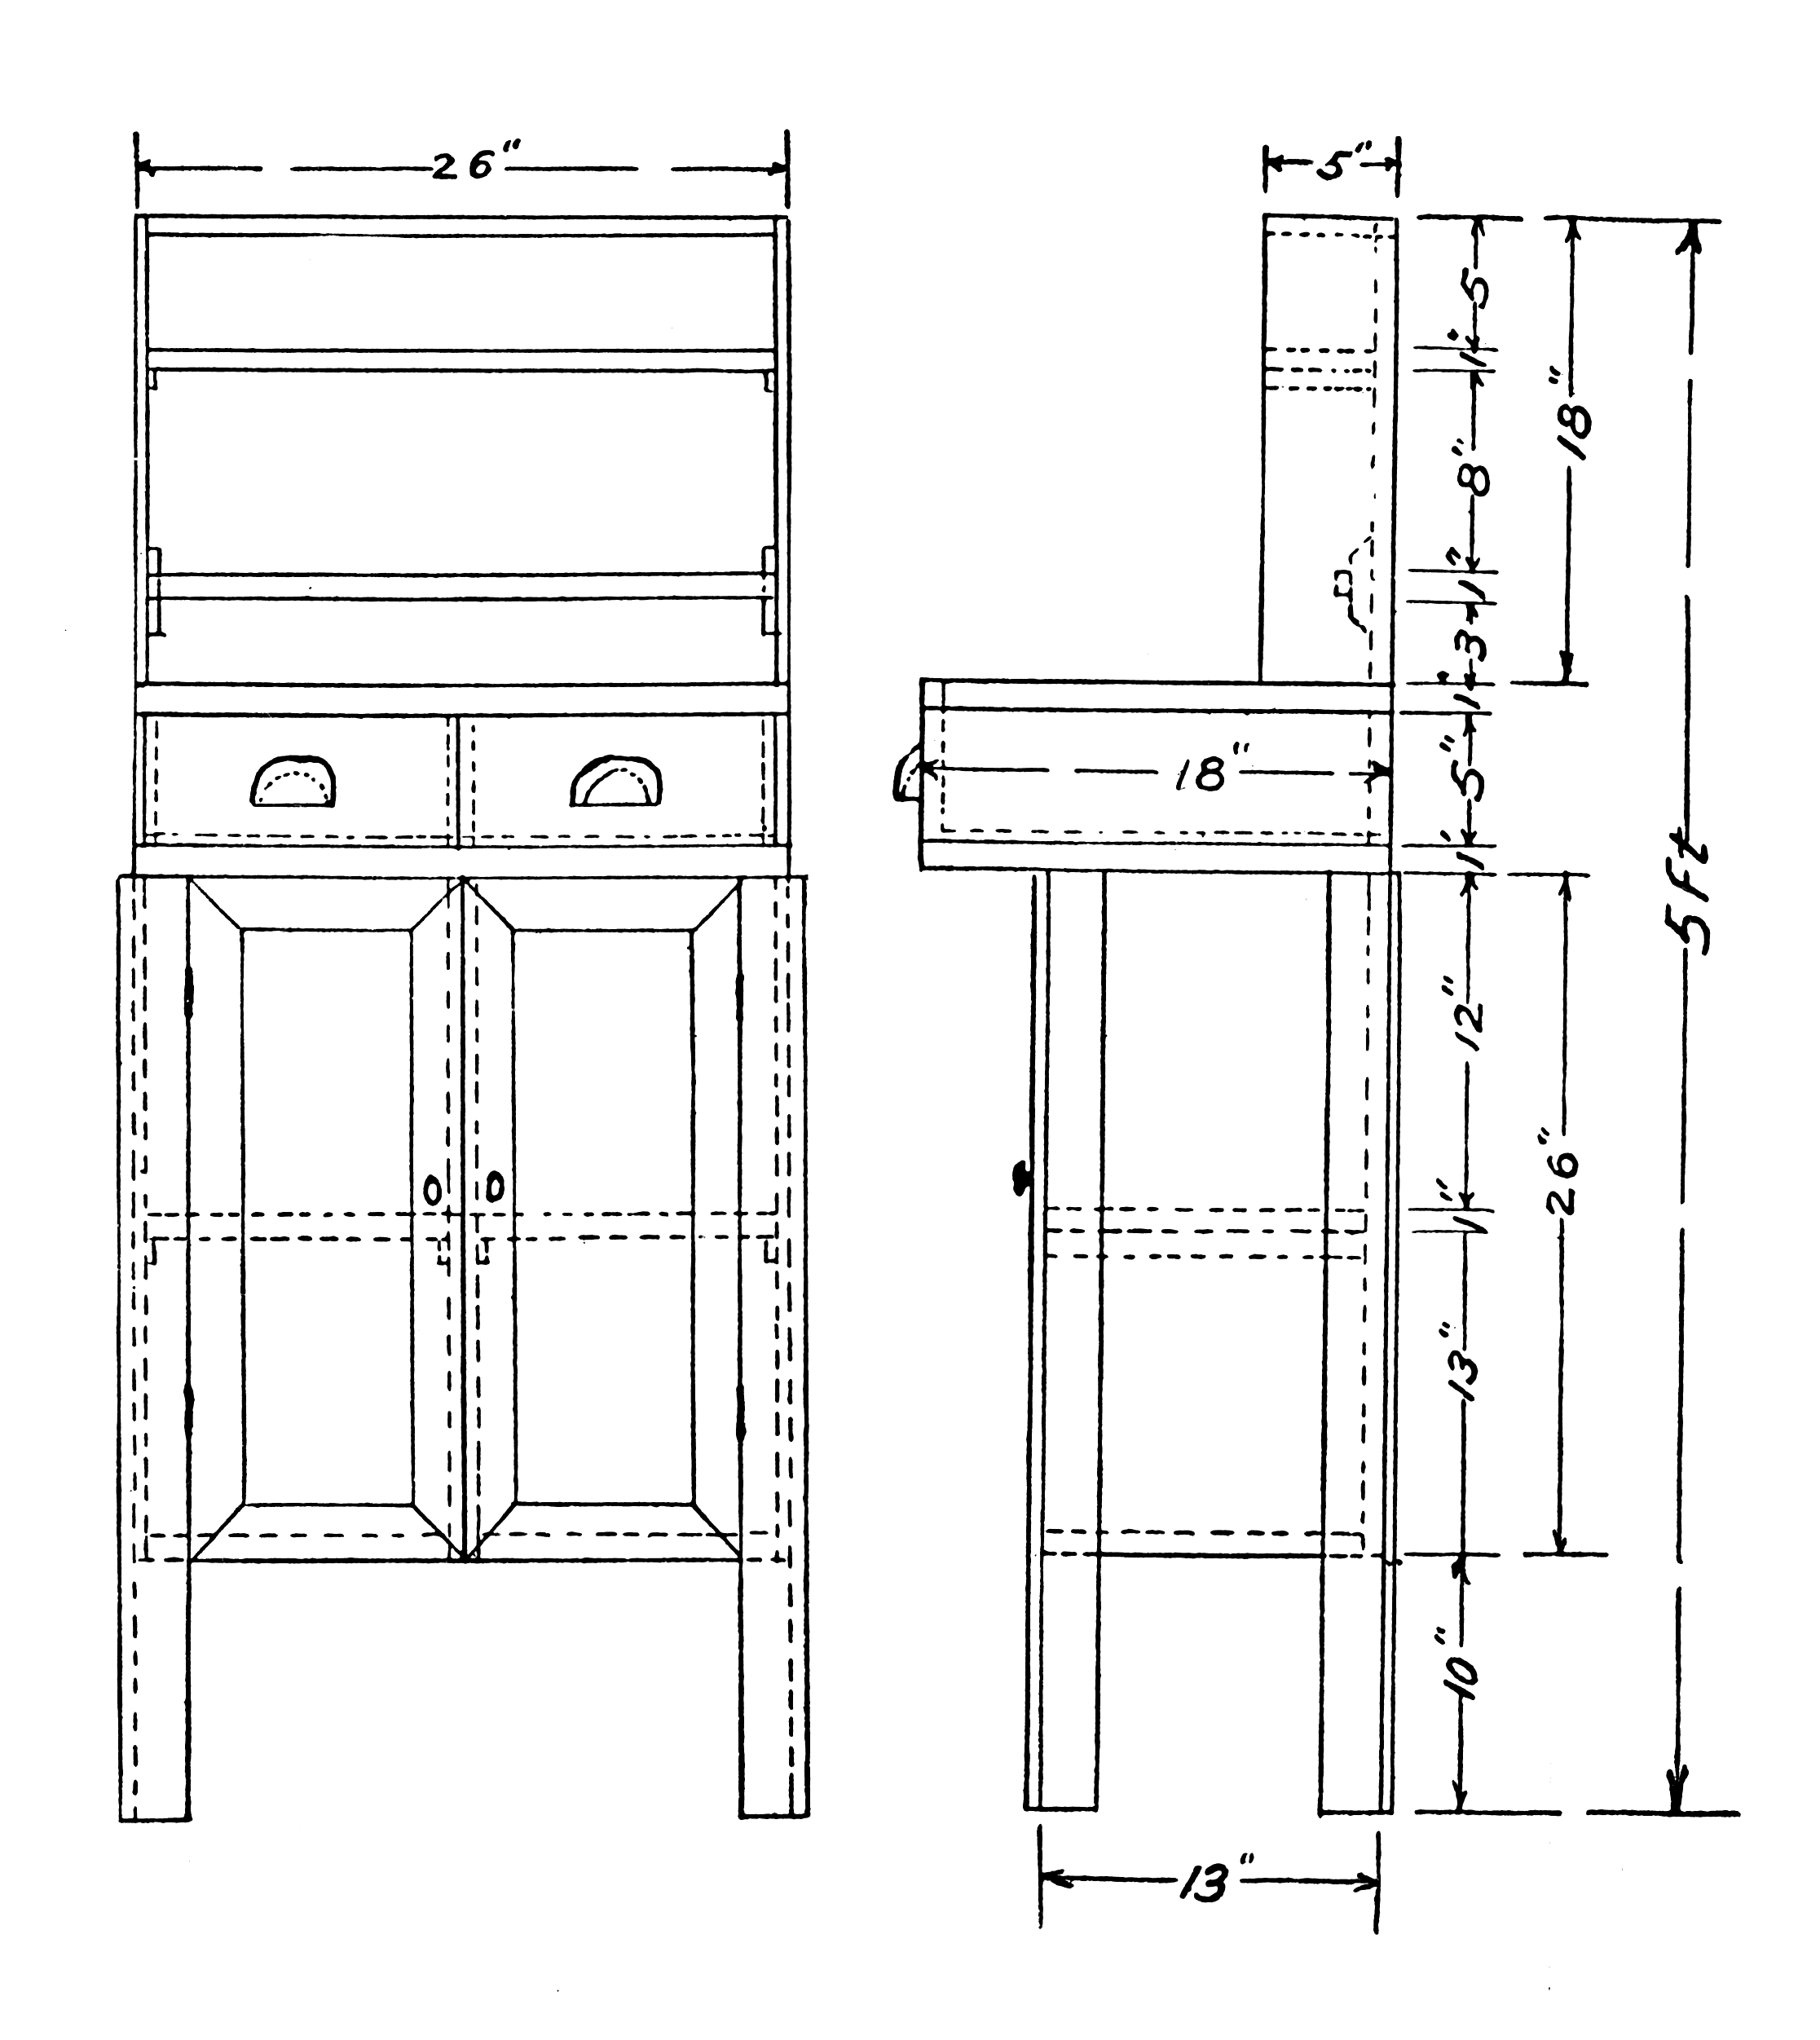
SIDEBOARD
(Made of Dry Goods Boxes)
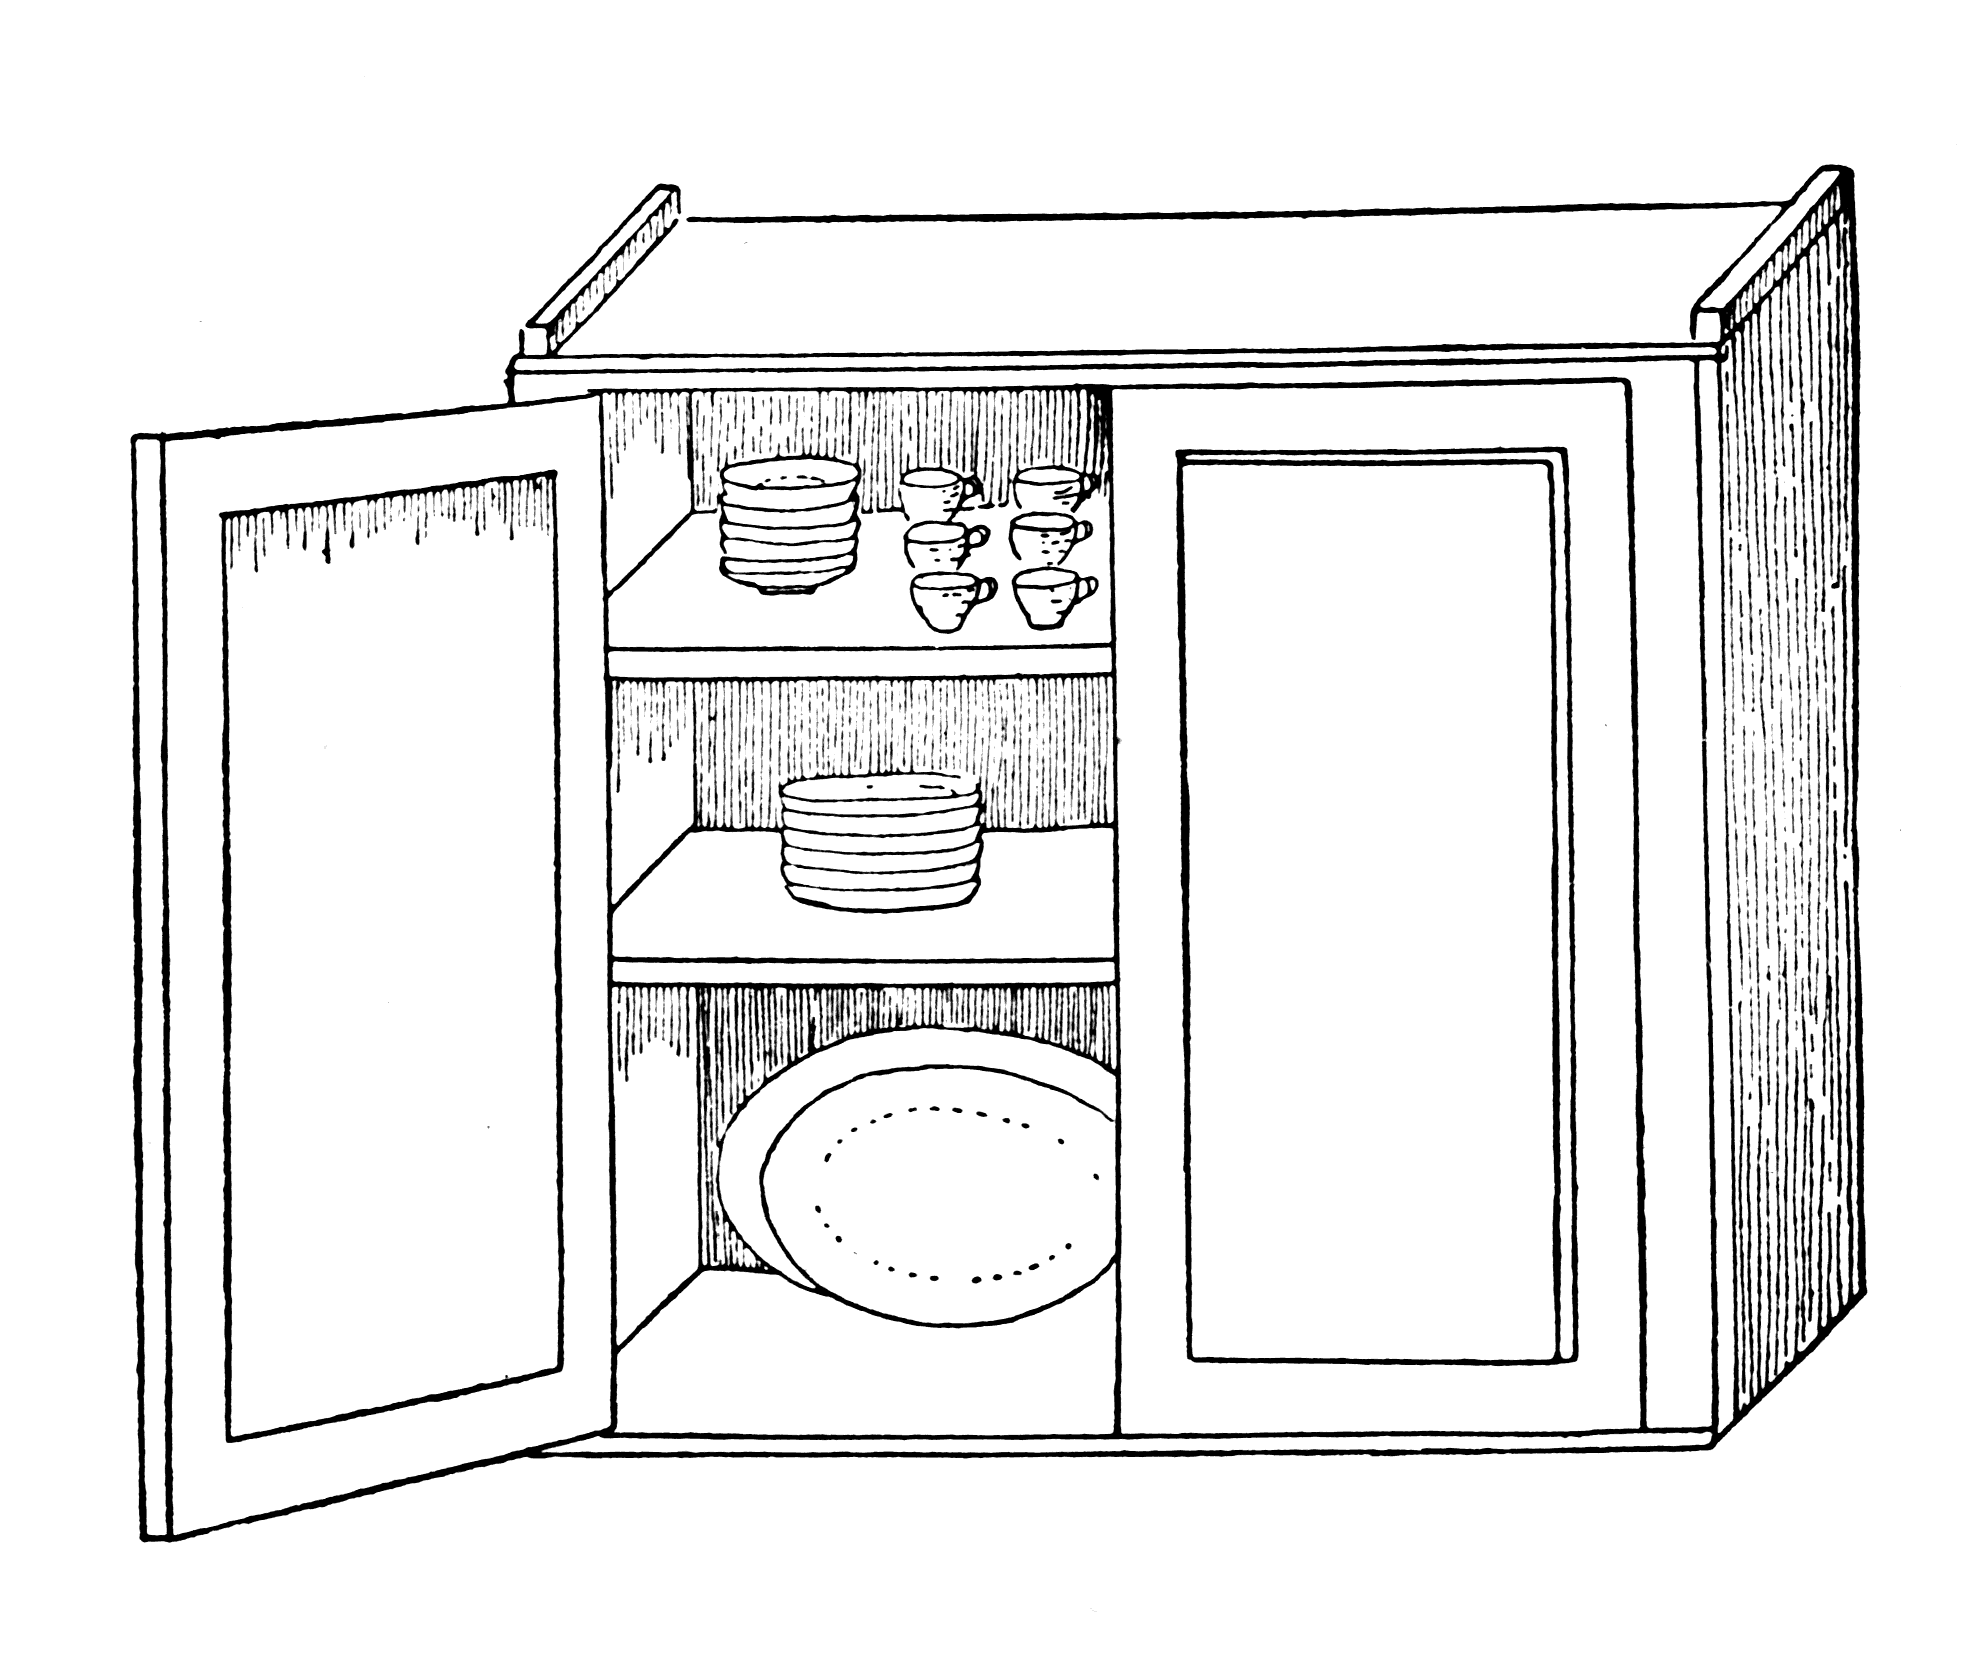
A unique article made of dry goods boxes, which may be used in the dining room as a sideboard or in the kitchen as a cupboard. Two dry goods boxes are joined together to make the lower section, one end on each box being removed to be used as shelves in the sideboard. The upper section with its three shelves is made from pieces of other boxes. On two of the shelves brass hooks are arranged at equal distances apart, on which the cups hang. A groove may be made under the lower shelf and on the top shelf, in which the small plates and saucers rest. The two drawers, made according to dimensions and out of pieces of boxes, can be lined with felt or outing flannel to hold the silverware. Attractive curtains may be made of some suitable material and hung in front of the upper section. This is especially an interesting problem for boys in a school to work out.
Materials:
Dimensions: Lower Section:
Upper Section:[Pg 48]
Directions:
Boxes which can be most easily converted into the desired sections must be selected. Two boxes (13” × 12½” × 26”) are joined together to form the body of the lower section of the sideboard. Remove the ends of the boxes, to be used as shelves, using the side of a larger box for the top of this section. The shelves are fastened in by 4 cleats (½” × ¾” × 12”) nailed crosswise the partition and the sides of the section. Four strips (½” × 2¾” × 36”) and four strips (½” × 2¼” × 36”) are taken from the third box to make the legs of the cabinet. The doors are fastened on with hinges, using two metal knobs in front of the doors to open them. The foundation of the upper section is made of a box (5” deep × 18” × 26”). The three crosspieces used as shelves are made from the two small boxes (5” × 12” × 18”). Make the drawer of a box (5” × 18” × 24”), putting a partition through the center of the box and on the inside if two drawers be desired. Place two hand bolts on the front of the drawer. Sandpaper, stain, and polish the sideboard.
SCREEN
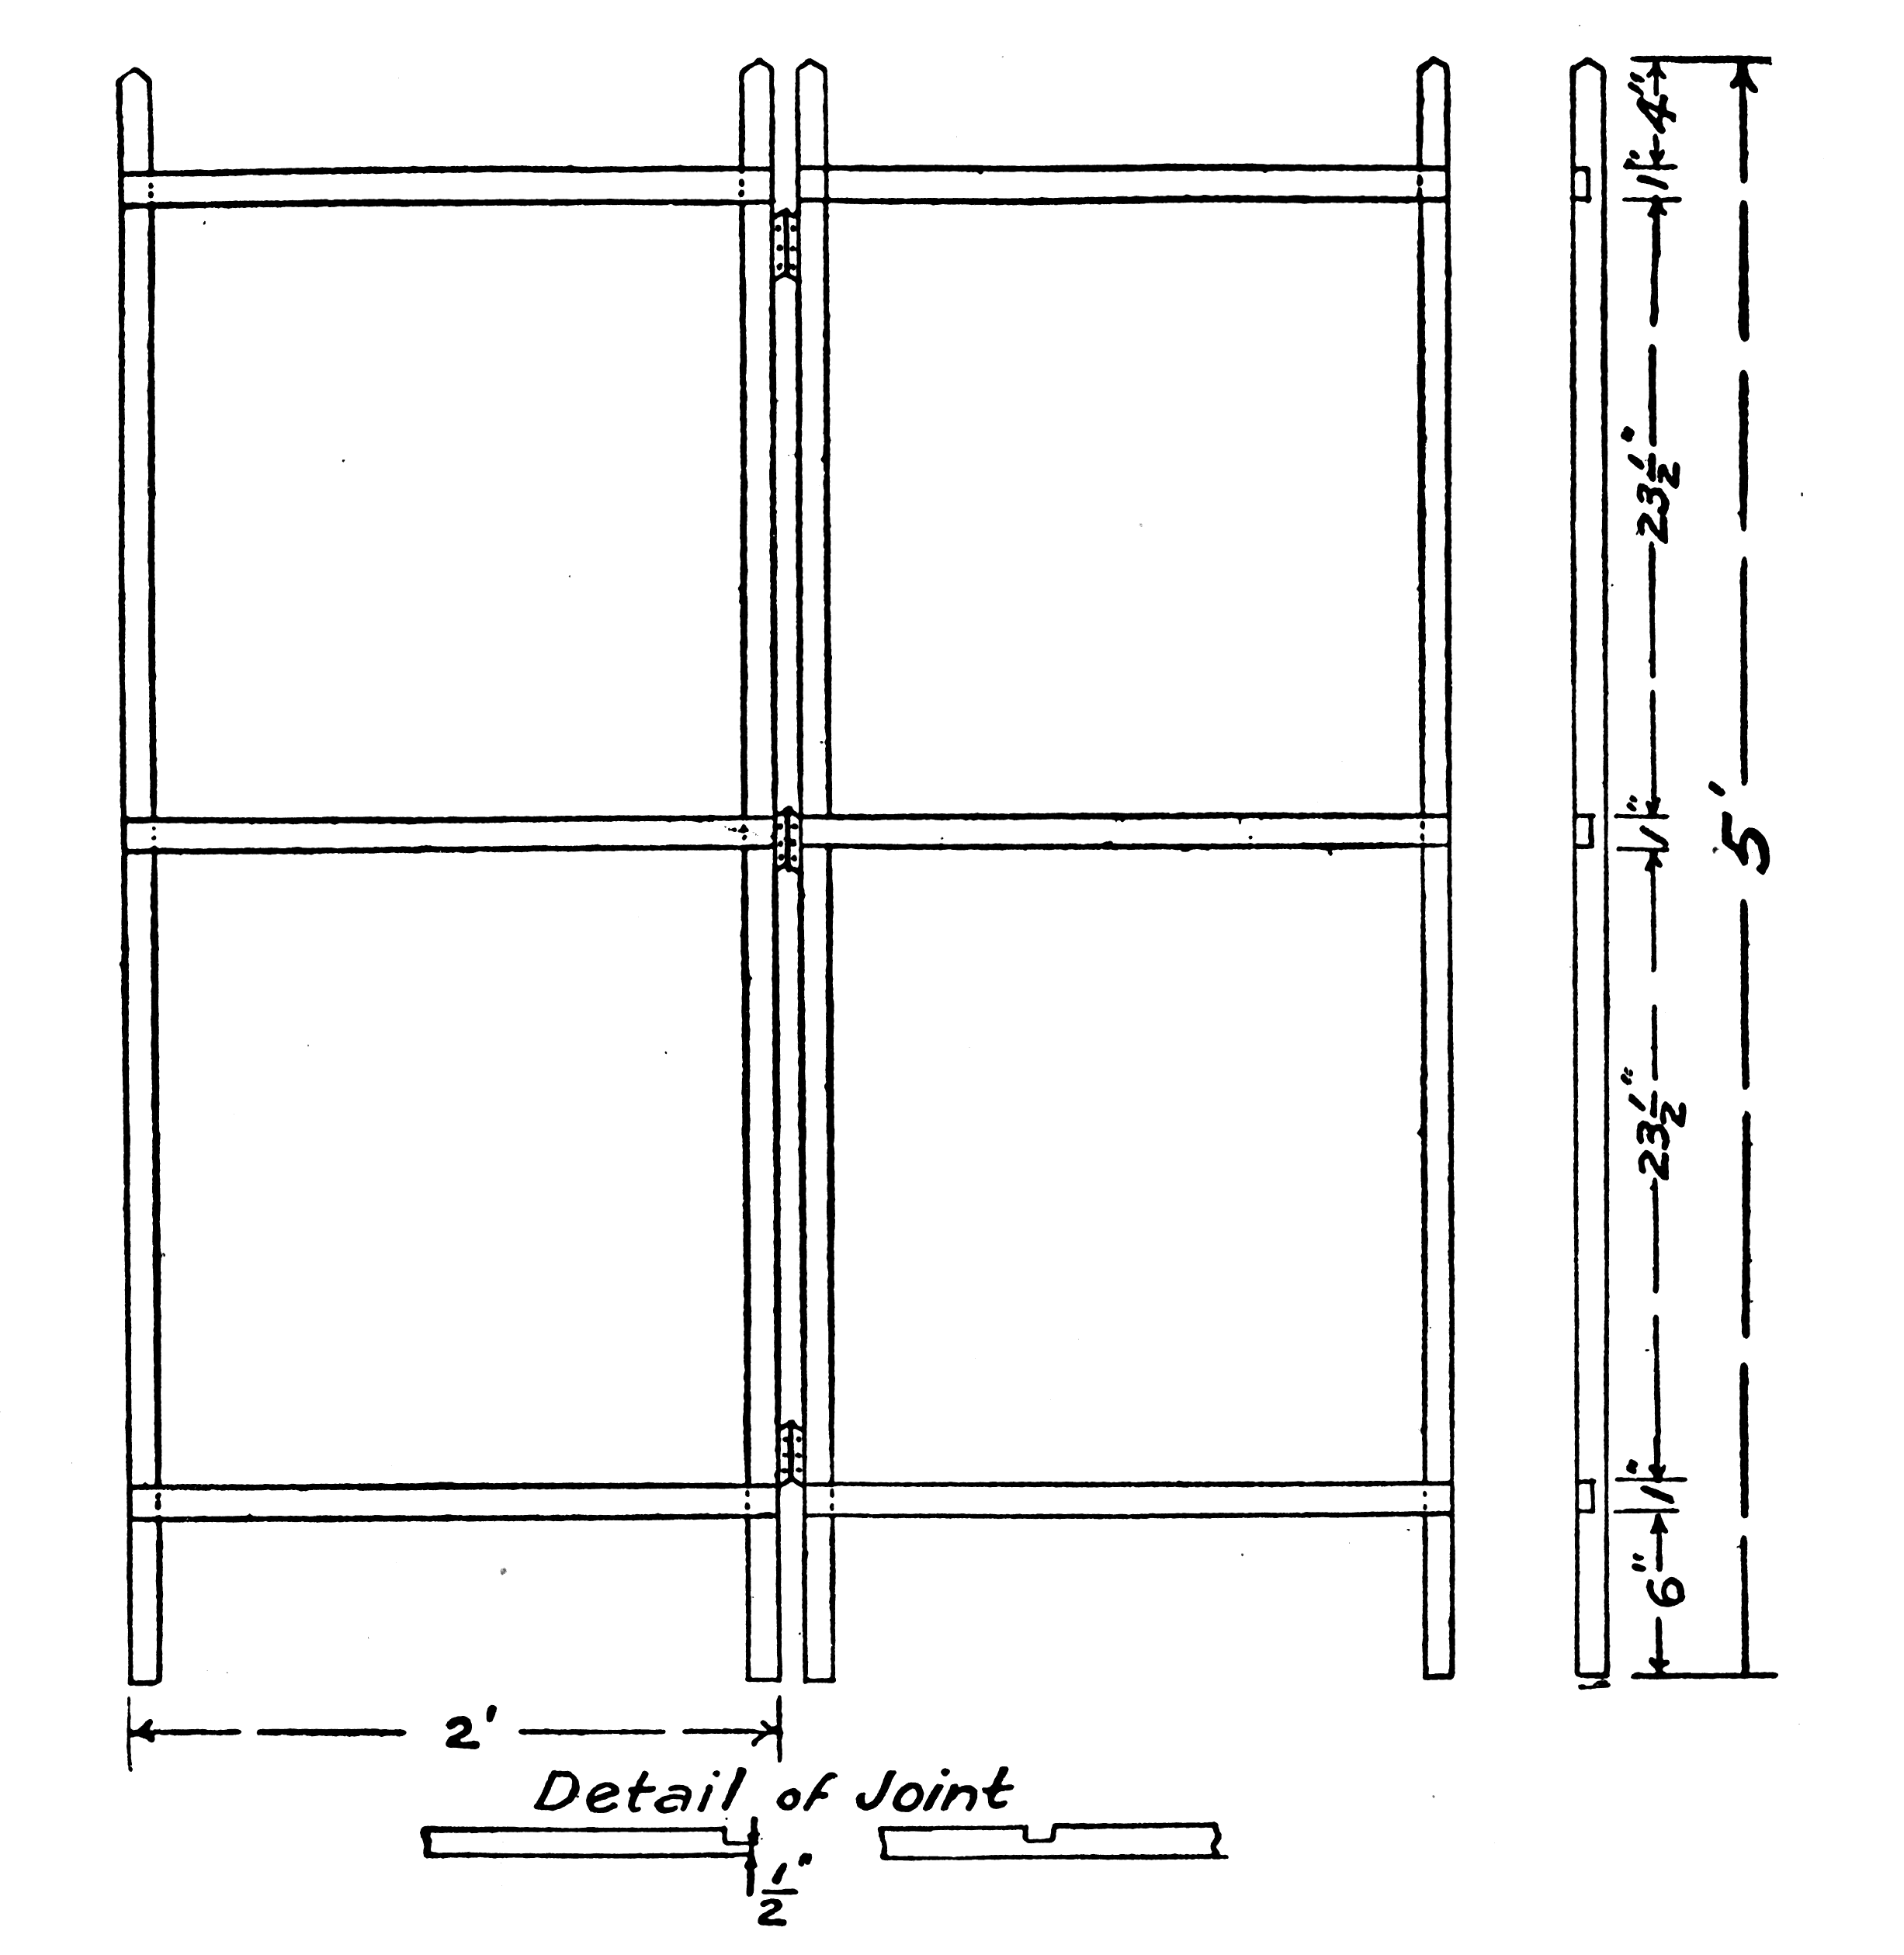
A screen is useful in many ways in the home. It adds a great deal to the appearance of a bedroom. By putting it around the bed one may often avoid draughts. In the dining room it is indispensable in the front of a serving table while the meal is going on. The illustration above shows a two-panelled screen which may be easily made in the home, or it furnishes good material for a woodwork problem to be used in [Pg 50] the school. It is made of oak and covered with burlap. By adding to the number of pieces the third panel may be made with ease.
Materials:
Dimensions:
Measure and saw the pieces according to required dimensions. Cut the joints and nail the three crosspieces to the two upright pieces. Make the other panel in the same way and join the two together with the three hinges. Sandpaper, stain, and polish the frame. After it has dried thoroughly, cover it with the burlap on the outside, tacking this on with the brass-headed tacks.
[Pg 51]
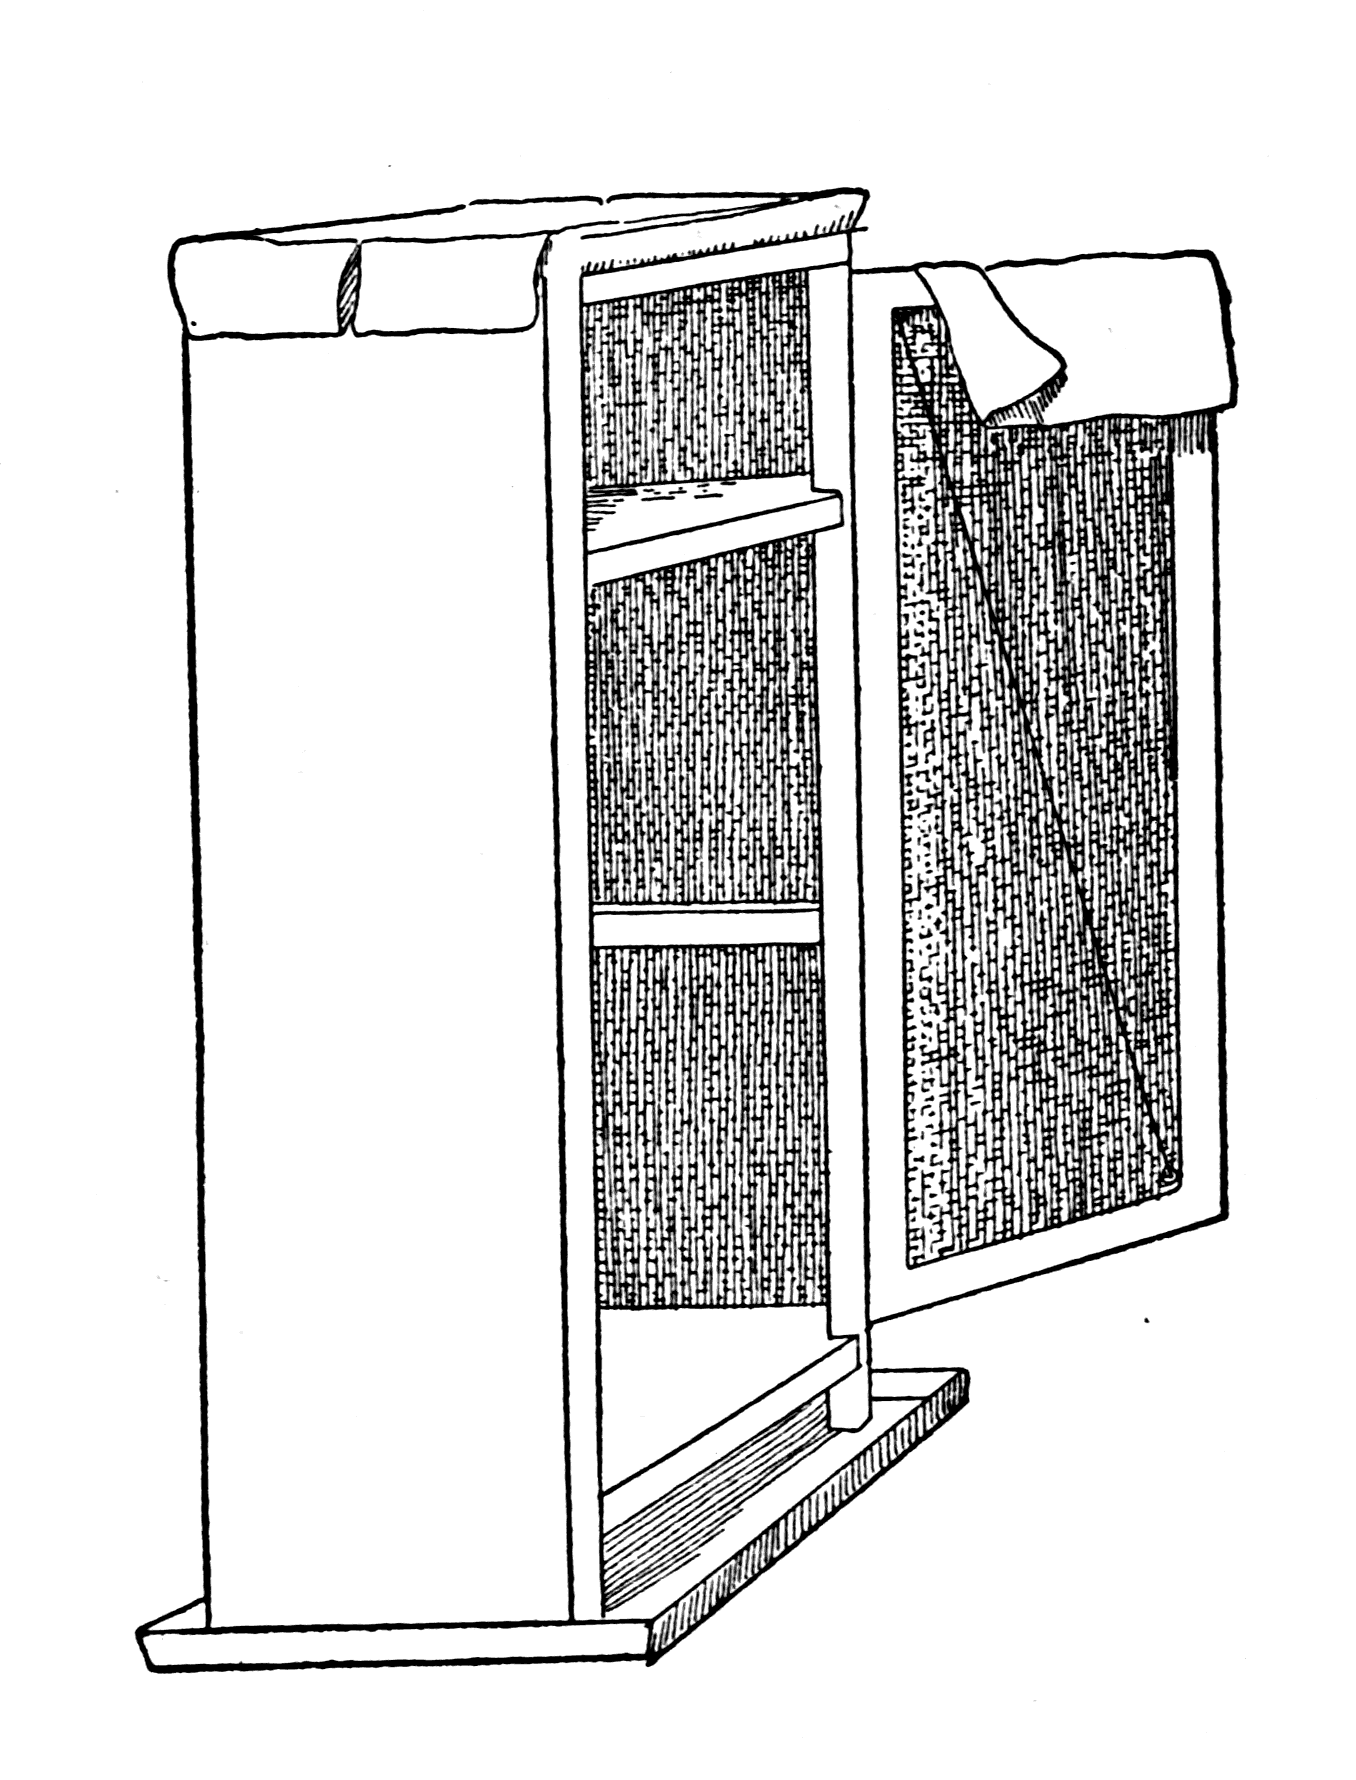
ICELESS REFRIGERATOR NO. 1
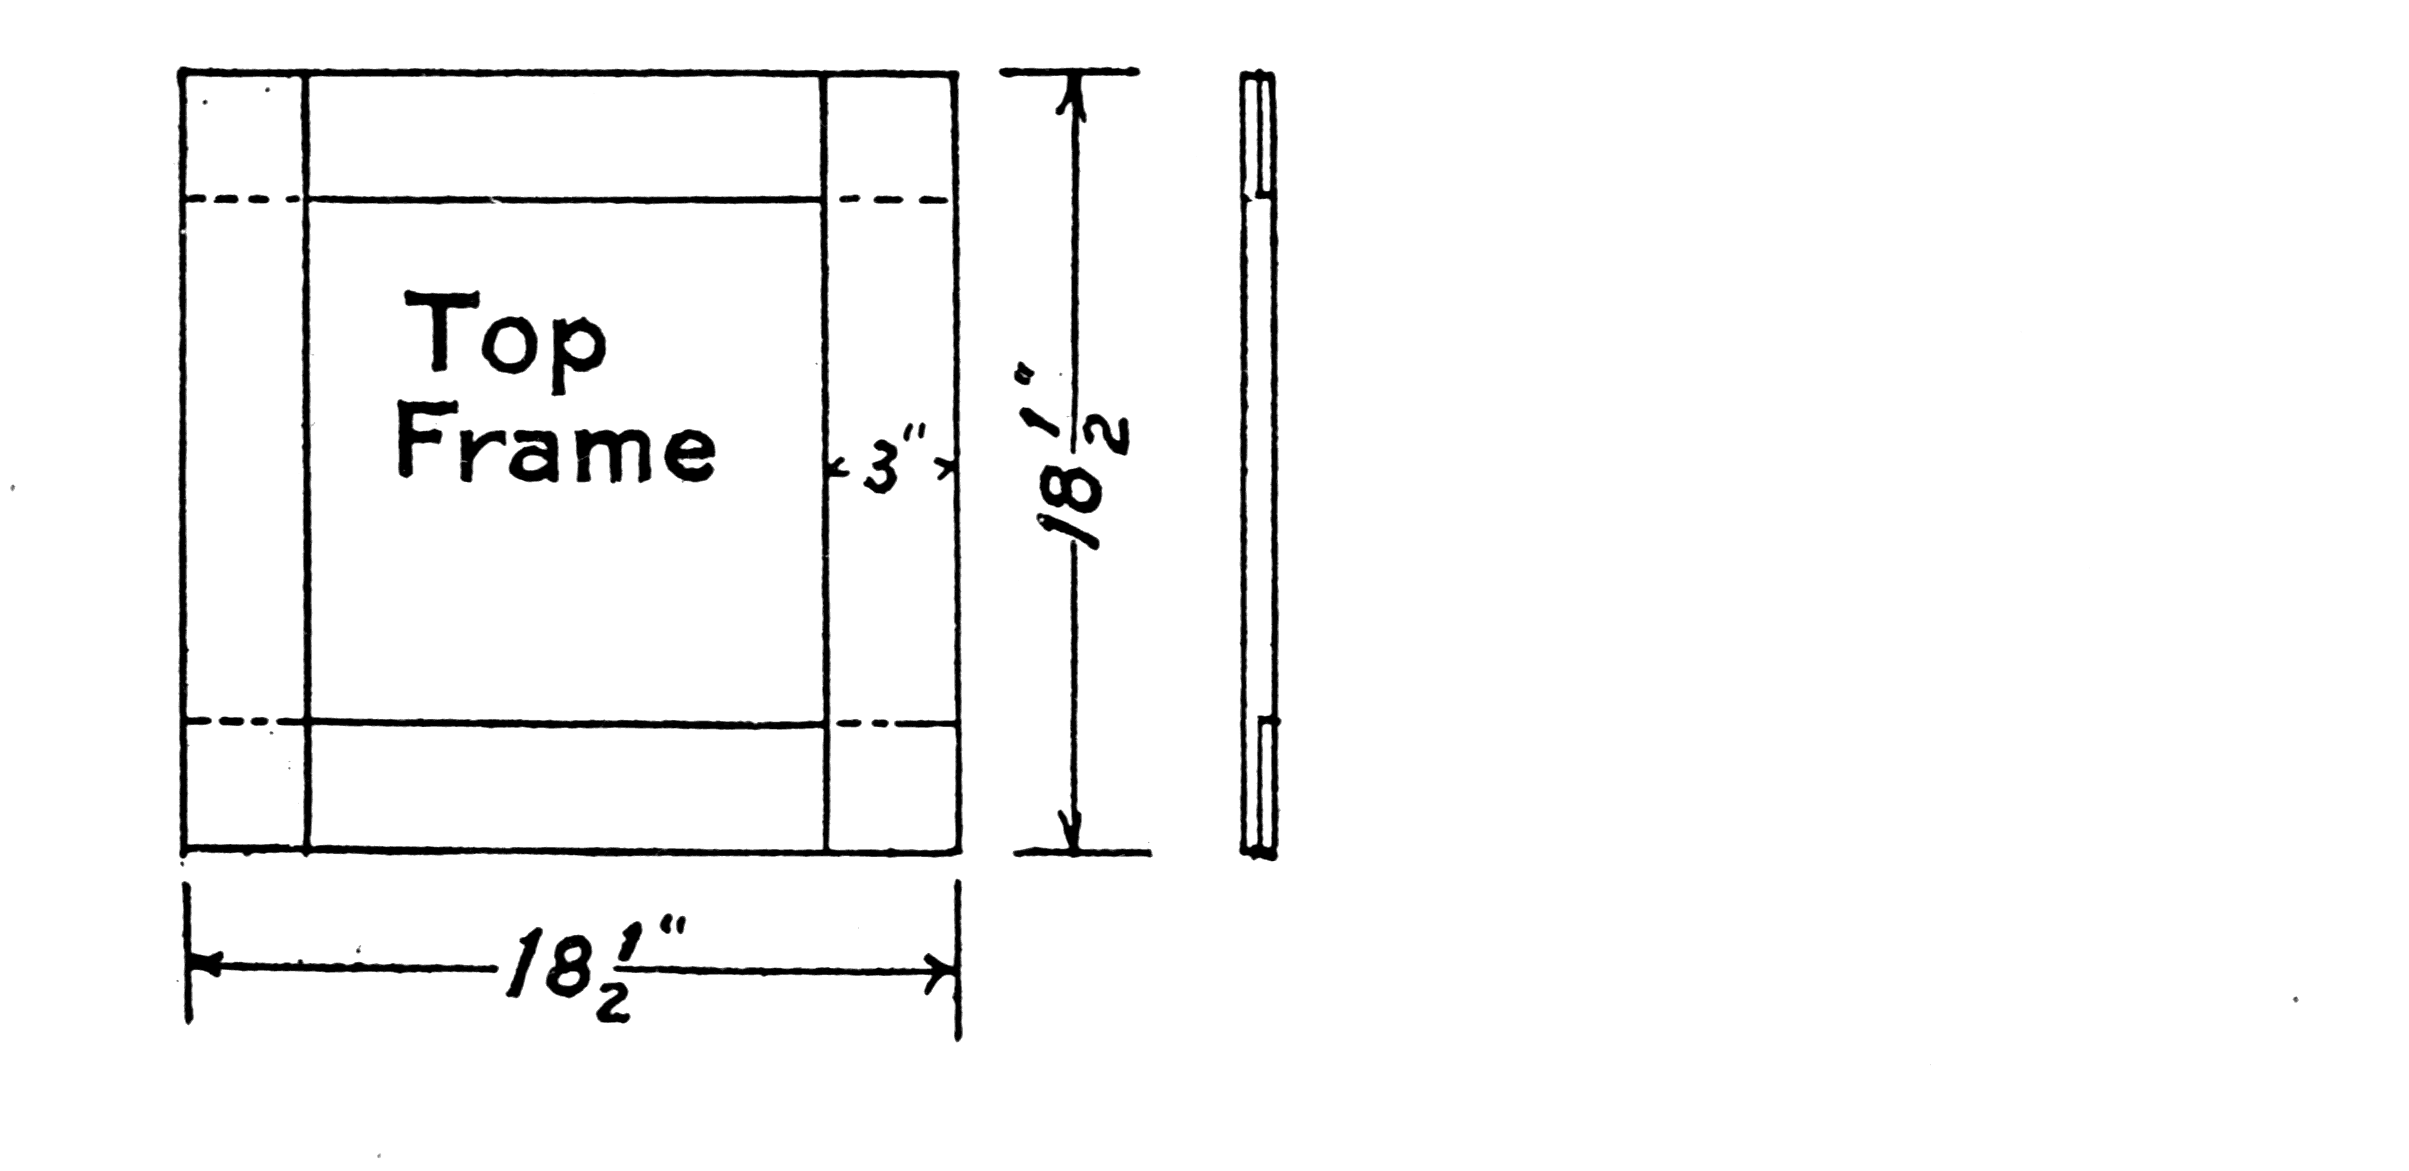
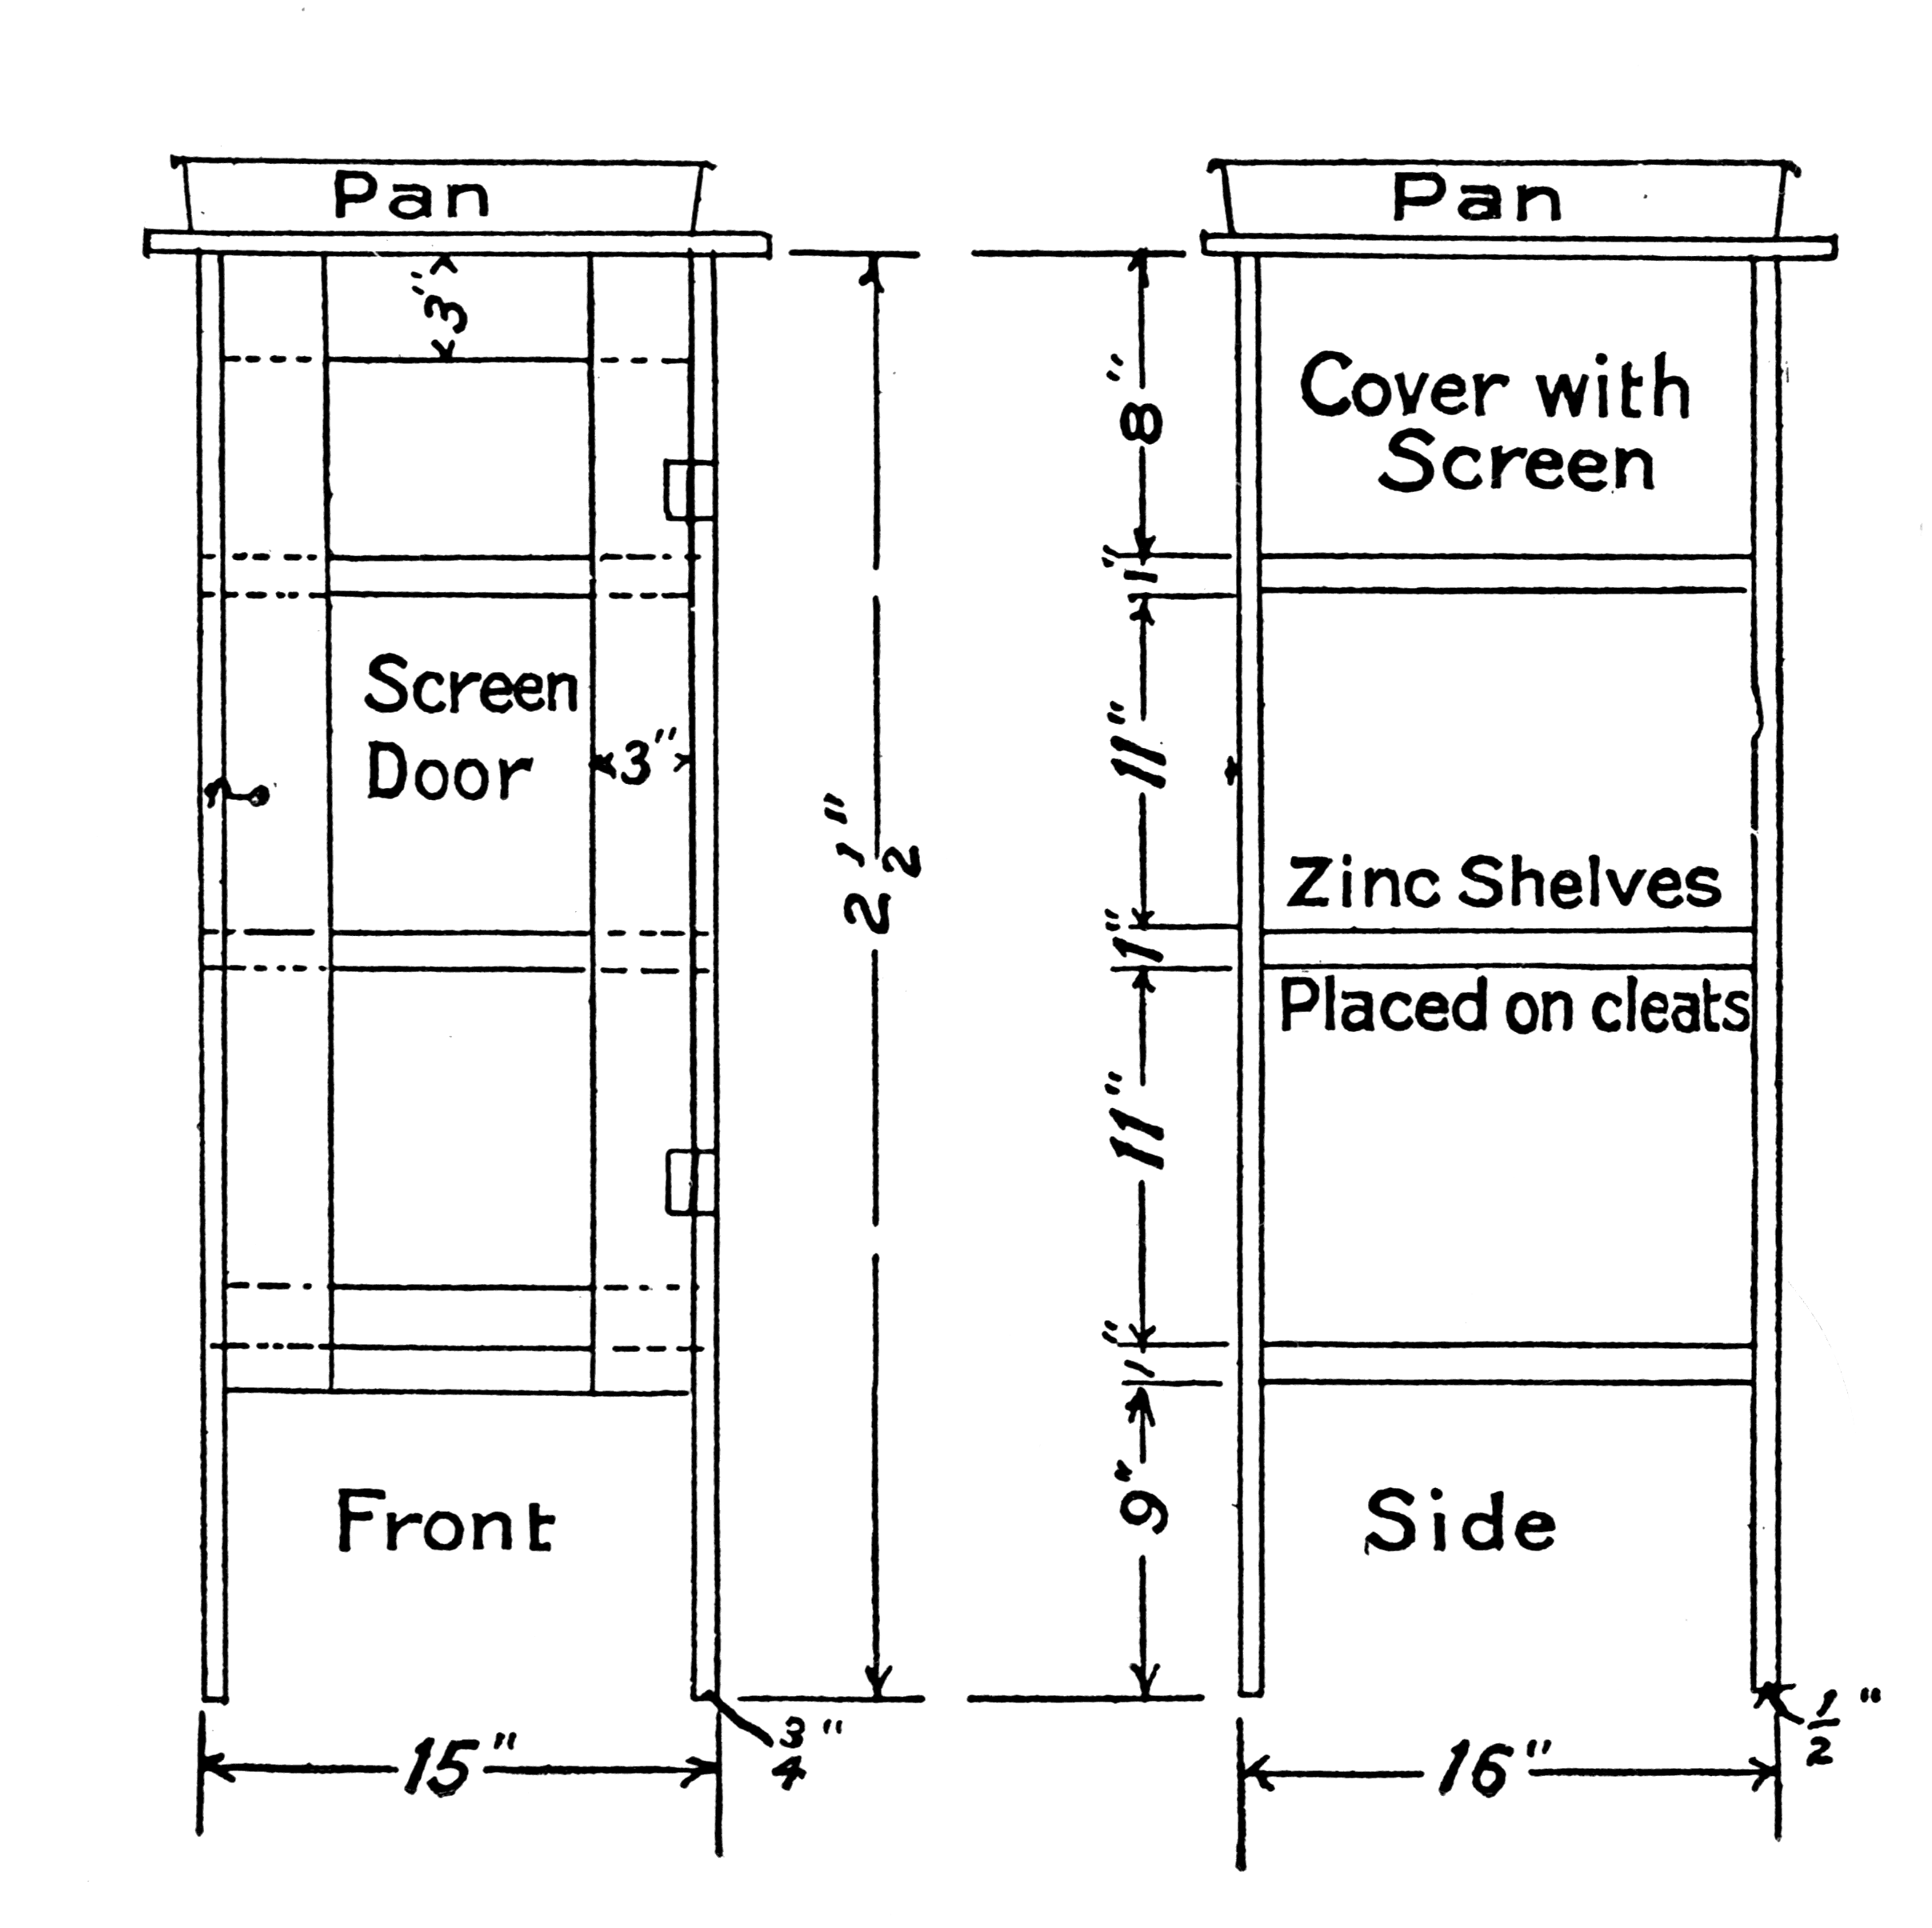
Country homes without ice houses and too far from town to have access to manufactured ice may have an iceless refrigerator as a good substitute. This convenience comprises a simple wooden frame with a covering of canton flannel, burlap, Indian-head cloth or linen crash made to fit so that little air is admitted into it. Wicks made of the same material as the cover are tacked on top of each side of the cover and extend over into the pan of water sitting on top of the frame. This water is taken up by the wicks and carried down on the sides of the cover by capillary attraction when evaporation takes place, drawing the heat from the inside and lowering the temperature. The more rapid the evaporation, the lower the temperature. Tests have shown that if the refrigerator is kept in a place where the air circulates around it freely, a temperature of 50 degrees Fahrenheit may be obtained.
Materials:
Dimensions:
[Pg 53] Directions:
Make the frame 3½’ high with twelve crosspieces tacked to the four posts, nailing the first 4 strips 9” from the bottom of the frame, and the remaining 8 strips about 11” apart. An 18½” square frame is made of wood and nailed on top of the posts. The corners of this square are mitered or lapped over and tacked together. Use a biscuit pan to fit in top of the square to hold the water. The whole refrigerator should stand in a larger pan which catches the drippings from the cover and keeps away the insects. The screen door is made 39” long × 16” wide, which is joined to the frame with hinges and fastens with a hook. Three movable shelves with perforations in them are made of zinc. Cover the whole frame with wire screening to protect it from the flies. When the frame is finished it should be painted white and enameled. This will permit of its being washed every day. A covering of white canton flannel is made to fit the screen, with the smooth side out, care being taken that the cover comes to the lower edge of the frame. The wicks are made half the width of the sides and tacked on the top edge of each side. These must be long enough to extend 3” over into the water. Strips of canton flannel 2” wide are tacked all around the sides and the top of the frame, and the eyes are sewed on these. White tape may be used for this purpose if more convenient. Sew one row of hooks on the edge of the covering near the latch and the other just opposite the opening, with the hem to extend far enough over on each side to cover crack at the edge of door. This permits the door to be opened without unfastening [Pg 54] the hooks, keeping out the warm outside air and at the same time retaining the cool air inside the refrigerator. Hook the covering around the top also. Place the refrigerator in a shady place where the air will circulate around it freely. Keep the wicks in a supply of fresh water in the top pan. The water is taken down the sides by capillary attraction, and when evaporation takes place the heat is taken from the inside thereby lowering the temperature.
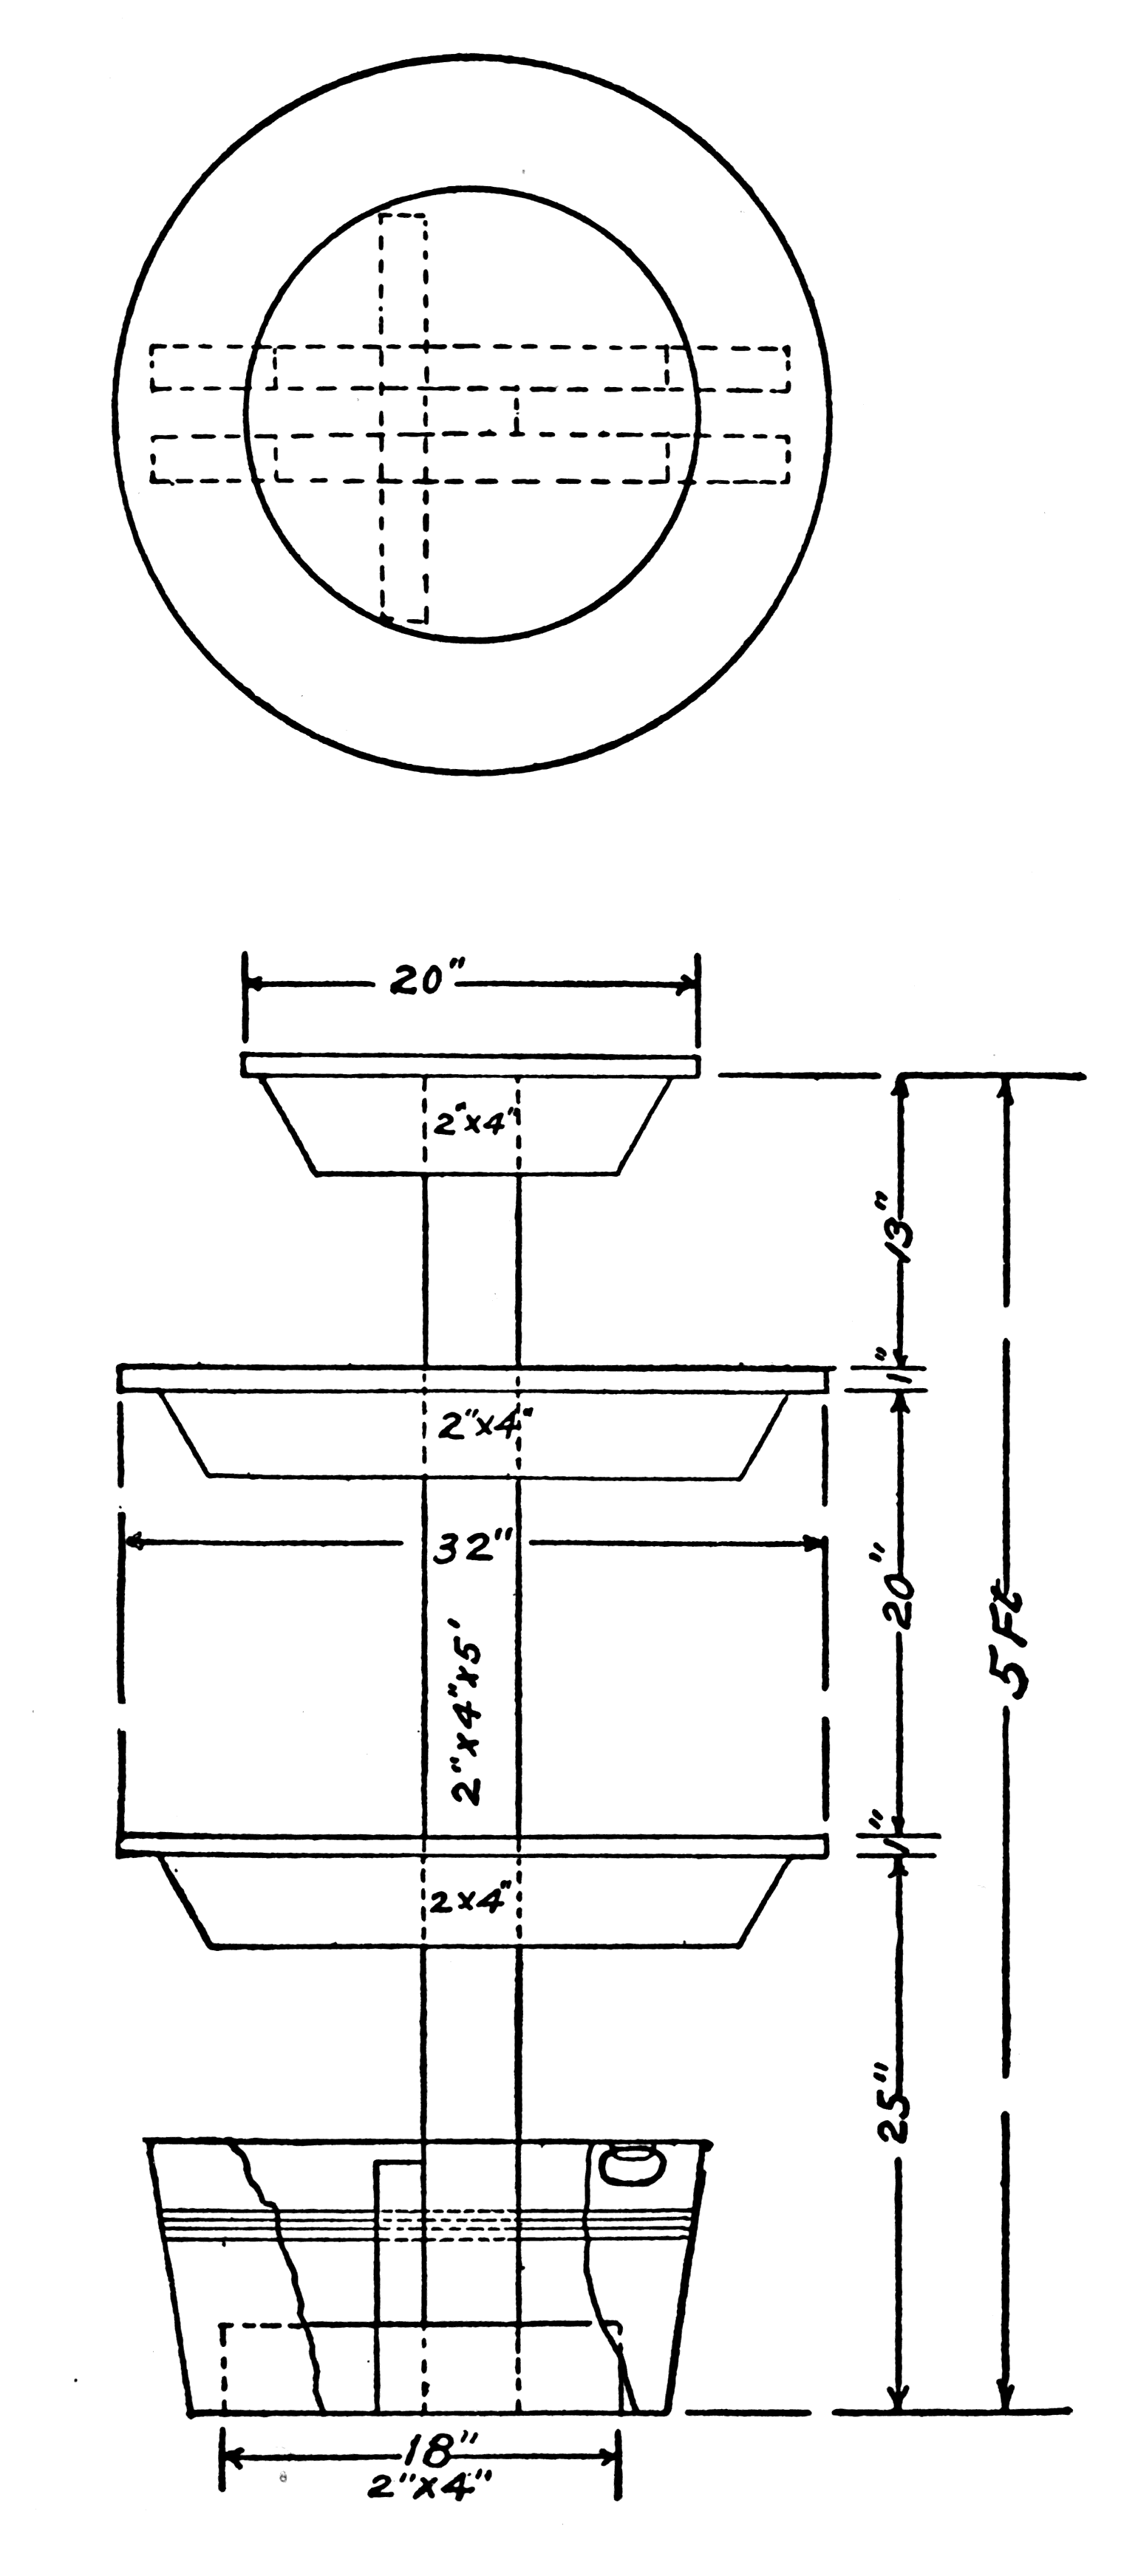
ICELESS REFRIGERATOR NO. 2
Another type of iceless refrigerator which appears more crude can be made at a cost of $1.80. In this a cotton sack is used for the covering. This refrigerator has proved more satisfactory than one would suppose. The butter and milk from several cows has been kept in a model of this type at ten degrees cooler than the outside air. It might be well to use cotton flannel for the covering instead of ducking because when the cloth is wet evaporation takes place more rapidly.
Materials:
Dimensions:
Directions: [Pg 57]
Nail the piece (2” × 4” × 18”) on the side of the stem making it even with the bottom piece. Saw a 2” base out on the side of the stem and nail the other piece measuring 2” × 4” × 18”. Measure 25” from the bottom of the stem and nail on 2 cleats to support the shelf. Cut space in the center of piece (1” × 32” × 32”) large enough to fit the stem and nail it to the cleats, thus making the first shelf. From this point measure 20” and nail 2 cleats on the stem to support the second shelf (1” × 32” × 32”). Measure 13” from the top of the stem and nail on shelf (1” × 20” × 20”) after cutting an opening (2” × 4”) in the center of shelf. The curtain is made of 4 widths of the canton flannel measuring 66” in length with a draw string put at the top and bottom of the curtain. This makes the refrigerator dust and fly proof.
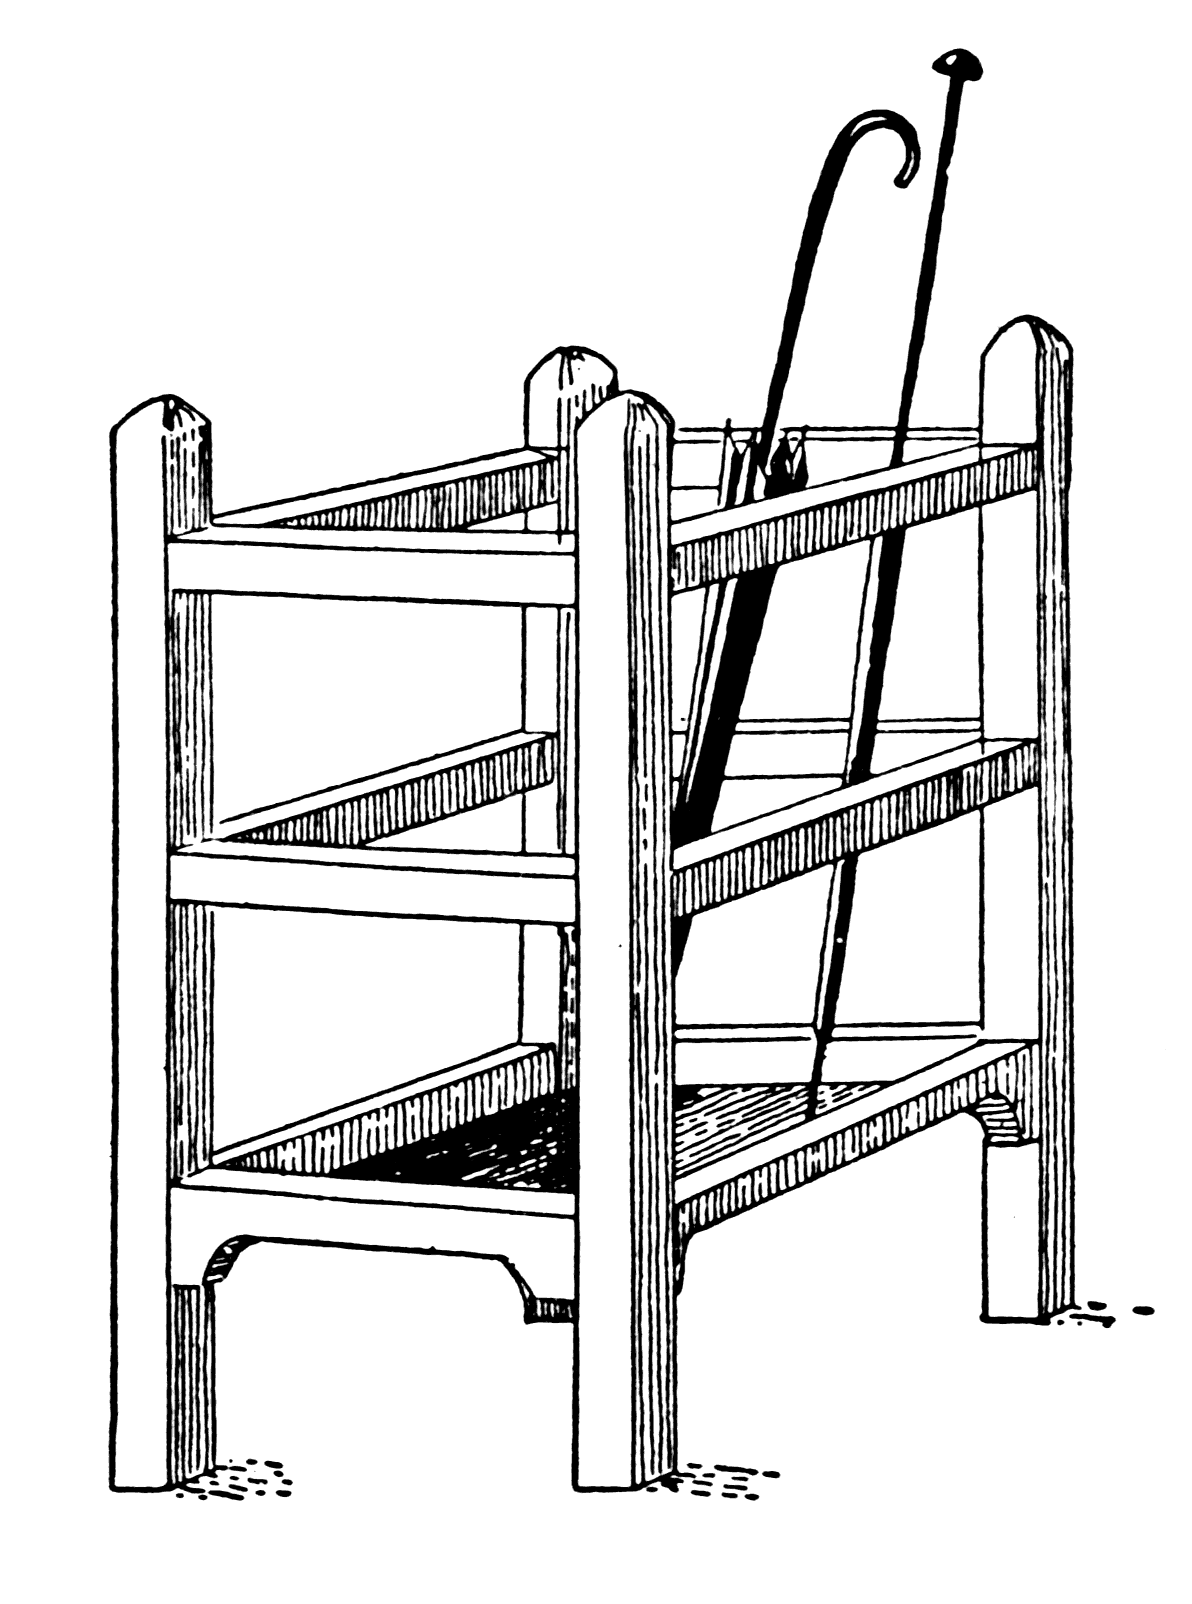
UMBRELLA STAND
A good problem to be used in woodwork classes in the school or to be made by boys in the home. It will be found appropriate and useful in the reception hall or on the porch. It is built of dry goods boxes, with a five-cent pan used in the bottom to catch the drippings from the umbrellas.
Materials:
Dimensions:
Directions:
Make three boxes of the six pieces (½” × 3” × 12”) and six pieces (½” × 3” × 11”), putting the bottom, 12” square, on the bottom box to be [Pg 60] used as foundation of the frame. Make a hole in this bottom large enough to hold a round tin pan. This hole should be cut before nailing the piece on the bottom of the box. Nail the four long pieces (measuring ¼” × 2¼” × 30”) on the end of the three boxes, placing the boxes seven inches apart on the frame. Nail four pieces (measuring ¼” × 2½” × 30”) on the ends of the boxes to extend one-fourth inch over the first four strips which were nailed on the boxes. Sandpaper, stain, and polish.
[Pg 61]
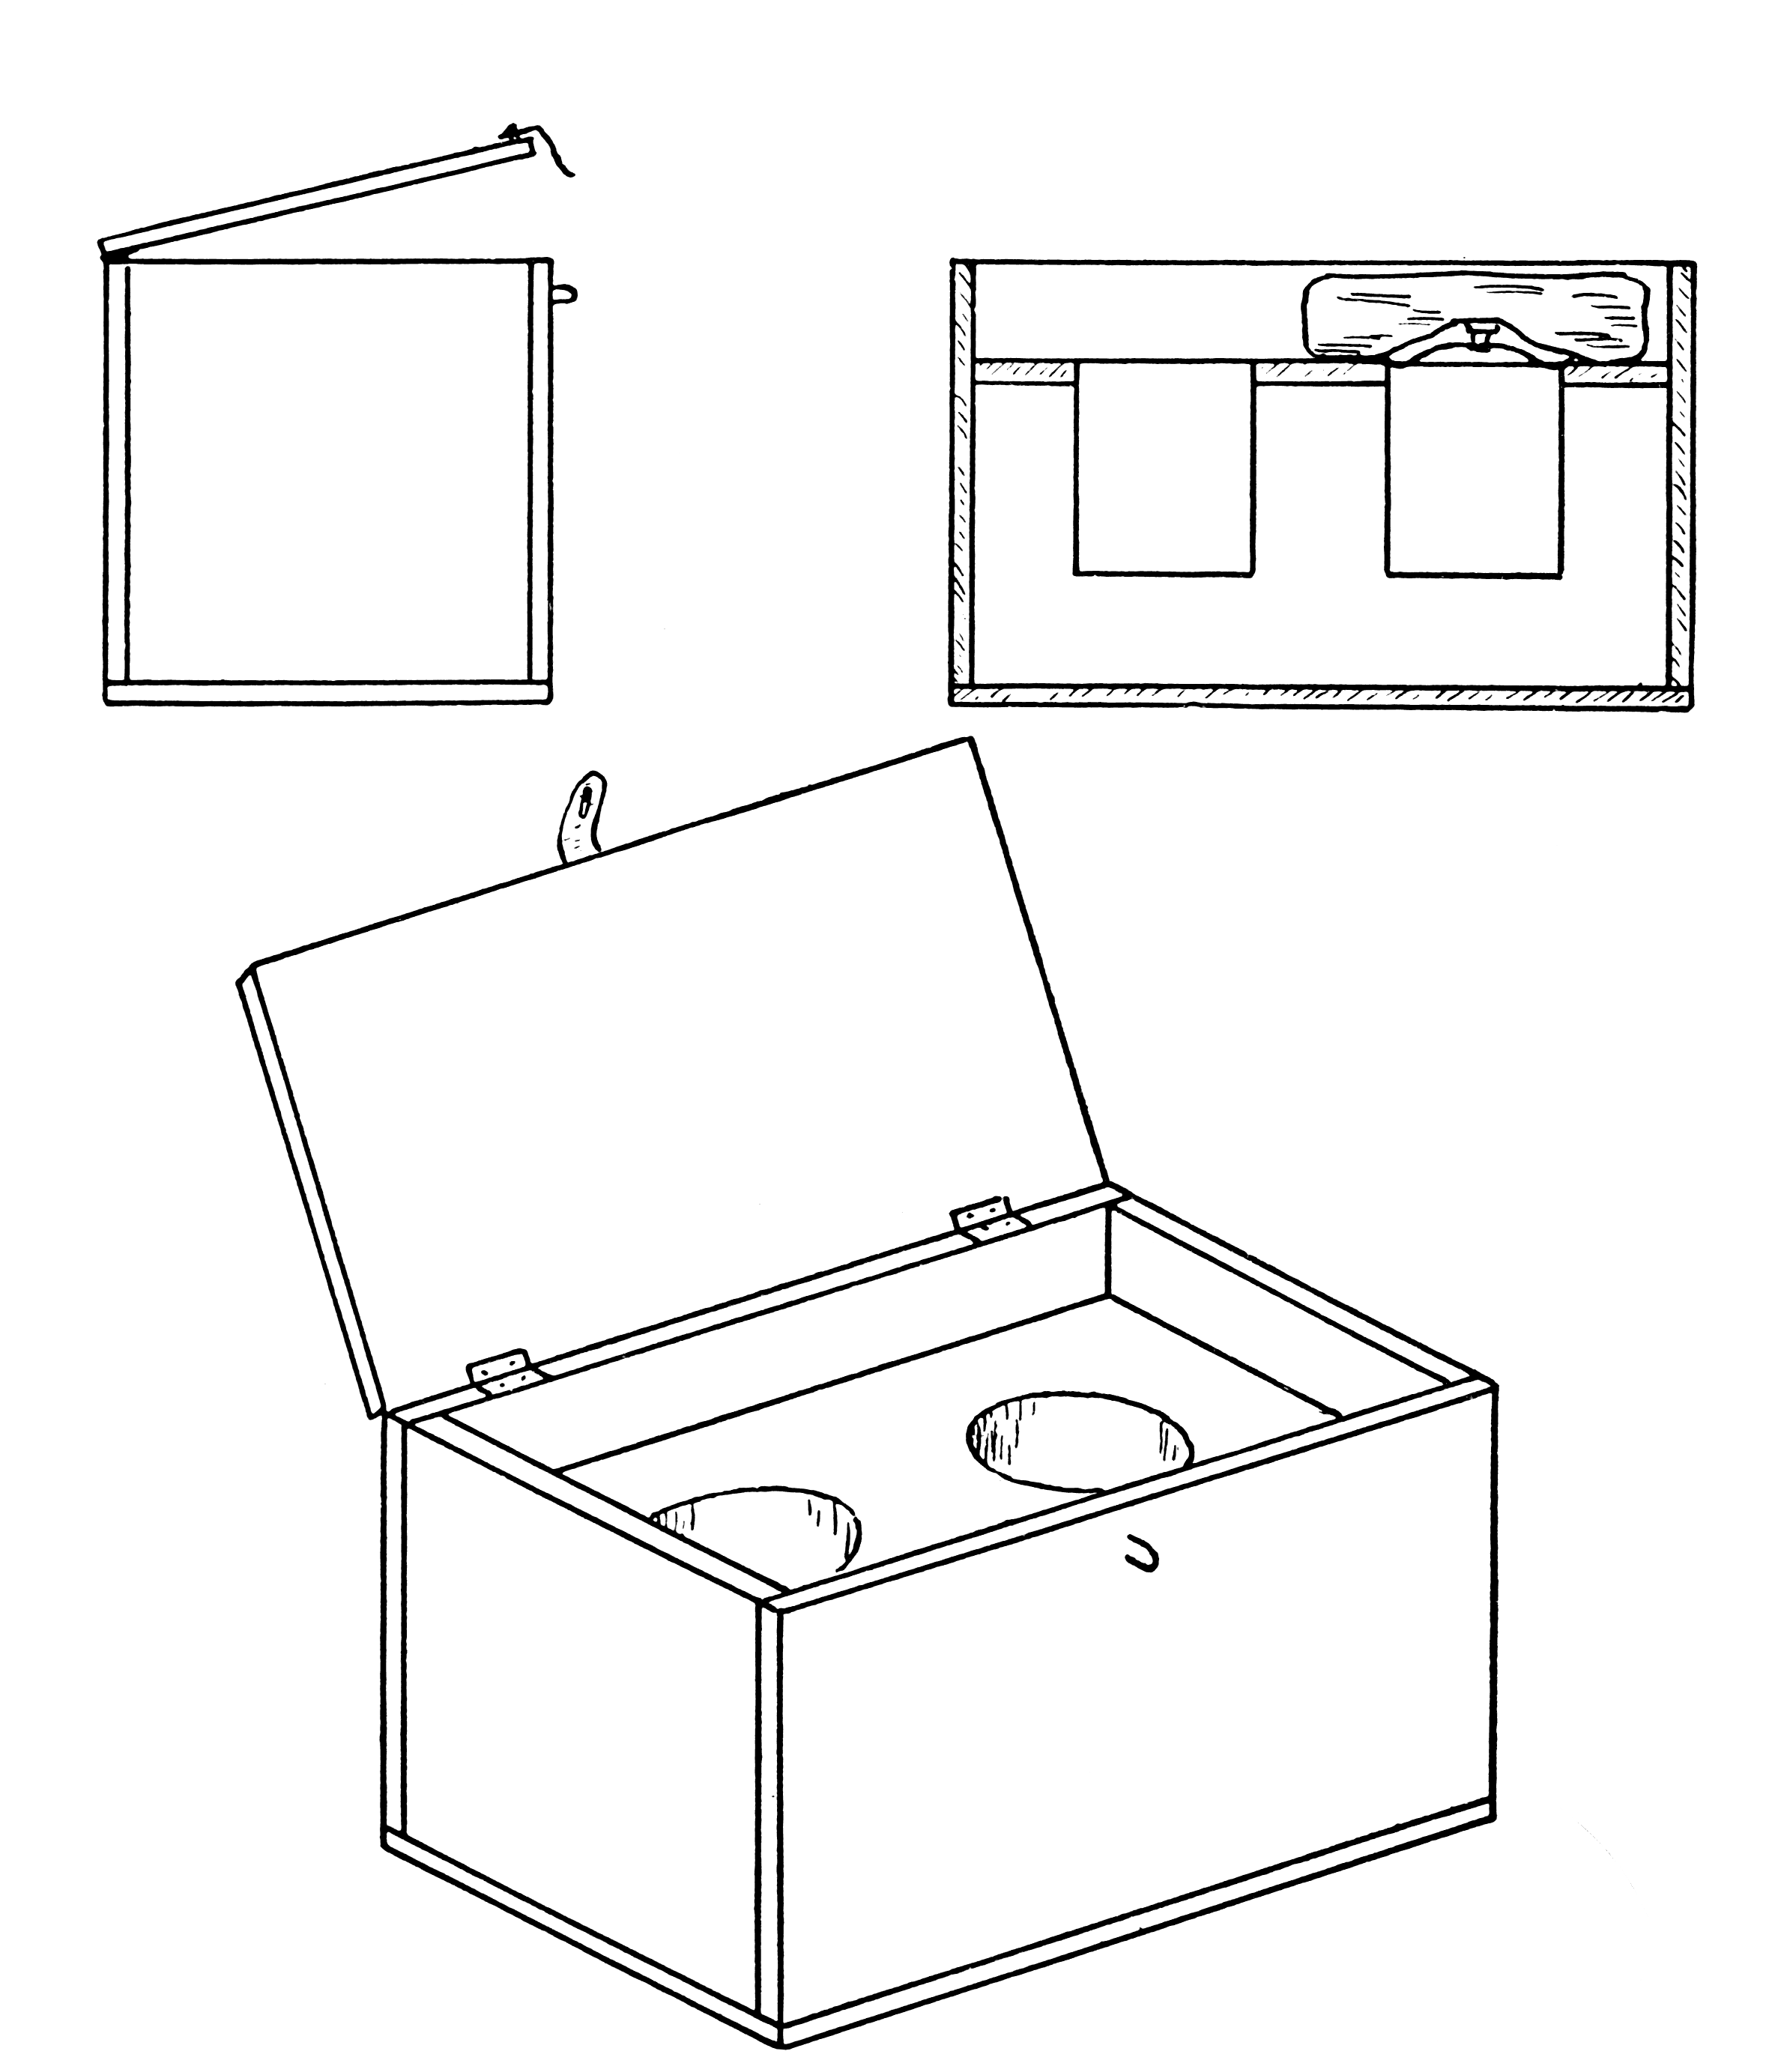
BLACKING BOX
A necessary and useful home convenience made of a box, with a cover made in two sections and joined with hinges. It is a time-saver to the busy housewife who has to go so often in search for blacking and polish before she can get the children ready for school. It serves as a reminder to the busy farmer who is disposed to go to town or to church before giving his shoes a dressing.
Materials:
Dimensions:
Directions:
Remove the cover from box (5¾” deep × 13¾” × 14¼”) and nail the legs on, making them seven inches longer than the outside depth of the box. Nail one half of the cover on top of box, allowing it to project evenly all round the edge of the box. Fasten the other half of the cover to this half with hinges. Sandpaper, stain, and polish.
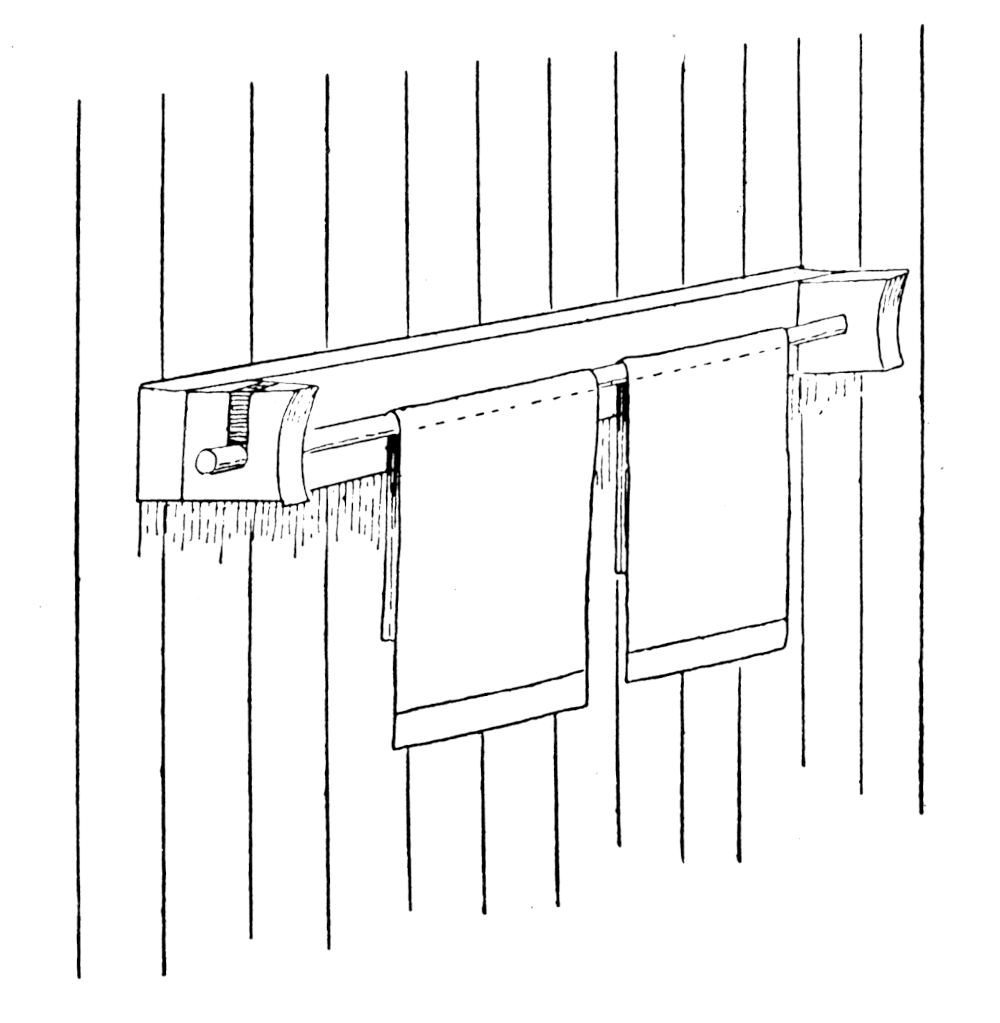
TOWEL ROLLER
A towel roller built so simply that any boy on the farm would take pleasure in working out the problem. It is much easier to keep a clean towel in the right place when the proper place is provided for the towel to be kept. This convenience should be a joy to every tired farmer when he comes in to partake of a meal. Again, the tendency of all children to throw the towels about the place is a great nuisance to the housewife. This rack provides that the towel be sewed together and placed on the roller, which is then slipped into the groove made to hold it.
Materials:
Dimensions:
[Pg 64]
Directions:
The brackets are made any desired shape, with a hole a half-inch in diameter bored in the centre of each piece. A slit is cut in one bracket from the hole to the top for the end of the rod to slip in and out. Round the piece (1¼” × 1¾” × 24”) for the rod. At each end cut a tenon one inch in diameter. Nail the end pieces to the board (¾” × 5” × 24”). Insert the rod into the hole in the one end piece and slip it into the slit at the other end. Sandpaper, stain, and polish.
[Pg 65]
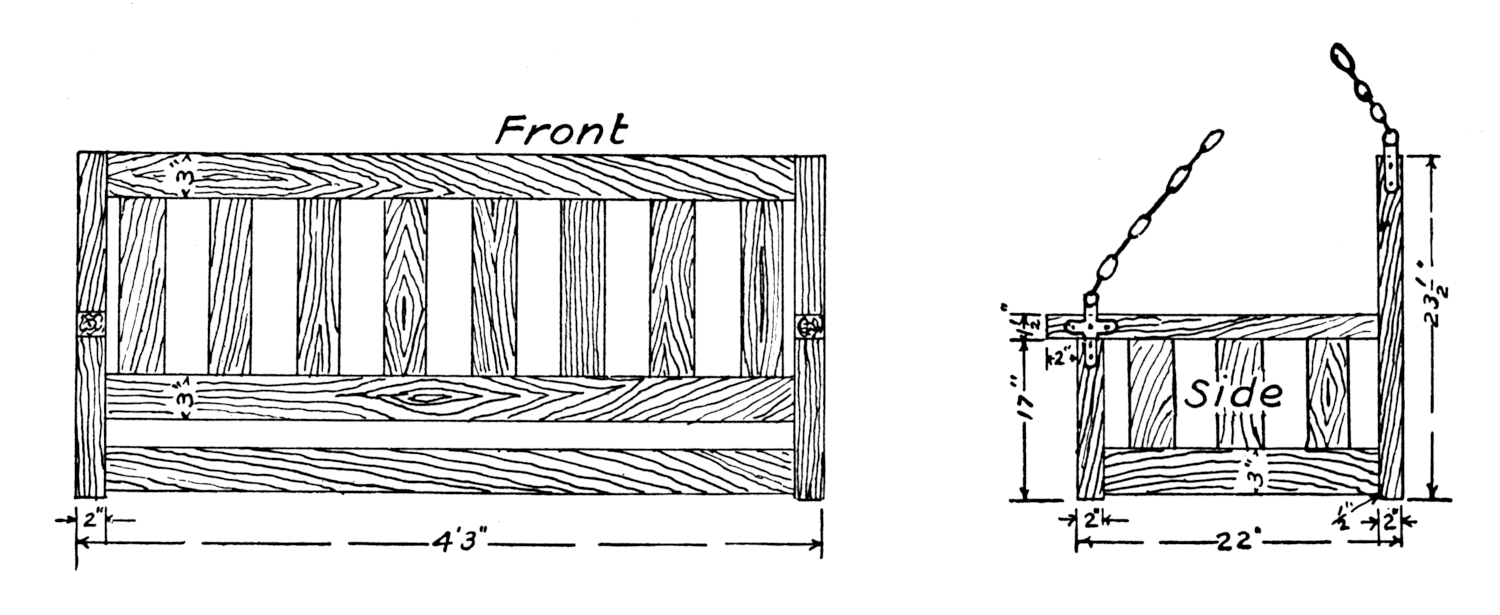
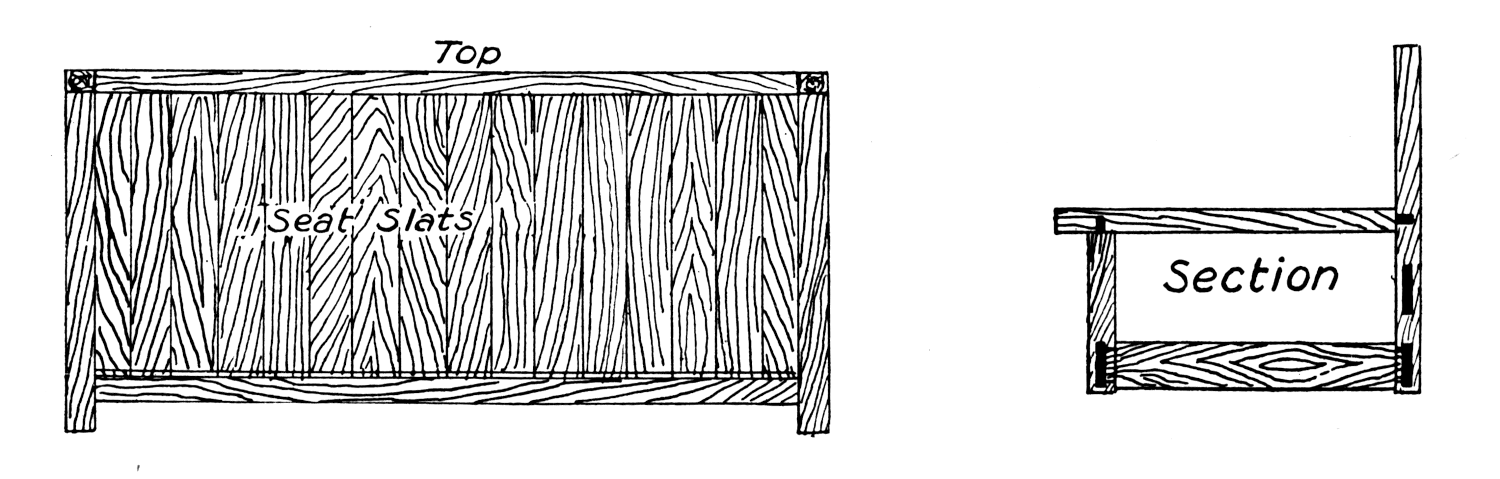
PORCH SWING
An inexpensive mission style swing made of oak with space long enough for two to sit in and broad enough to be used for lounging purposes. A pad made of burlap and stuffed with an old discarded quilt will add to the comfort of the swing.
Dimensions:
Directions:
Mortise the end posts for the back and the front, also arm posts. Mortise the back and front and end rails of the frame to fit the end posts. Nail and glue them into position. Round the edges of the seat slats and nail to cleats on the front and back of the frame. Mortise the back and end slats, fitting them into the rails and frame and fasten with strong glue. Use support made of iron and fastened to the seat with screws to give strength to the mortises formed at the arms and front posts. The chains to suspend the swing are fastened to holes made in these iron supports. Make the back of the swing first, then the ends and front, nailing the seat slats in after the glue has fastened the mortises securely together.
[Pg 66]
A DUSTLESS MOP
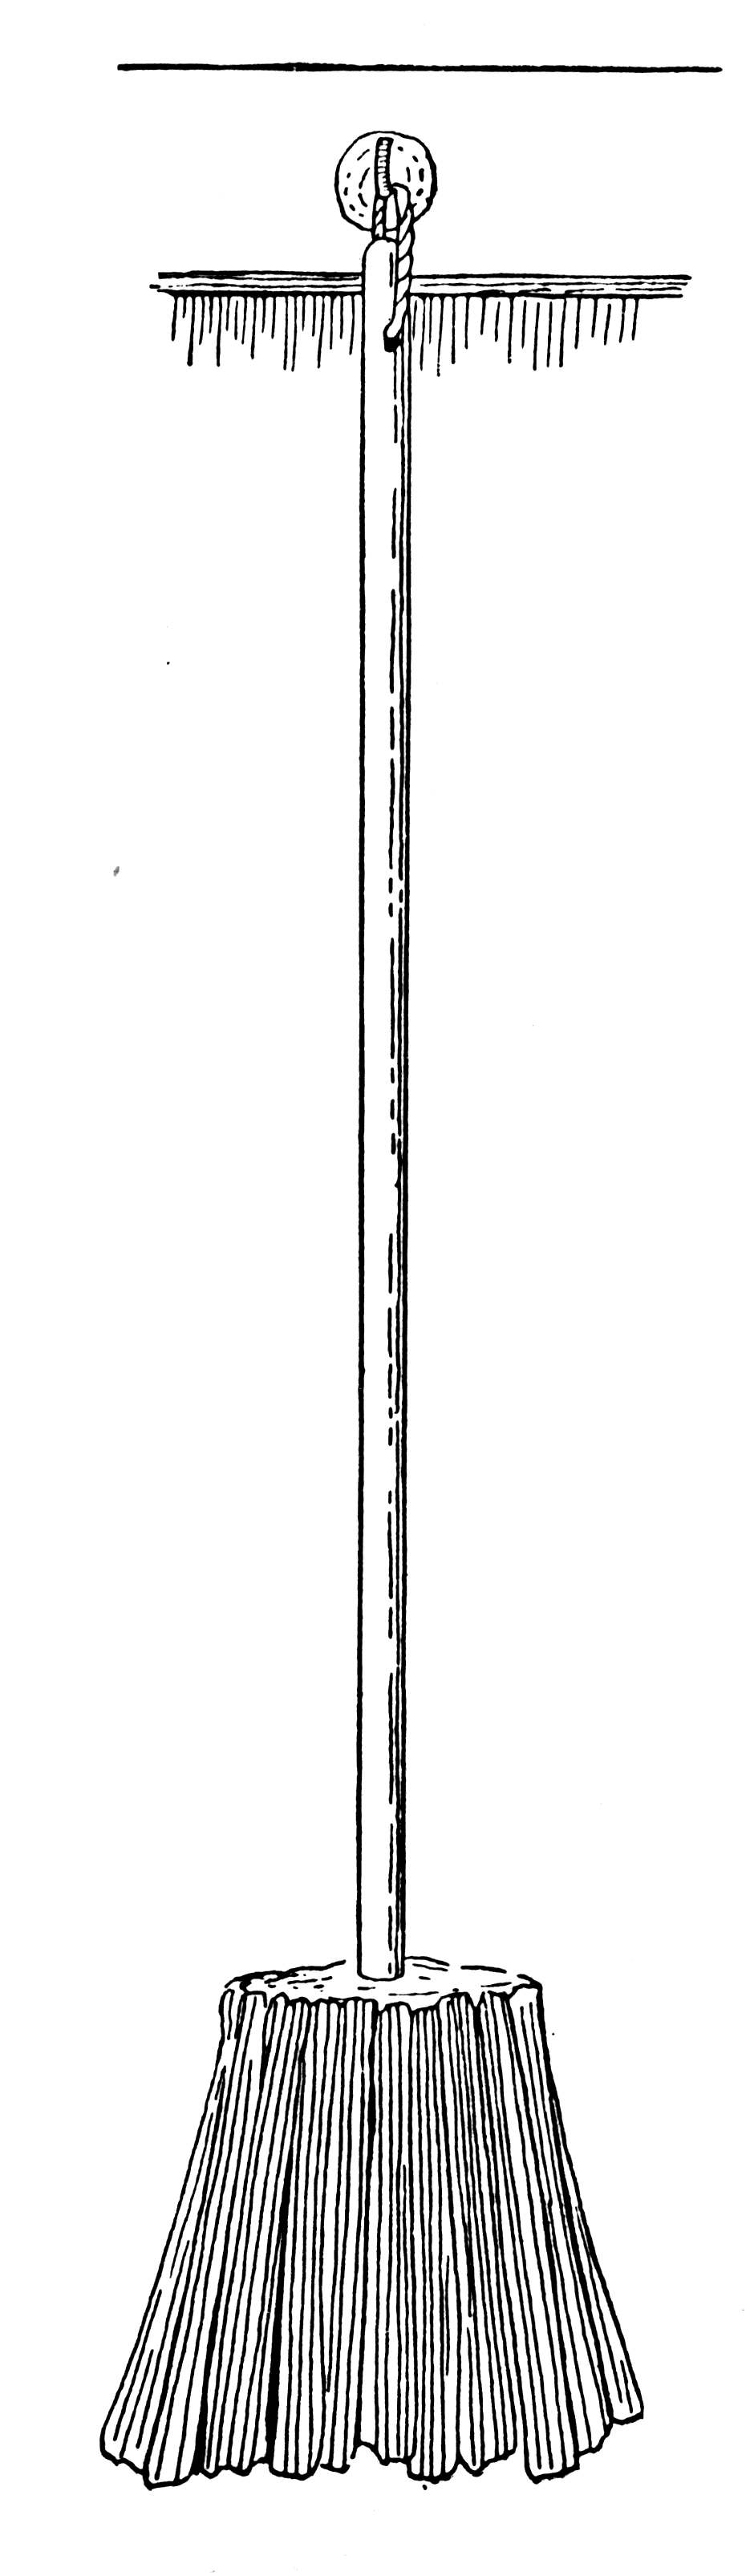
A cheap and efficient article for the housewife is a mop made of old stockings and the handle of an old, discarded broom. This mop may be used successfully for polished and painted floors as well as for unpolished floors. It is made by cutting the straw off of a broom which has worn out. This is cut even with the wires which hold the straw on the handle. Cover this part of the broom with an old stocking, which is tacked to the handle securely by sewing it around two or three times with a double thread. Legs of old stockings are cut twelve inches long with these strips cut leaving a band two inches wide to sew to the covering of the broom. Sew them round and round the surface in rows about an inch apart, until the mop has been made the desired thickness. Dip the mop into a solution made of one-half a cupful of melted paraffin and one cupful of coal oil. When the mop is not in use, it must be wrapped up and kept in a paper bag in order to keep it moist.
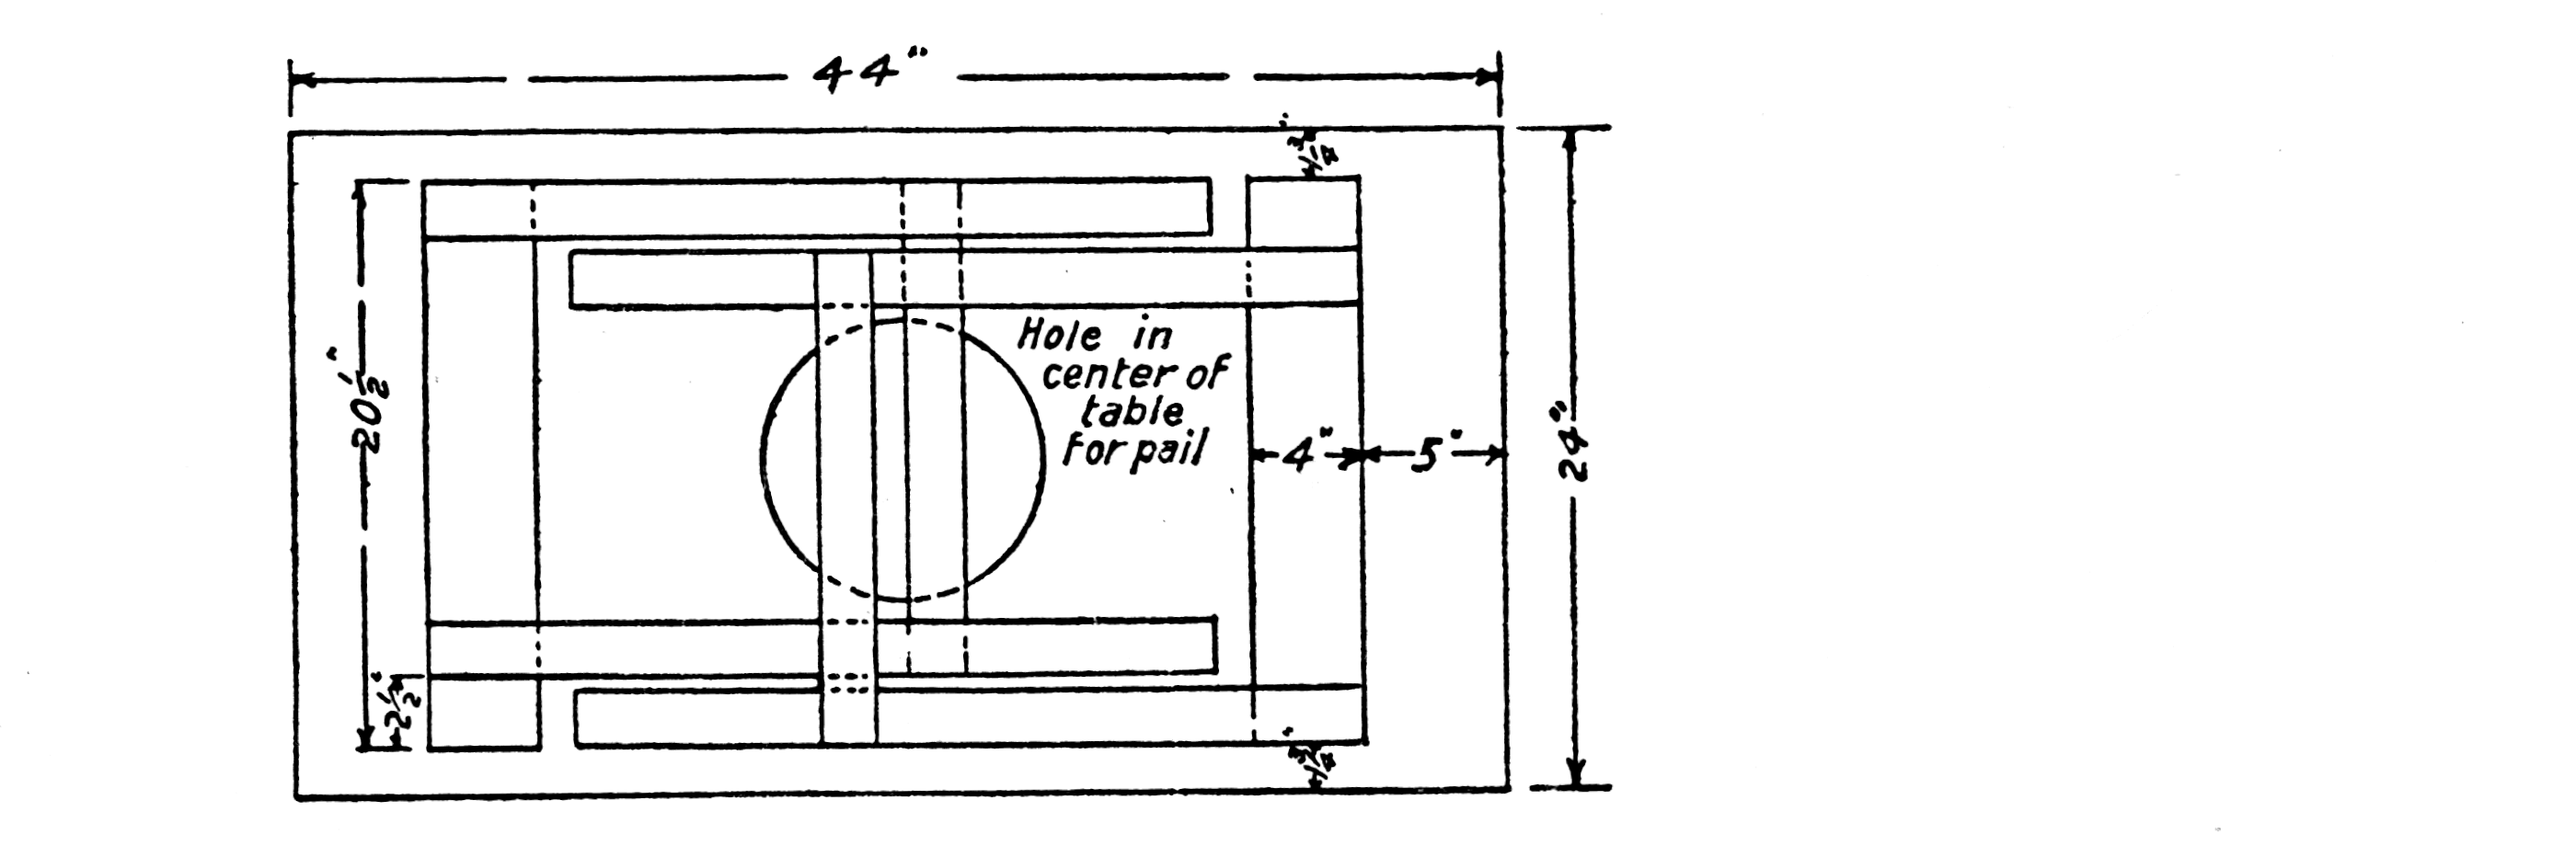
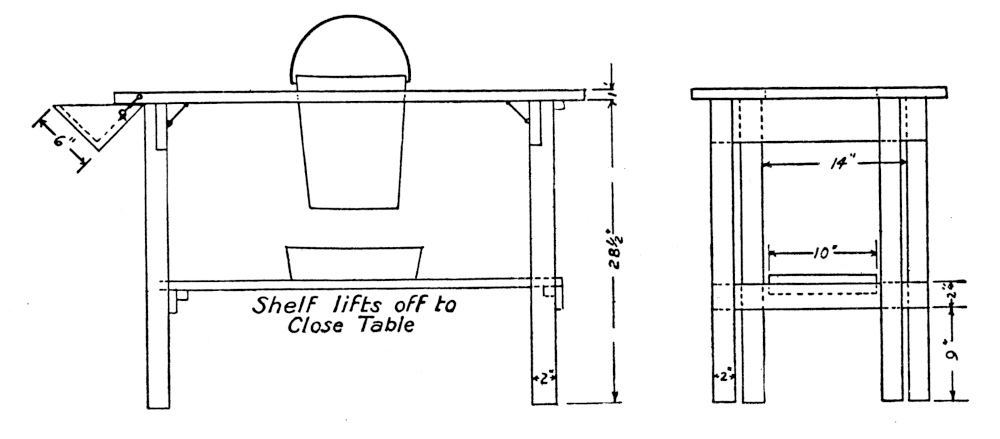
FOLDING CANNING TABLE
The table shown in this illustration is made of poplar and designed especially for the Canning Club agent. It folds up and requires little space, which makes it convenient to take around during the canning season. The top is zinc-lined to make it more durable and sanitary. In the center an opening is made to hold the bucket which catches the parings from the vegetables or fruits. On the left side is an adjustable zinc-lined trough to hold the vegetables or fruits while preparing them for use. This will save many steps in going to and from the basket to get these things. A hole is bored in the trough, to which is attached a small pipe that allows the water with which the vegetables or fruits have been washed to run off.
Materials:
Dimensions:
[Pg 69]
[Pg 70] Directions:
Measure 4 inches from each end of the top and fasten the two crosspieces (¾” thick × 1½” wide × 20½” long) putting one on each end to brace the top of the table. These crosspieces must also be put at equal distances from the sides of the top. Screw the legs on these two pieces, using the crosspieces (⅞” × 1½” × 15½”) as braces for the legs. Use two gate hooks on each end of table to support the legs when the table is unfolded. The bottom shelf (⅞” × 10” × 34”) is placed crosswise on the braces and 9” from the bottom of legs. This shelf is not to be stationary, for it has to be removed when the table is unfolded. Bore a hole 9” in diameter in the center of table to hold the bucket. Fasten the trough, after it has been completed, on the left side of the table with two gate hooks. Cover the top of the table with the zinc, using the 60 3-penny nails to tack it on the top. Sandpaper, stain, and polish the table.
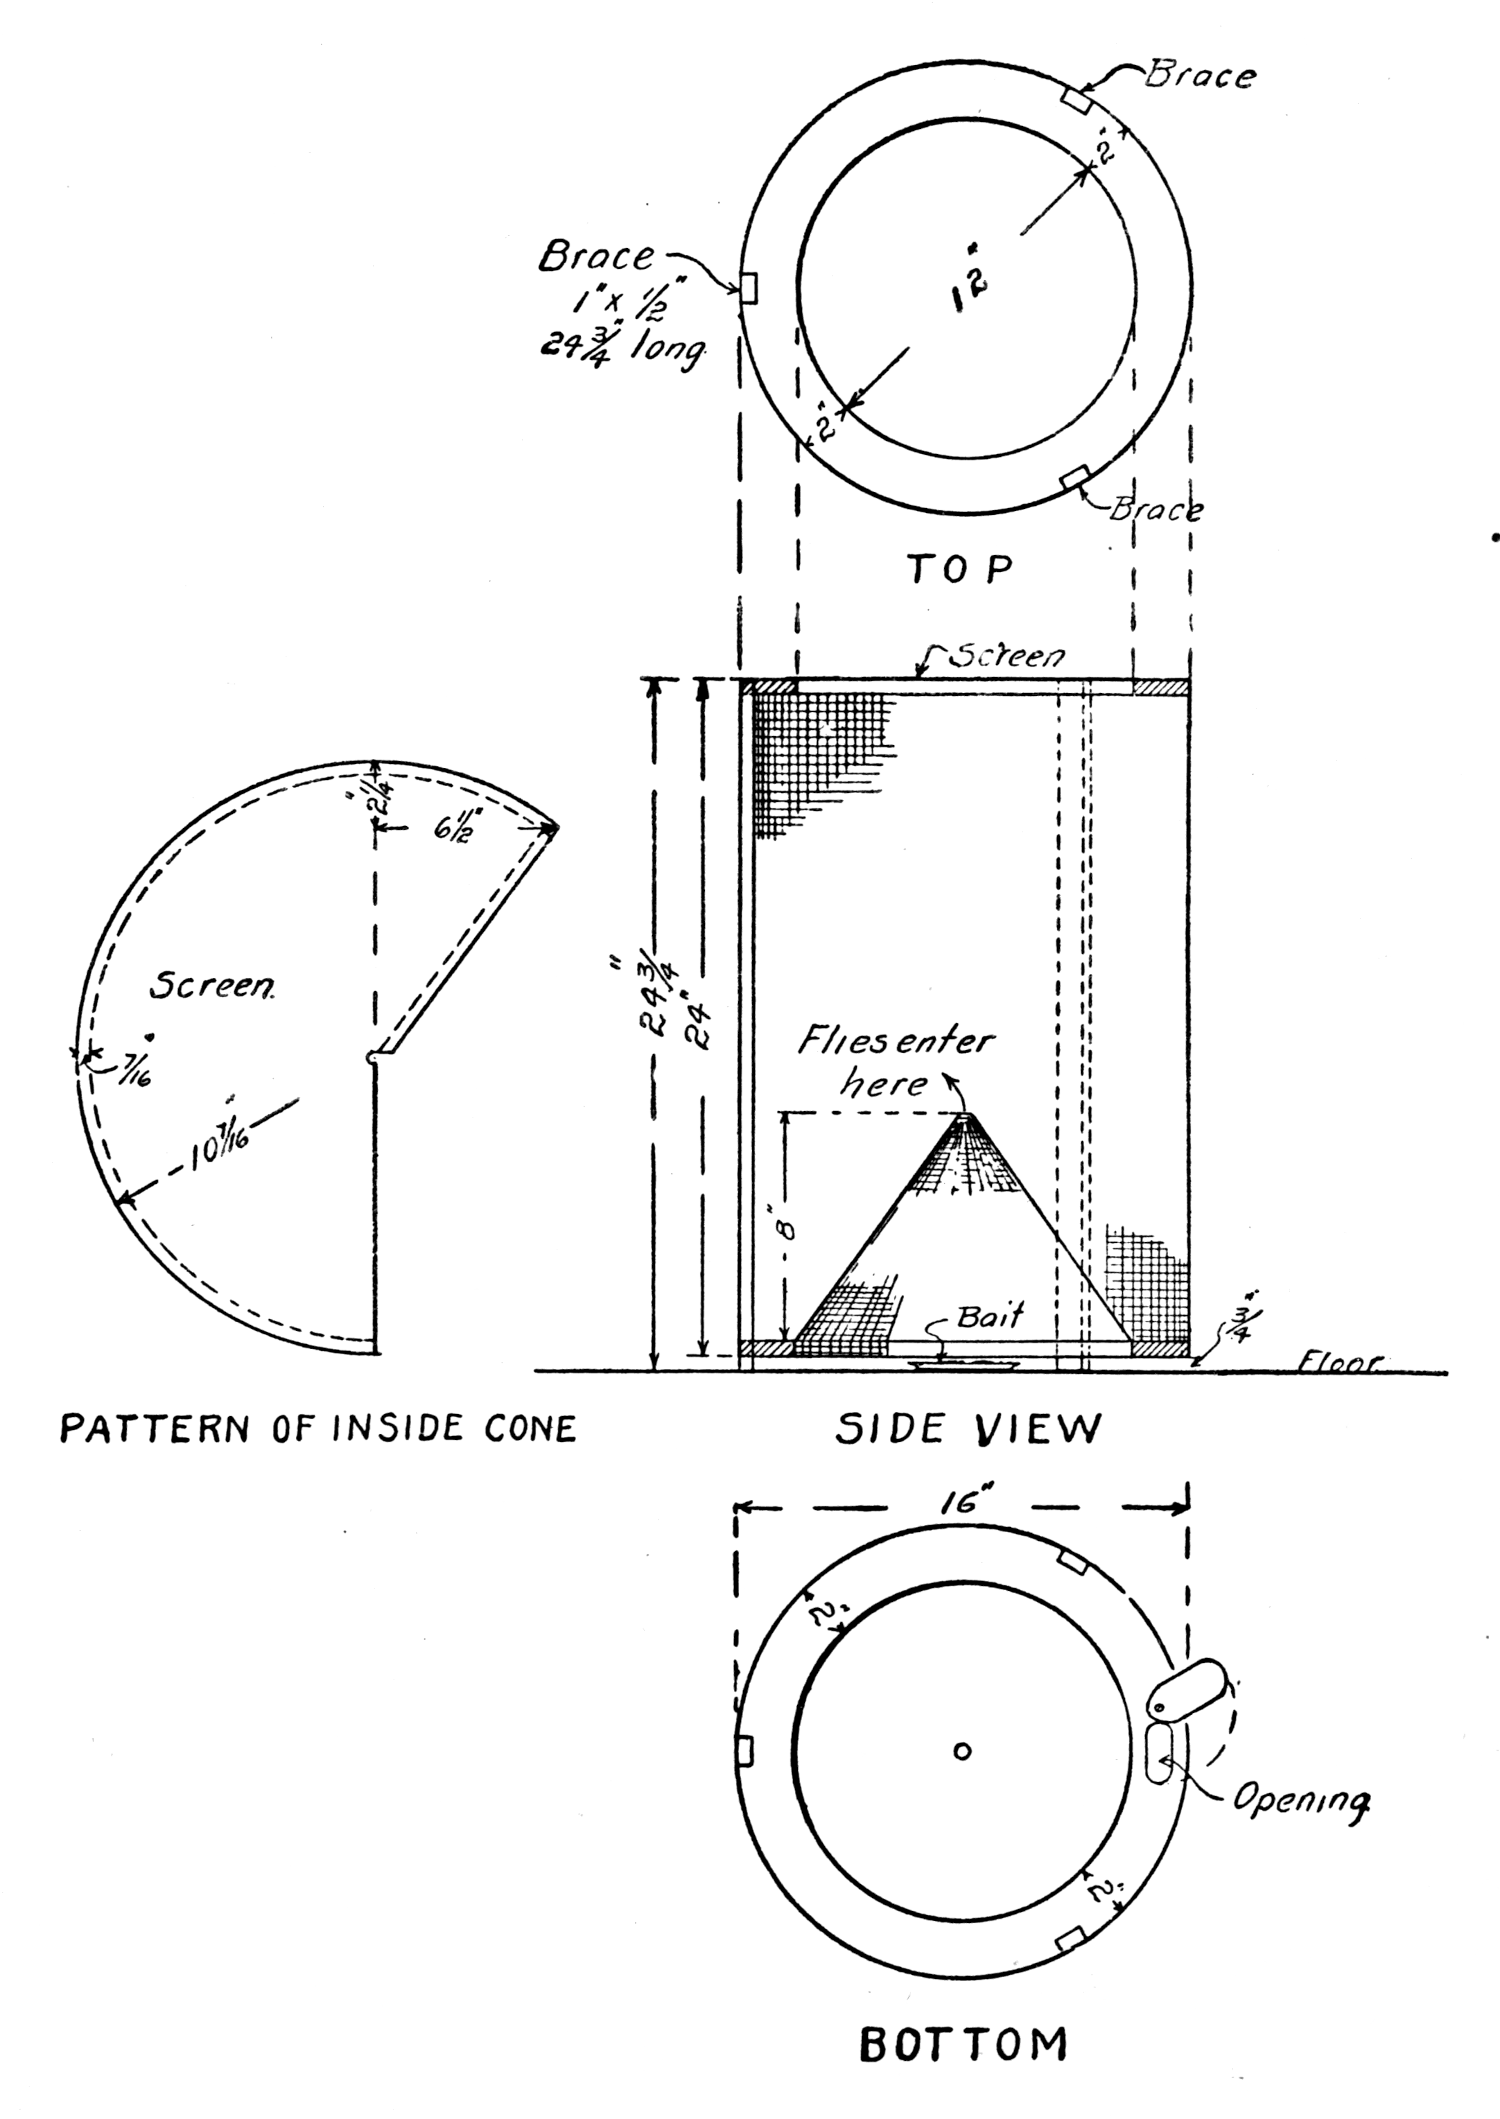
FLY TRAP
This trap as described below is not only good for the house and the back porch, where so many flies are attracted by the odor of the foods, but also excellent for use out of doors. It is inexpensive and can be easily made at home. Much of the success of the trap depends upon the bait used. There are many kinds of baits recommended, such as a plate of vinegar with sugar scattered around it, banana skins, syrups, and meat. The bait is placed beneath the cone in a saucer, which rests on the bottom board of the trap. The flies then enter the cone and are destroyed by smoking before being removed through the hole in the top. If a poisonous bait is used the smoking is not necessary.

Materials:
Dimensions:
[Pg 72]
[Pg 73] Directions:
Take one piece (1” × 16” × 16”) and find the center, using a radius of 8” to make a circle for the bottom of the trap. Then use a radius of 6” to make an opening in the bottom on which the cone fits. An opening of 1” × 2” is made at some convenient point in the bottom of trap through which the dead flies are removed. Take a piece of wood (¼” × 1½” × 2½”) and make a cover to fit over this opening. Fasten it on the bottom with a screw so that it may be easily turned. Make the cone of a piece of wire netting 10” wide. It must fit the inside circle in the bottom as shown in the illustration. Tack this to the bottom with 3-oz. tacks. The top of the trap is made just like the bottom using the same radius. Cut out 3 places in the top and bottom for the braces (⅞” × 1” × 24¾”) to fit in. These must extend ¾” below the bottom and nailed in place with 5-penny box nails. Cover the opening in the top with a piece of wire netting 13” in diameter. The whole frame is then covered with the 24” wire netting.
[Pg 74]
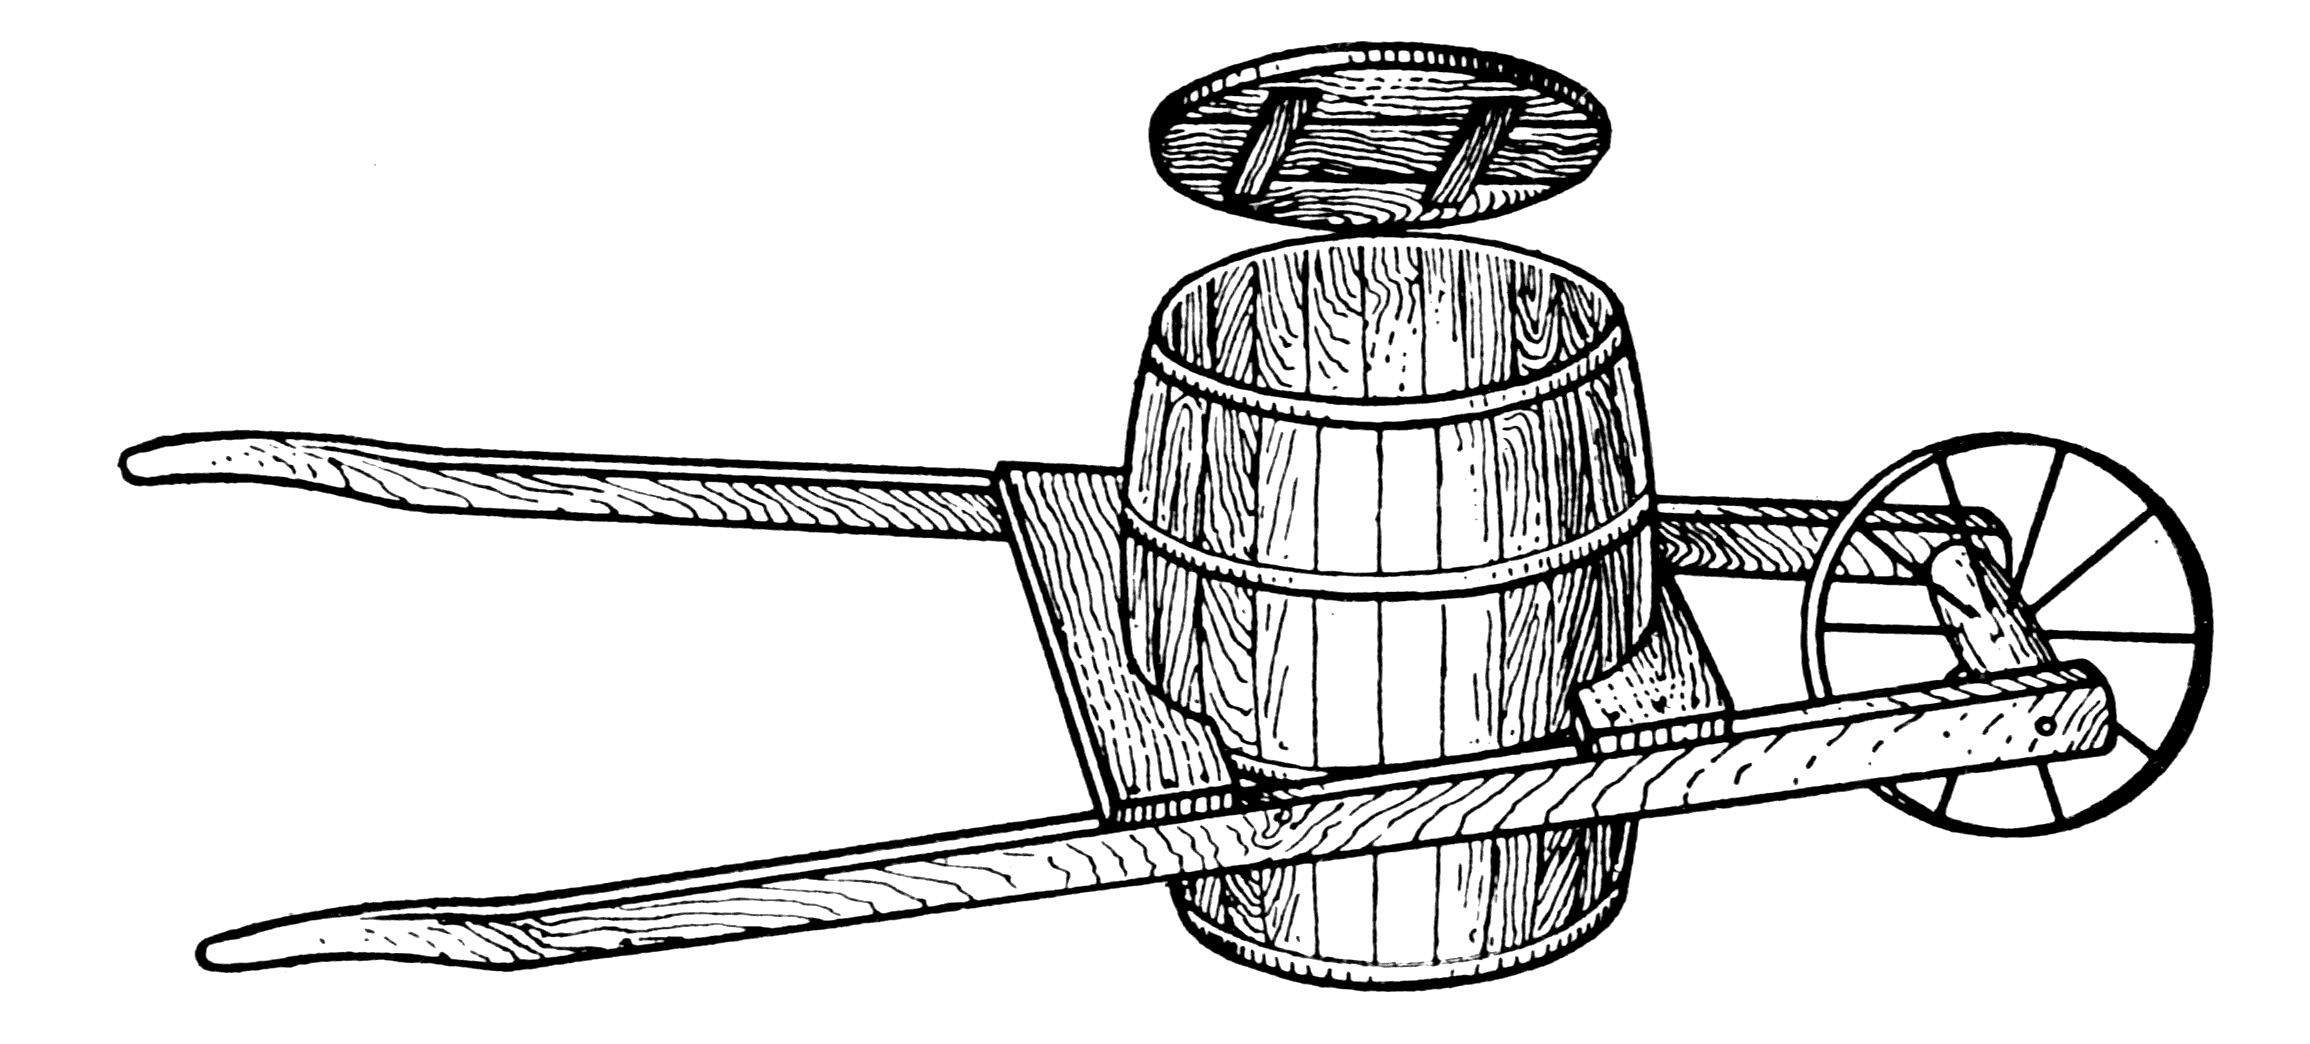
GARBAGE BARREL
The problem of the quickest disposal of the kitchen refuse for the housekeeper is one of great consideration. The garbage barrel, as shown in the illustration, is a solution for this problem, in that it is put between rails with a wheel. The garbage may thus be rolled away as many times a day as necessary, with a minimum amount of effort. A covered receptacle promotes sanitation around the back premises. The size of this convenience varies with the material available for making the device and with the size of the family.
Materials:
Dimensions:
Directions:
Measure and saw the handles the right dimensions. Taper them at one end as shown in the illustration. Fasten the rails to the handles with the eight (3½” × ⅜”) bolts, making the front rail shorter than the back one. The opening between the rails must fit the barrel at the bottom hoop. Attach the wheel, 14” in diameter, to the smaller end of the two handles.
[Pg 75]
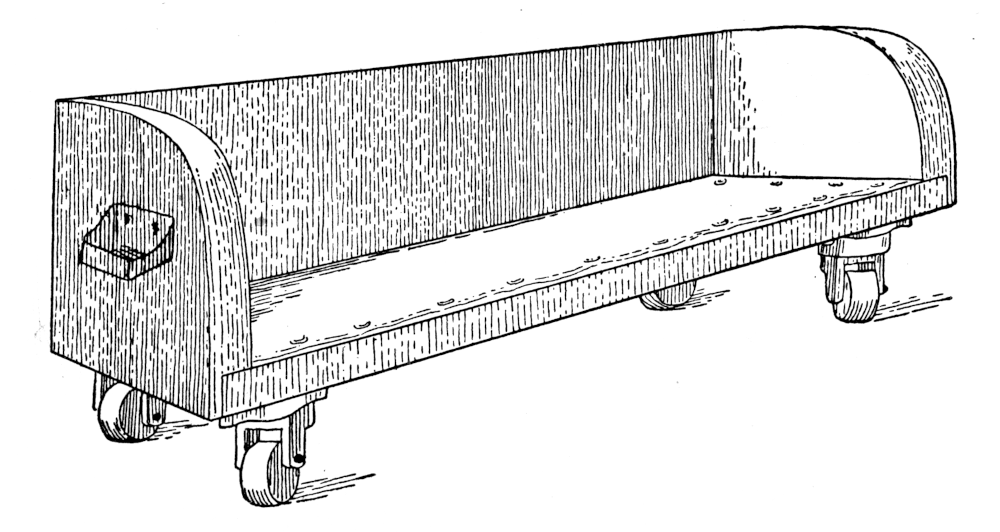
THE SCRUBBING CHARIOT
A clever little device which consists of a comfortable padded frame which permits the woman to do her scrubbing with more ease and comfort and saves her from taking many unnecessary steps. To the left it has a stand for the soap, and on the right may be placed a wire hoop to hold the bucket of water while scrubbing. This will be found more useful to the woman who has not access to the more modern conveniences used for scrubbing.
Materials:
Dimensions:
Directions:
Nail the sides to the bottom board. Fit the front piece to this and nail to the bottom and sides. Four flat rollers are screwed on the bottom, and the frame sandpapered, stained, and polished. A cushion made of the burlap and stuffed with excelsior, a piece of an old comfort, or cotton, is tacked in the bottom with the brass-headed tacks. Tack the soap stand on the left side of the chariot and an iron hoop to the right, if so desired. A soap box or cheese box may be used to advantage in making this device if one side is knocked out and the three remaining sides cut down to the height of 5”.
[Pg 76]

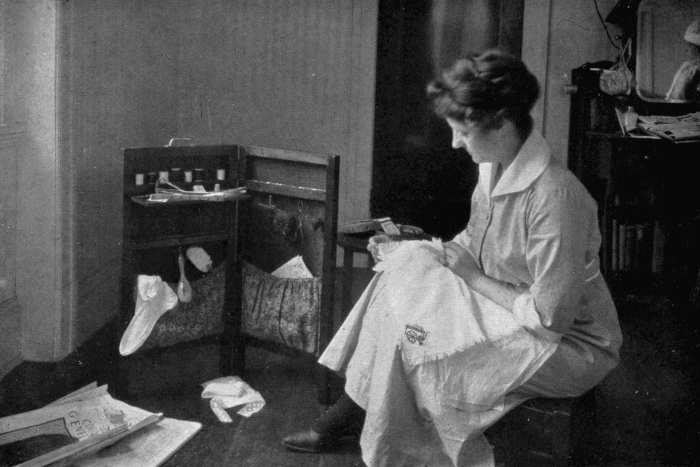
SEWING SCREEN
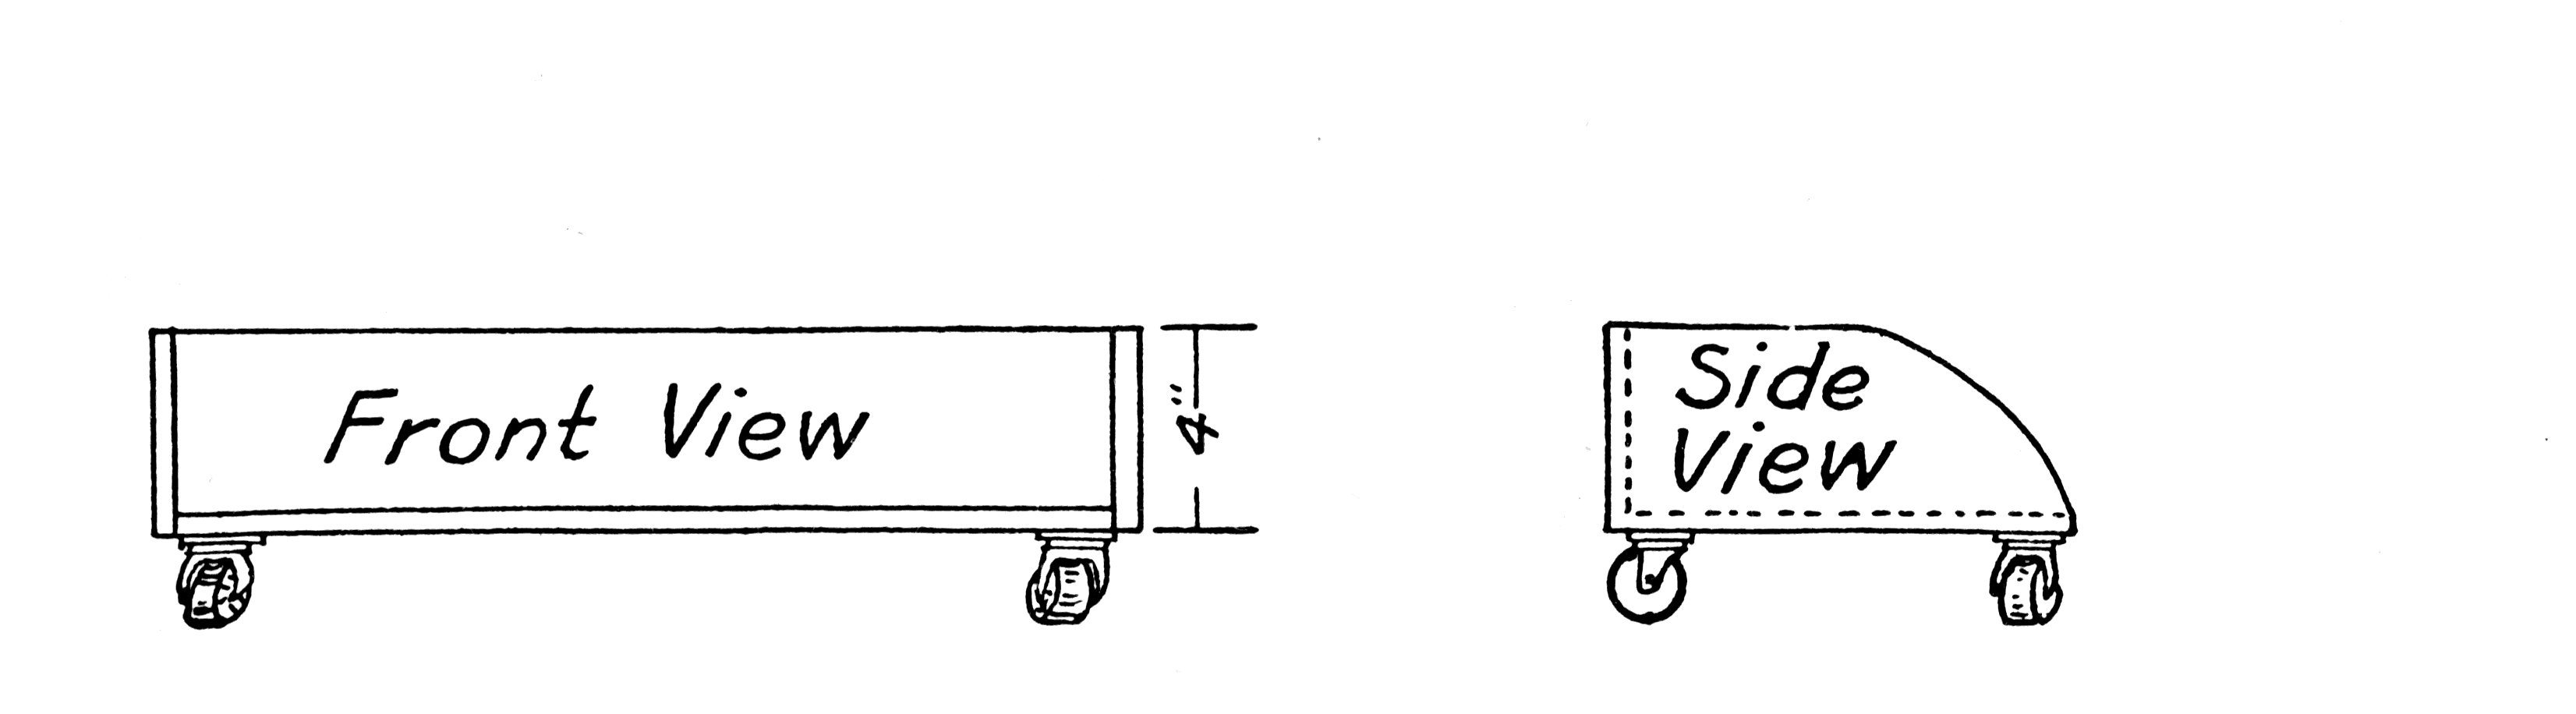
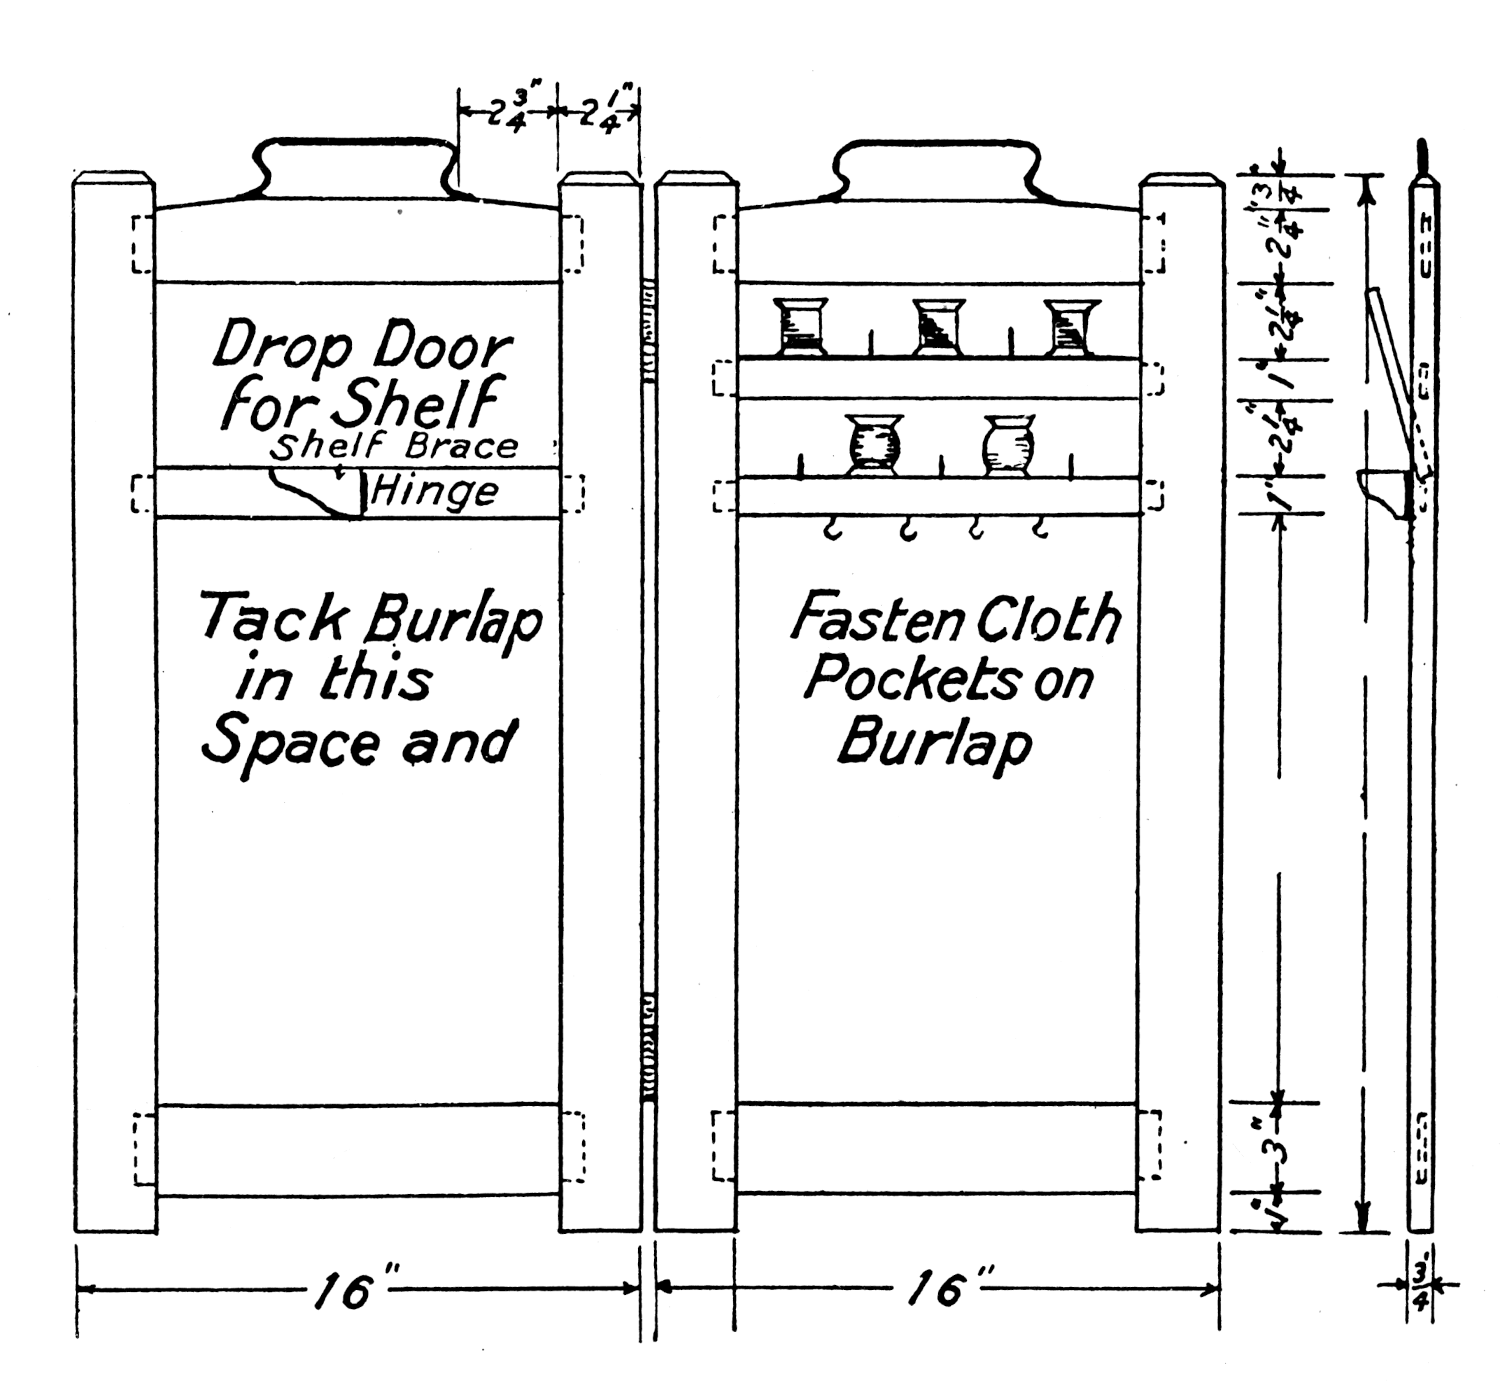
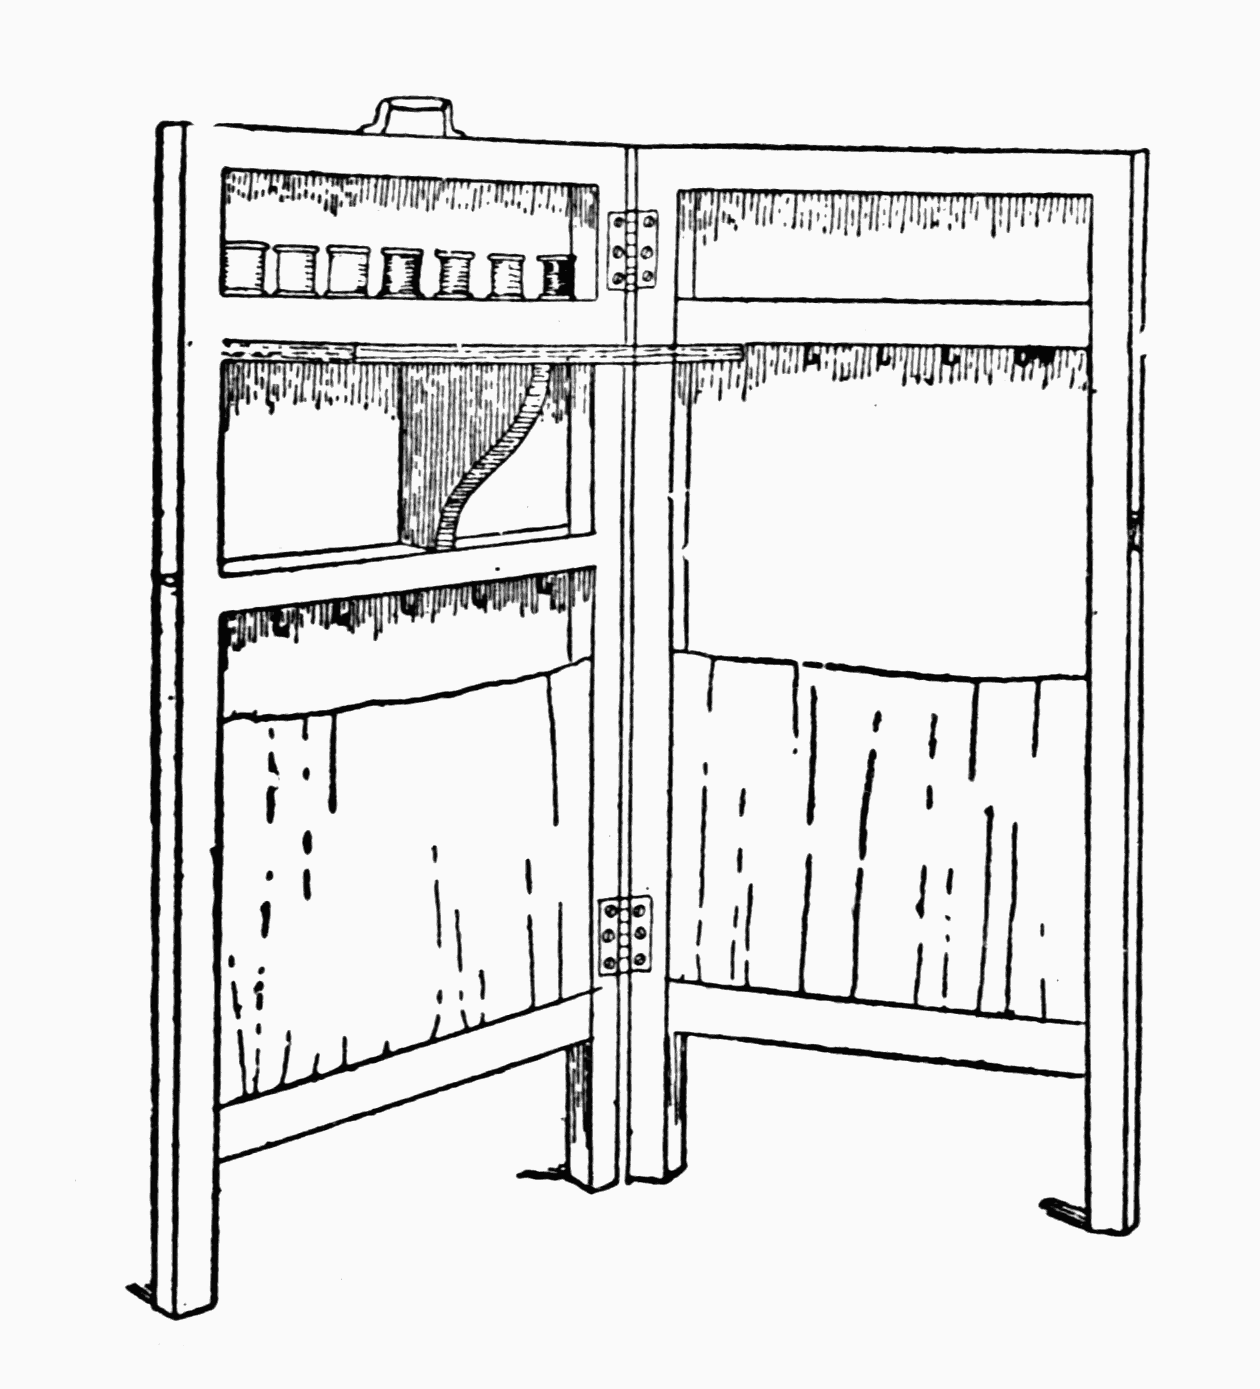
An effort to minimize the “ups and downs” of the busy woman when she finds a few precious moments to do fancy work or to read. It is an accessible device, consisting of a light frame, covered with burlap, with conveniently arranged pockets and other useful features. It is of a convenient height to be lifted from place to place with a little effort; or it may be put on casters and rolled around. Its position near the tired woman’s chair will cause her to feel an eternal warmth toward the designer, for she will find somewhere on its hooks, shelf, or in its pockets the very thing needed when with a sigh of relief she has taken her seat.
[Pg 78]
Materials:
Dimensions:
[Pg 79] Directions:
On the two upright pieces (1½” × 1½” × 30”) make 4¾” mortises to fit the tenons made on the crosspieces, making the first mortise 1” from the bottom of the frame and the second mortise 16½” from the first. The third and fourth mortises in the upright piece are made 2¼” apart and the third the same distance from the top. The other upright piece to the panel is treated in the same way. On two of these crosspieces there are nailed, at equal distances apart, little pegs to hold the spools. Cup hooks are fastened on the under side of one crosspiece to hold the bags. Make the other panel of the screen in the same way, only making mortises and tenons for three crosspieces instead of four. The first crosspiece on this panel is put 1” from the bottom; the second, 16½” from the first; and the third piece 4½” from the second. Hinge the drop door on the top edge of the last crosspiece and hinge the bracket to support the drop door in the center of crosspiece. Put the handles on each screen with the 4½” No. 5 screws. Hinge the two panels together and cover the outside of screen with burlap, using the brass-headed tacks for this purpose. The frame must be sandpapered, stained, and polished before the burlap and pockets are put on. The creton pockets are put on the inside of screen about halfway down the panel.
[Pg 80]
A HOMEMADE SHOWER BATH
A cheap but convenient arrangement to be used in any home for giving shower baths where the other fixtures are not to be had. This may be used to a greater advantage in country homes where there are many little children. They would find joy in the use of same.
Materials:
Directions:
Cut a hole in the 4-gallon water bucket in the center of the bottom. On this opening solder the piece of piping, 2” long. Attach to the end of this piece of pipe the 6’ of rubber tubing with the nozzle on the other end. The sprinkler from a watering can may be substituted for the nozzle if not convenient to get one. Tie a piece of rope to the handle of the bucket and run it through a pulley which is fastened to the ceiling with a staple. Have another staple put in the wall below the window sash and run the rope through it also. This allows the bucket to be raised or lowered to suit the convenience of the person taking the shower. A hook is placed below the staple in the window joist, which holds the bucket in place when not in use. The flow of the water is adjusted by the use of a clothes pin operated on the rubber tubing. Use a medium size zinc tub to stand in while taking the shower. It makes the whole shower bath more attractive to paint the bucket and tub white and then enamel them.
[Pg 81]

WATERWORKS OUTFIT FOR THE HOME
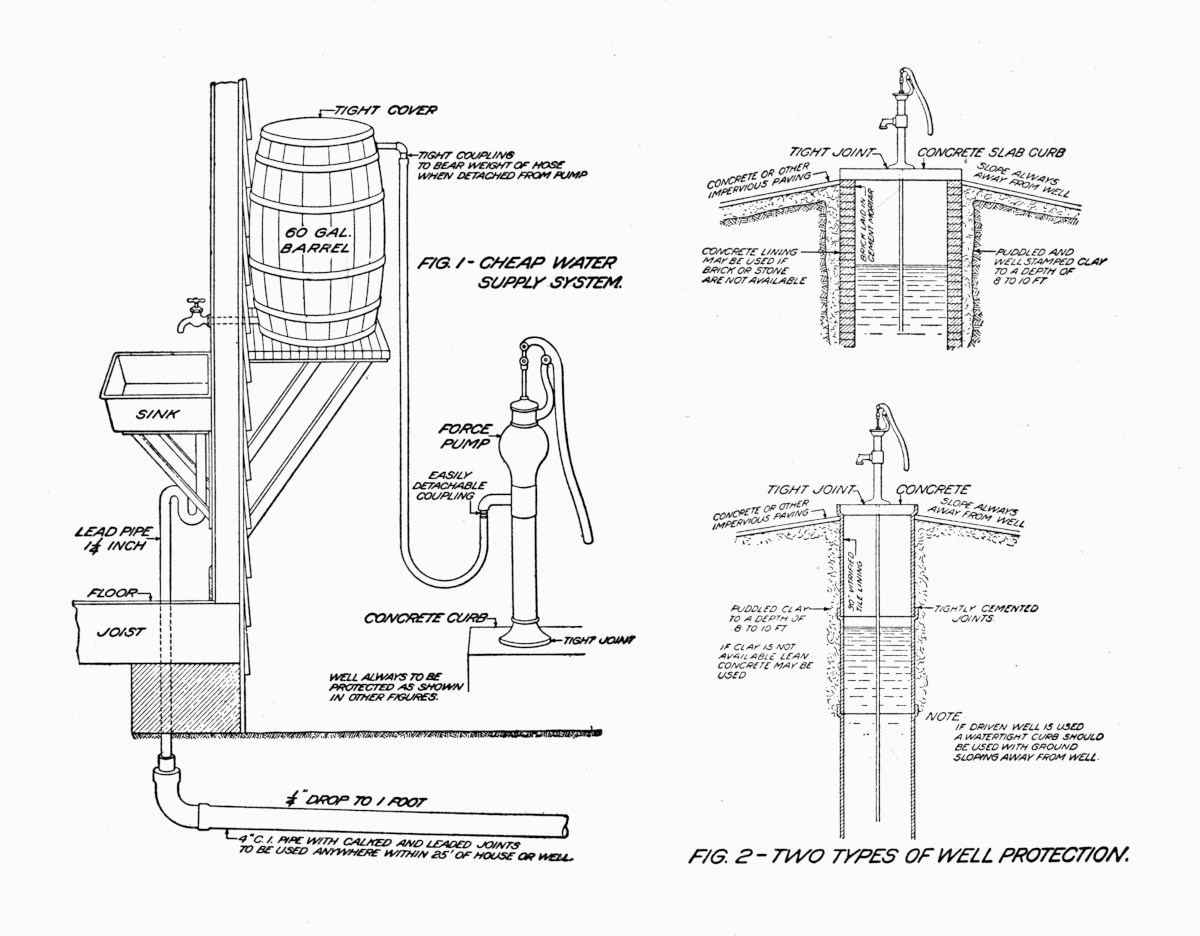
The following illustration shows a simple but cheap arrangement for a practical water system to be used in the farm home.
A few minutes pumping each morning by the man of the family will provide a supply of water for the day’s use, or, where there is no force pump, the water may be brought in pails until the barrel is filled every day. While not the most satisfactory plan for putting water into the home, it is far better than having to carry the water from a pump or often from a spring which is a long distance from the house. It is a labor- and time-saving device for the farm woman and enables her to do more efficient work in every way.
Materials:
Directions:
Pump.: Bore a hole about 2” below the lid of the barrel. This must be large enough to permit the piece of coupling to fit in it tightly. It is not necessary to use the coupling but it will give a better support to the hose. Fasten one end of the hose to the coupling and the other end to the pump. On the opposite side bore a hole with a ¾” auger and attach the ½” piece of water pipe to it.
Shelf: Raise the barrel to the platform, which is made of 1” boards, and well braced underneath. This platform is fastened to the house just outside of the kitchen. It must be put higher than the kitchen sink in order to obtain pressure enough to give a steady flow of water. A tight-fitting lid is placed on top of the barrel to keep out the trash and the insects. Fasten the faucet to the ½” pipe on the barrel which extends through an opening made in the wall.
Sink: Place the sink, supported by brackets, on the inside of the kitchen wall and at a convenient height from the floor for the woman to comfortably use.
Drainage: Fit the S-trap to the 4” drain pipe to carry off the water from the sink.
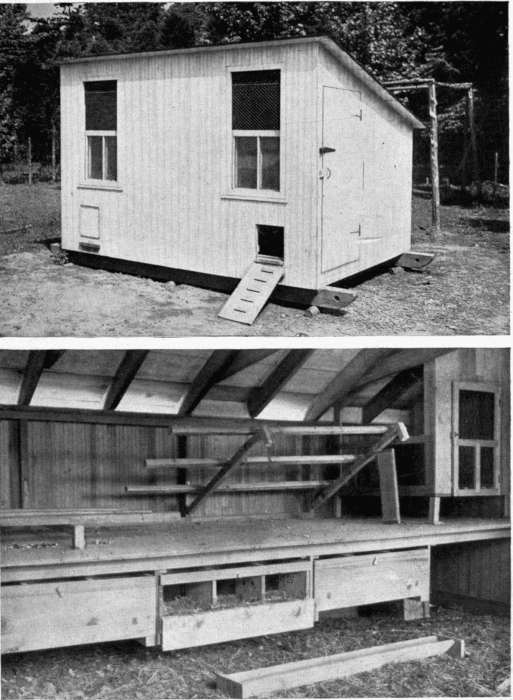
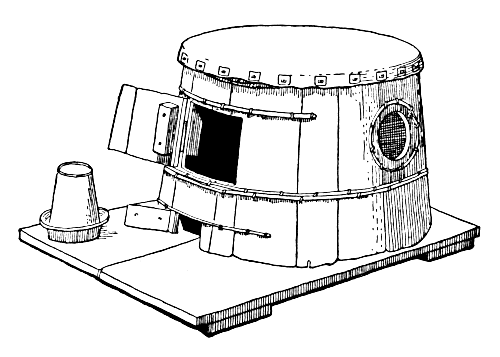
POULTRY HOUSE
A portable house placed on runners is shown in the following cut. It can be easily moved by four men carrying it, or be drawn by hitching a horse to the ends of the runners. A house of this type has many advantages over the stationary house because it can be moved into the field after the grain is cut, into the orchard, and into the different fields where the chickens can get plenty of fresh green food.
Materials:
| Use | Size | No. of pieces |
Length | Board measure |
| Sills (runners) | 4” × 6” | 2 | 12’ | 48’ |
| Joists | 2” × 4” | 3 | 14’ | 28’ |
| Studs and braces | 2” × 3” | 13 | 12’ | 78’ |
| Rafters | 2” × 4” | 3 | 16’ | 32’ |
| —— | ||||
| Total | 186’ | |||
| ⅞” Matched flooring (floor and sides) | 340’ | |||
| ⅞” Sheathing, surfaced one side | 100’ | |||
| Roofing paper, 1 roll. | ||||
| Windows, hardware, etc. | ||||
Directions:
A good location is the first consideration in the building of a poultry house. Select a well drained spot, facing the southeast and large enough to make comfortable quarters for the chickens.
The house is built of any kind of durable and well-seasoned lumber. The kind of material used in making the floor will depend largely on the soil and the money to be spent in the construction of the house. Board floors are often used but they are more susceptible to rats. Cement floors are more easily cleaned and more sanitary, and not so expensive in a locality where plenty of gravel is available. A board floor must be raised several inches from the ground as a protection from rats and to allow for runners to be placed underneath the house.
Roosts are placed on the same level with each other next to the end or back walls and from 6” to 10” above the dropping boards, which are 2½” from the floor. Roosts may be stationary as in the cut, or they may be fastened by hinges to the walls and raised to clean the dropping board.
Roost spacing will depend upon the size of the fowls, but a 10” space to each fowl is usually sufficient. They must be put 15” apart.
Nests made 14” square are built under the dropping boards around the walls of the house as shown in cut. A 4” piece of wood is placed on the side, which drops as a door in front of the nests.
Windows as shown in the cut are more expensive and not as good as a front made of wood extending about 2’ from the bottom. Wire screening, admitting better ventilation and more sunlight, is tacked over the rest of the opening in the front. A curtain may be made of unbleached muslin and fastened on a pole at the top of the open front, which may be lowered as a protection in bad weather.
Make the roof of some water tight material and cover the walls on the inside to protect the fowls from draughts.
Nests.—Comfortable and convenient quarters must be furnished the sitting hen. The location of the nest must be in a quiet, dark place to keep the hen from becoming restless. A box fifteen inches square and twelve inches high, with a narrow strip four to five inches wide at the bottom of the open front of the box, makes a comfortable nest. Barrels or half-barrels or nests made of a piece of sod will also be comfortable quarters for the sitting hen. The nests must be well lined with hay, straw, or excelsior. Both the nests and the hen must be thoroughly dusted with insect powder before the sitting time comes.
Hatching and Rearing.—There are two methods used in the hatching and rearing of chickens—the natural, when the chicks are hatched and reared by a hen, and the artificial, when they are hatched in incubators and brooded in houses indoors or out-of-doors. The natural method will be found to be more satisfactory when dealing with a small number of chickens. A small number of hens, if managed with system and care, will produce a large number of chickens at a very small cost.
Care must be taken in the selection of the eggs to be used for hatching purposes. Select well-formed eggs which are regular in shape and size and which are neither too large nor too small. They should come from healthy hens of one breed and should be smooth and of one color. Eggs must be kept in a dry, cool place and at a temperature of from fifty to sixty degrees Fahrenheit. The fertility of an egg weakens with age; so they must be kept [Pg 86] only a few days before they are to be set. The number of eggs to be put under each hen will vary with the season, the size of the hen, and the size of the eggs; but it is usually safe to put about thirteen eggs under a hen of average size.
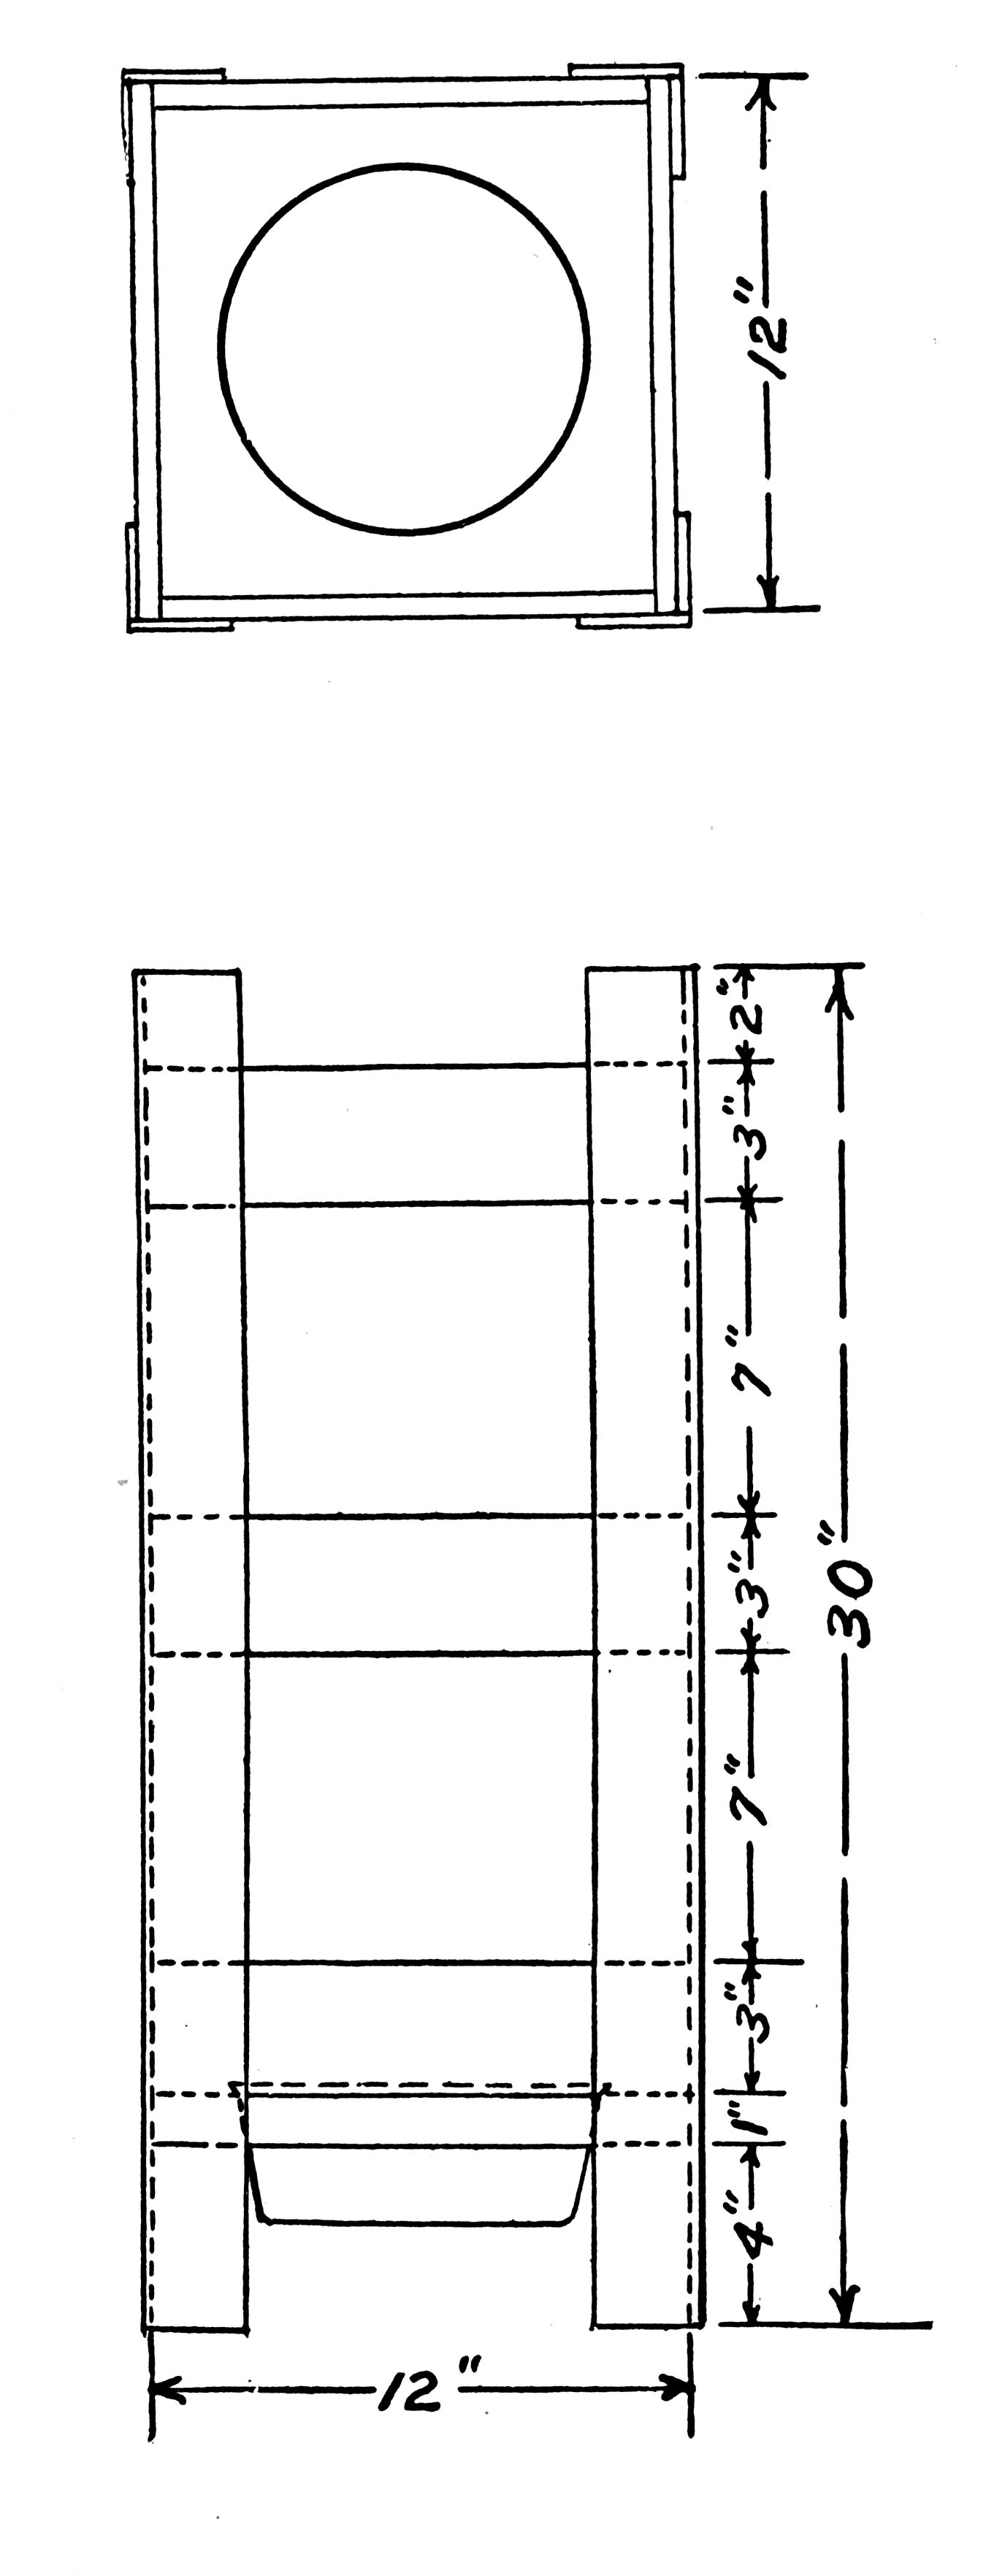
Egg Tester.—Test the eggs in a dark room on the seventh and fourteenth days for the removal of infertile eggs. This may be done by a very simple home-made tester made of a pasteboard or wooden box, with a hole the size of an egg bored in the front, and an opening in the top through which the smoke is to pass. If a wooden box with a bottom is used, an opening must be made in front, with a door so as to put the lamp in. A box without a bottom may be used and simply set right over the lamp. Either a lamp, candle, or lantern may be used on the inside of the box. Holding the egg in front of the box and letting the light shine through it will show the condition of the egg. An infertile egg will be clear, while a fertile egg has a spider-like center with threads leading out from it. All infertile eggs must be removed.

Poultry is classified as the egg breeds, the meat breeds, the general-purpose breeds, and the ornamental breeds.
The egg breeds are small fowls which mature quickly. They [Pg 87] are very active, but not good chickens to be used for setting purposes. They are good layers, and they lay a great many white-shelled eggs, for which there is a great demand on some markets. The age of maturity for this breed is from four and one-half to five months. The Leghorns and the Minorcas are the principal representatives of this breed. The single-combed white Leghorn has been the most popular.
The meat breeds are large fowls with long necks and heavy coats of feathers; and they lay a comparatively small number of brown-shelled eggs. They are slow in movement, with little desire to forage. They make fine mothers, and for this reason they make good fowls to be used for setting. The Brahmas, Cochins, and Langshanks are the principal fowls of this breed.
The general-purpose breeds occupy a medium place between the egg and meat breeds as to size, egg production, and meat production. For these characteristics they are especially recommended to the farmer who wishes both egg and meat fowls. They lay a number of brown-shelled eggs and they make splendid mothers. The Plymouth Rocks, Wyandottes, Orphingtons, and Rhode Island Reds are the best varieties of this breed.
The ornamental breeds are ornamental both in character and purpose, and for this reason they are not practical for use on the farm.
Feeding.—The farmer has often become discouraged by the elaborate rations which are recommended by poultrymen to be used in feeding the chickens. While some of the by-products of industries, such as Linseed Meal and Meat Meal are necessary, most of the feed used in poultry raising may be raised on the farm. It is well to be familiar with the different values of foods fed to the chickens, for they like a change in their rations, and it is necessary that they have it. If the food contains too much fat, the hens will become too fat, which will lessen their usefulness as egg producers; while if the food contains too much protein, some symptoms of indigestion will result. It is hard to determine the right amount of fat and protein to be fed to the chickens, for this varies to suit conditions and the purpose for which it is fed.
Young chicks should be fed a dry or wet feed forty-eight hours after they are hatched. Nature has already provided them with yolk of egg, which must be digested before they are given more food. Their first feed must be fine grit or a drink of sour milk. In two hours after the first feeding they may be given dry oat flakes with an egg which has been boiled for an hour, or a Johnny cake made of ten parts of cornmeal, two parts of wheat middlings, two parts of wheat bran, mixed with skimmed milk and baked. Change this diet after a week to a dry ration—for example, two parts of cracked wheat, two parts of oat flakes, four parts of cracked corn, one part of rice, and one part of millet. Plenty of green food and sour milk should be fed to them. Feed them often, but in small proportions. Let them take plenty of exercise. It is important to keep the hen up and allow the chicks to run out until they are weaned.
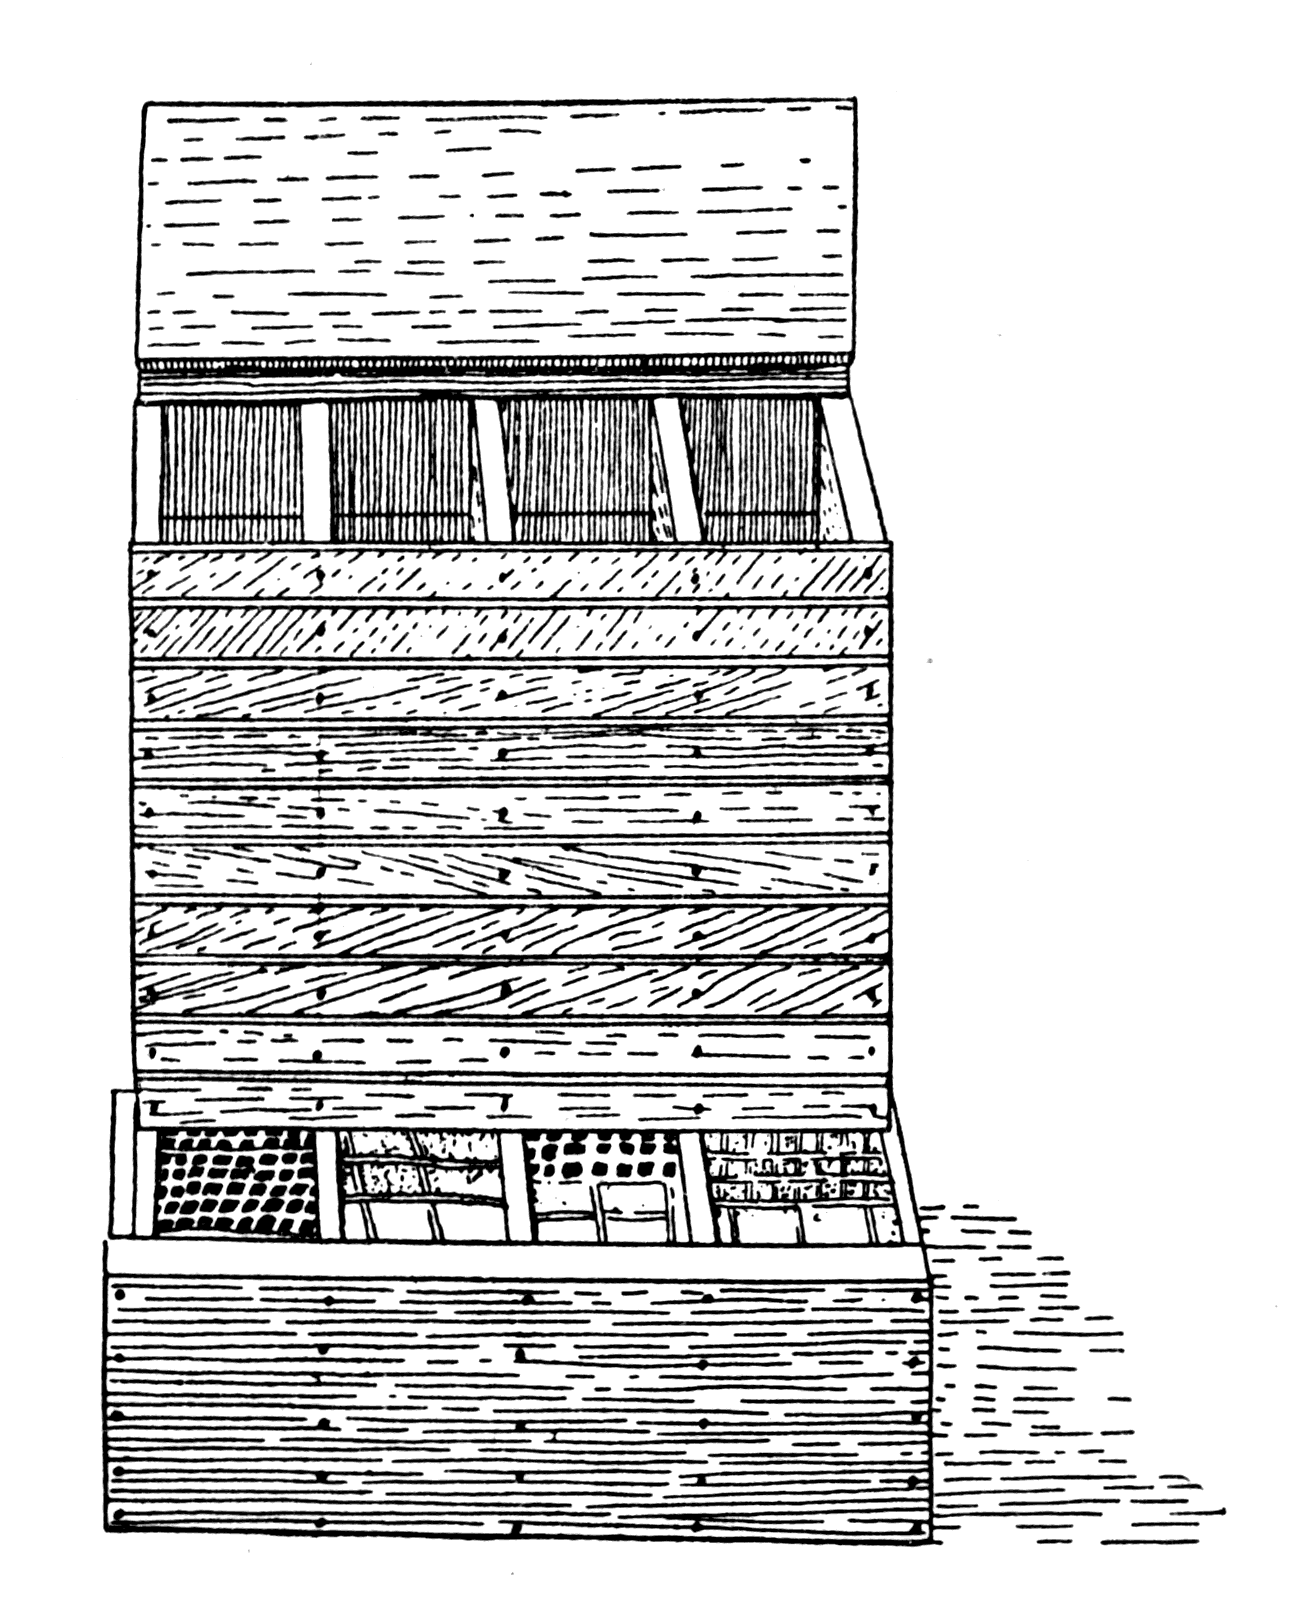
DRY MASH HOPPER NO. 1
There are many kinds of dry mash hoppers on the market but it is difficult to find one that is not wasteful. This hopper which is made of poplar is easily made and it has been found to be very successful. It may be built of the desired length and made to hold the required amount of dry mash. The most important detail in the building of this hopper is the slope of the bottom which must be at an angle of forty-five degrees with the wall of the henhouse. It must be built well off the floor with a roost placed for the hens to stand on while they are feeding. This will keep the litter out of the hopper. The wire netting must be of one-quarter inch square mesh which is fastened to the hopper and stretched to the bottom of the trough at its lowest point.
Materials:
Dimensions:
Directions:
Take the two end pieces (1” × 5” × 26”) and cut the tops at an angle of 60 degrees and the bottom of these ends at an angle of 45 degrees. Nail the bottom piece (1” × 9” × 19”) to these end pieces and then nail on the back (1” × 9” × 26”).
[Pg 90]
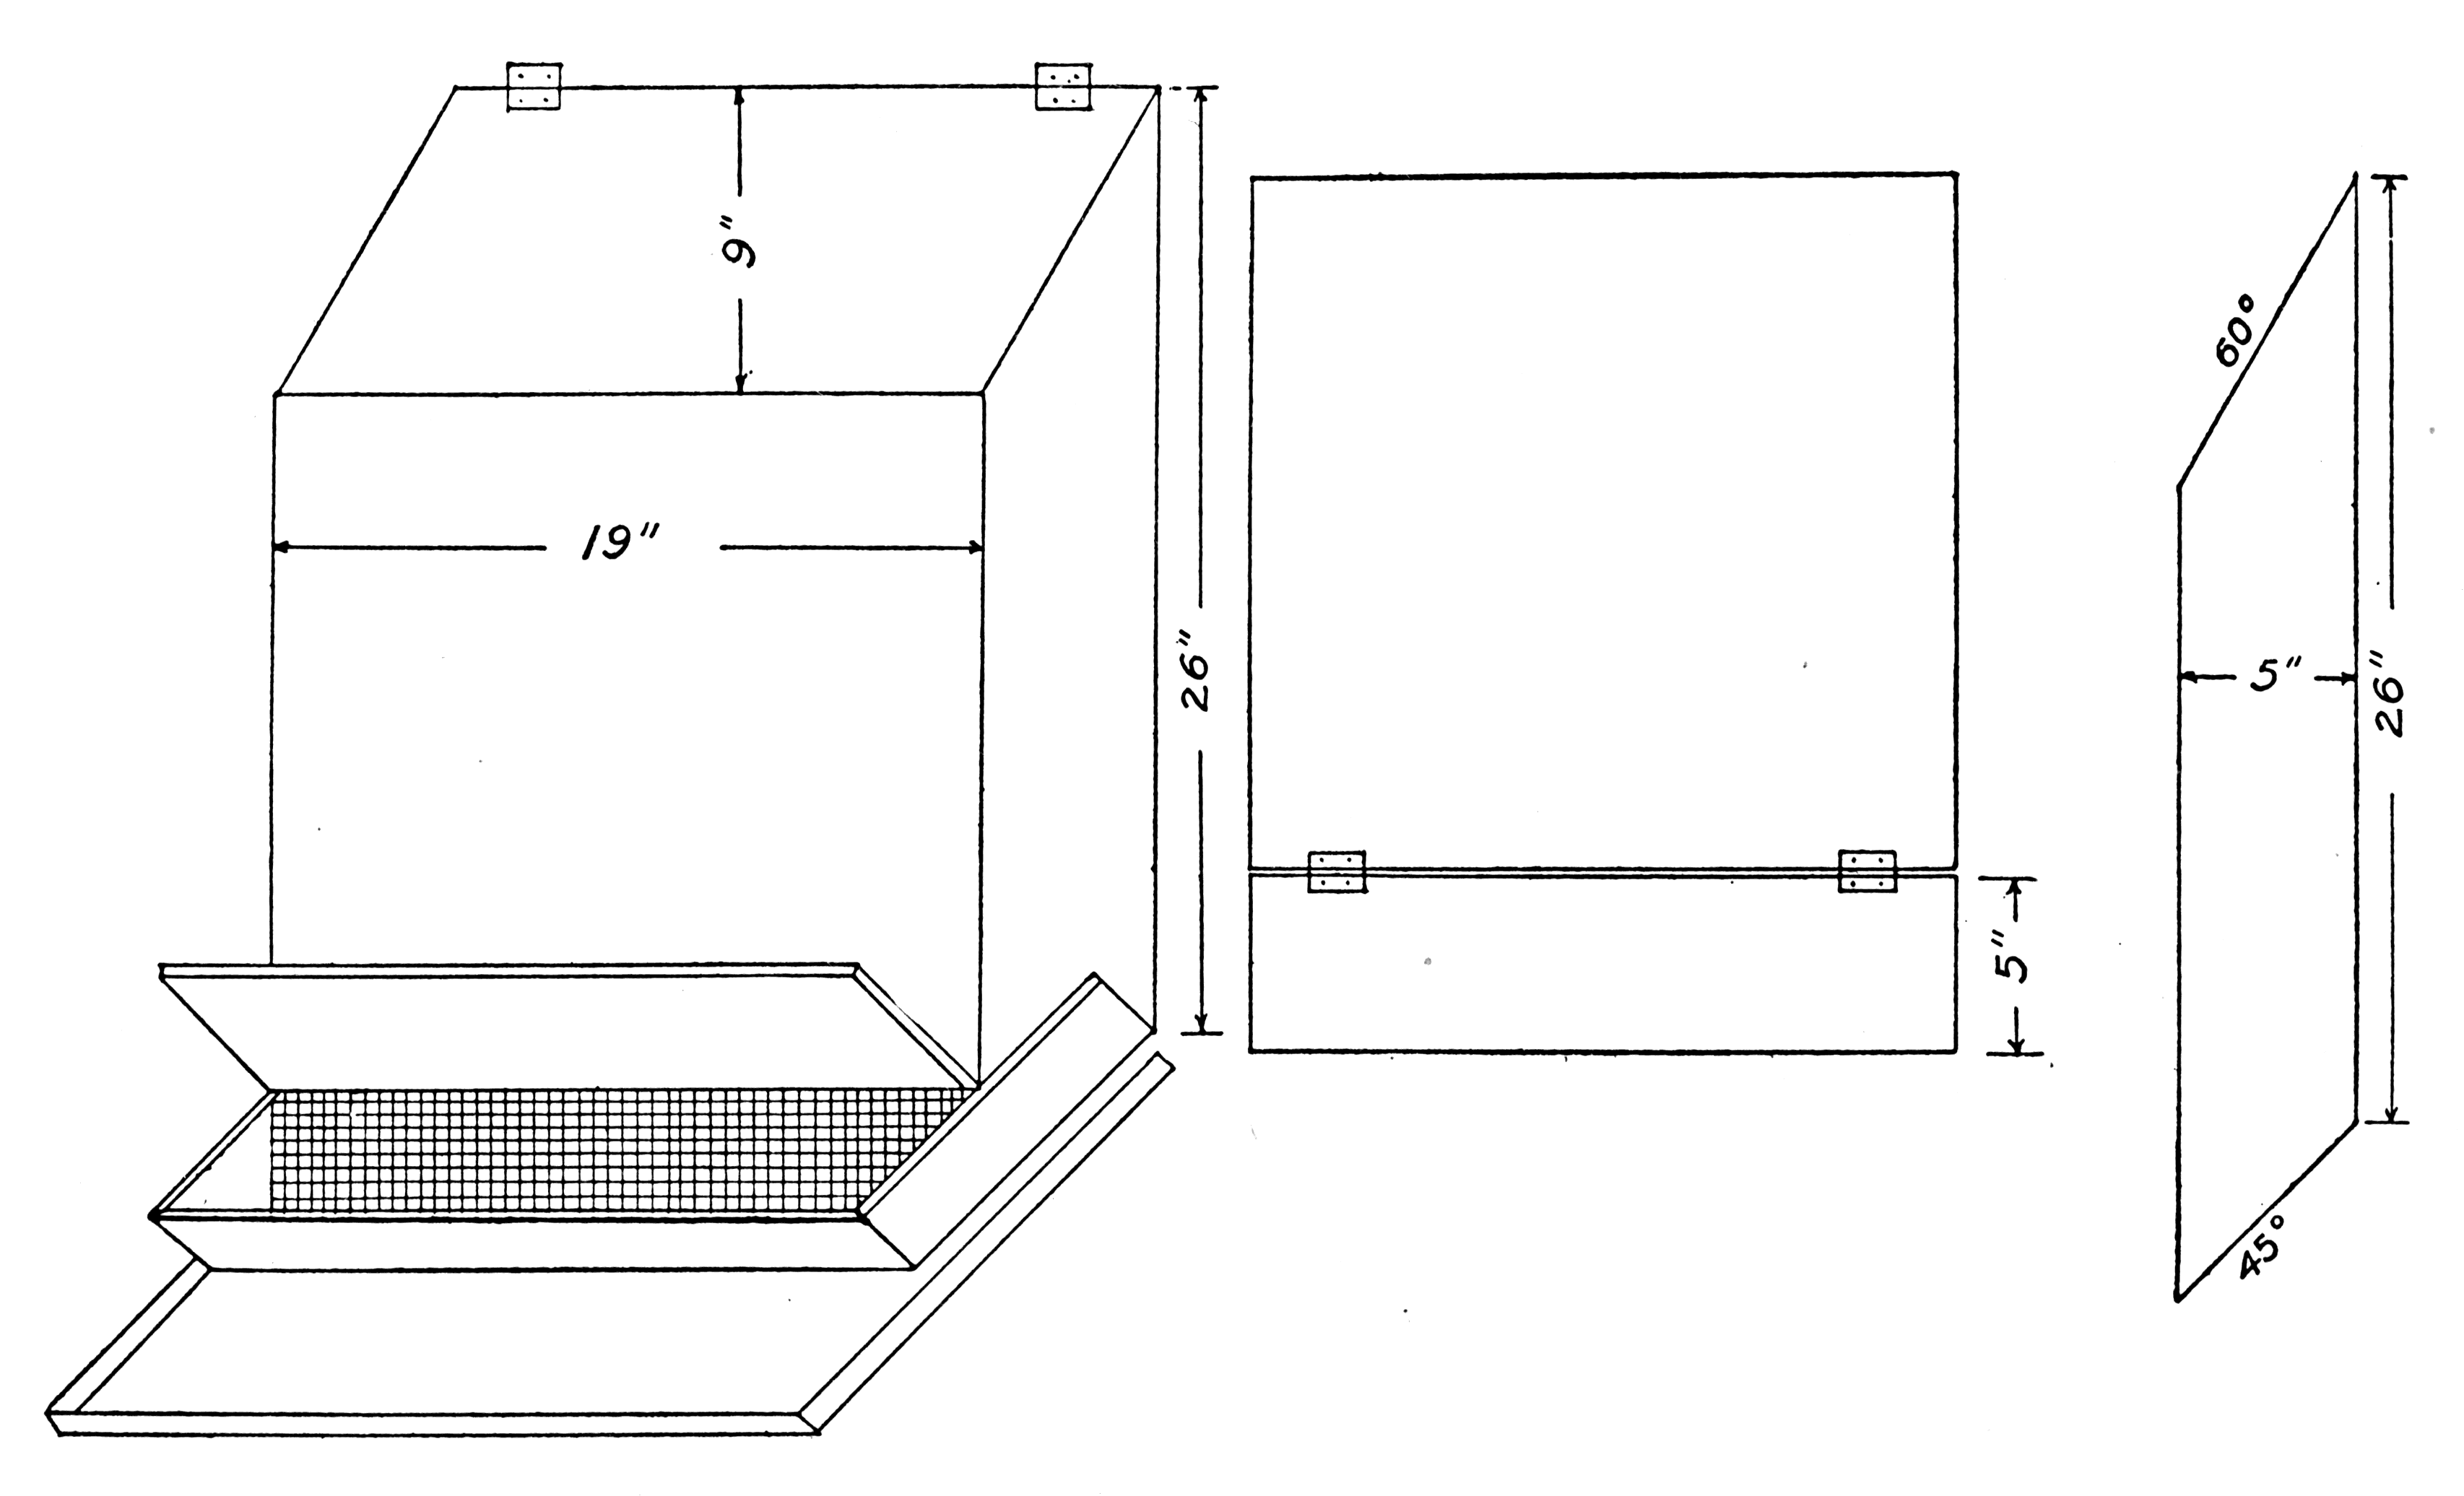
The front piece (1” × 19” × 17”) is then nailed on the hopper.
The two end pieces (1” × 4” × 9”) to be used on the trough are cut at an angle of forty-five degrees at one end and nailed on each side of the bottom of the hopper as shown in the illustration. Then the front of the trough (1” × 4” × 19”) is nailed to the sides. Tack the wire mesh over the opening in the trough and hinge the front piece (1” × 5” × 19”) on the front of the trough with one pair of 1½” (butt) hinges. The other pair of hinges is used to fasten the top (1” × 9” × 19”) on the hopper.
Make the roost by nailing the two sides (1” × 2” × 15”) to the front (1” × 2” × 21”). Fasten this frame on the sides of the hopper with two two-inch gate hooks as shown in illustration.
The hopper when completed is fastened to the sides of the wall of the henhouse with thirty-two number ten screws at a convenient height to the chickens.

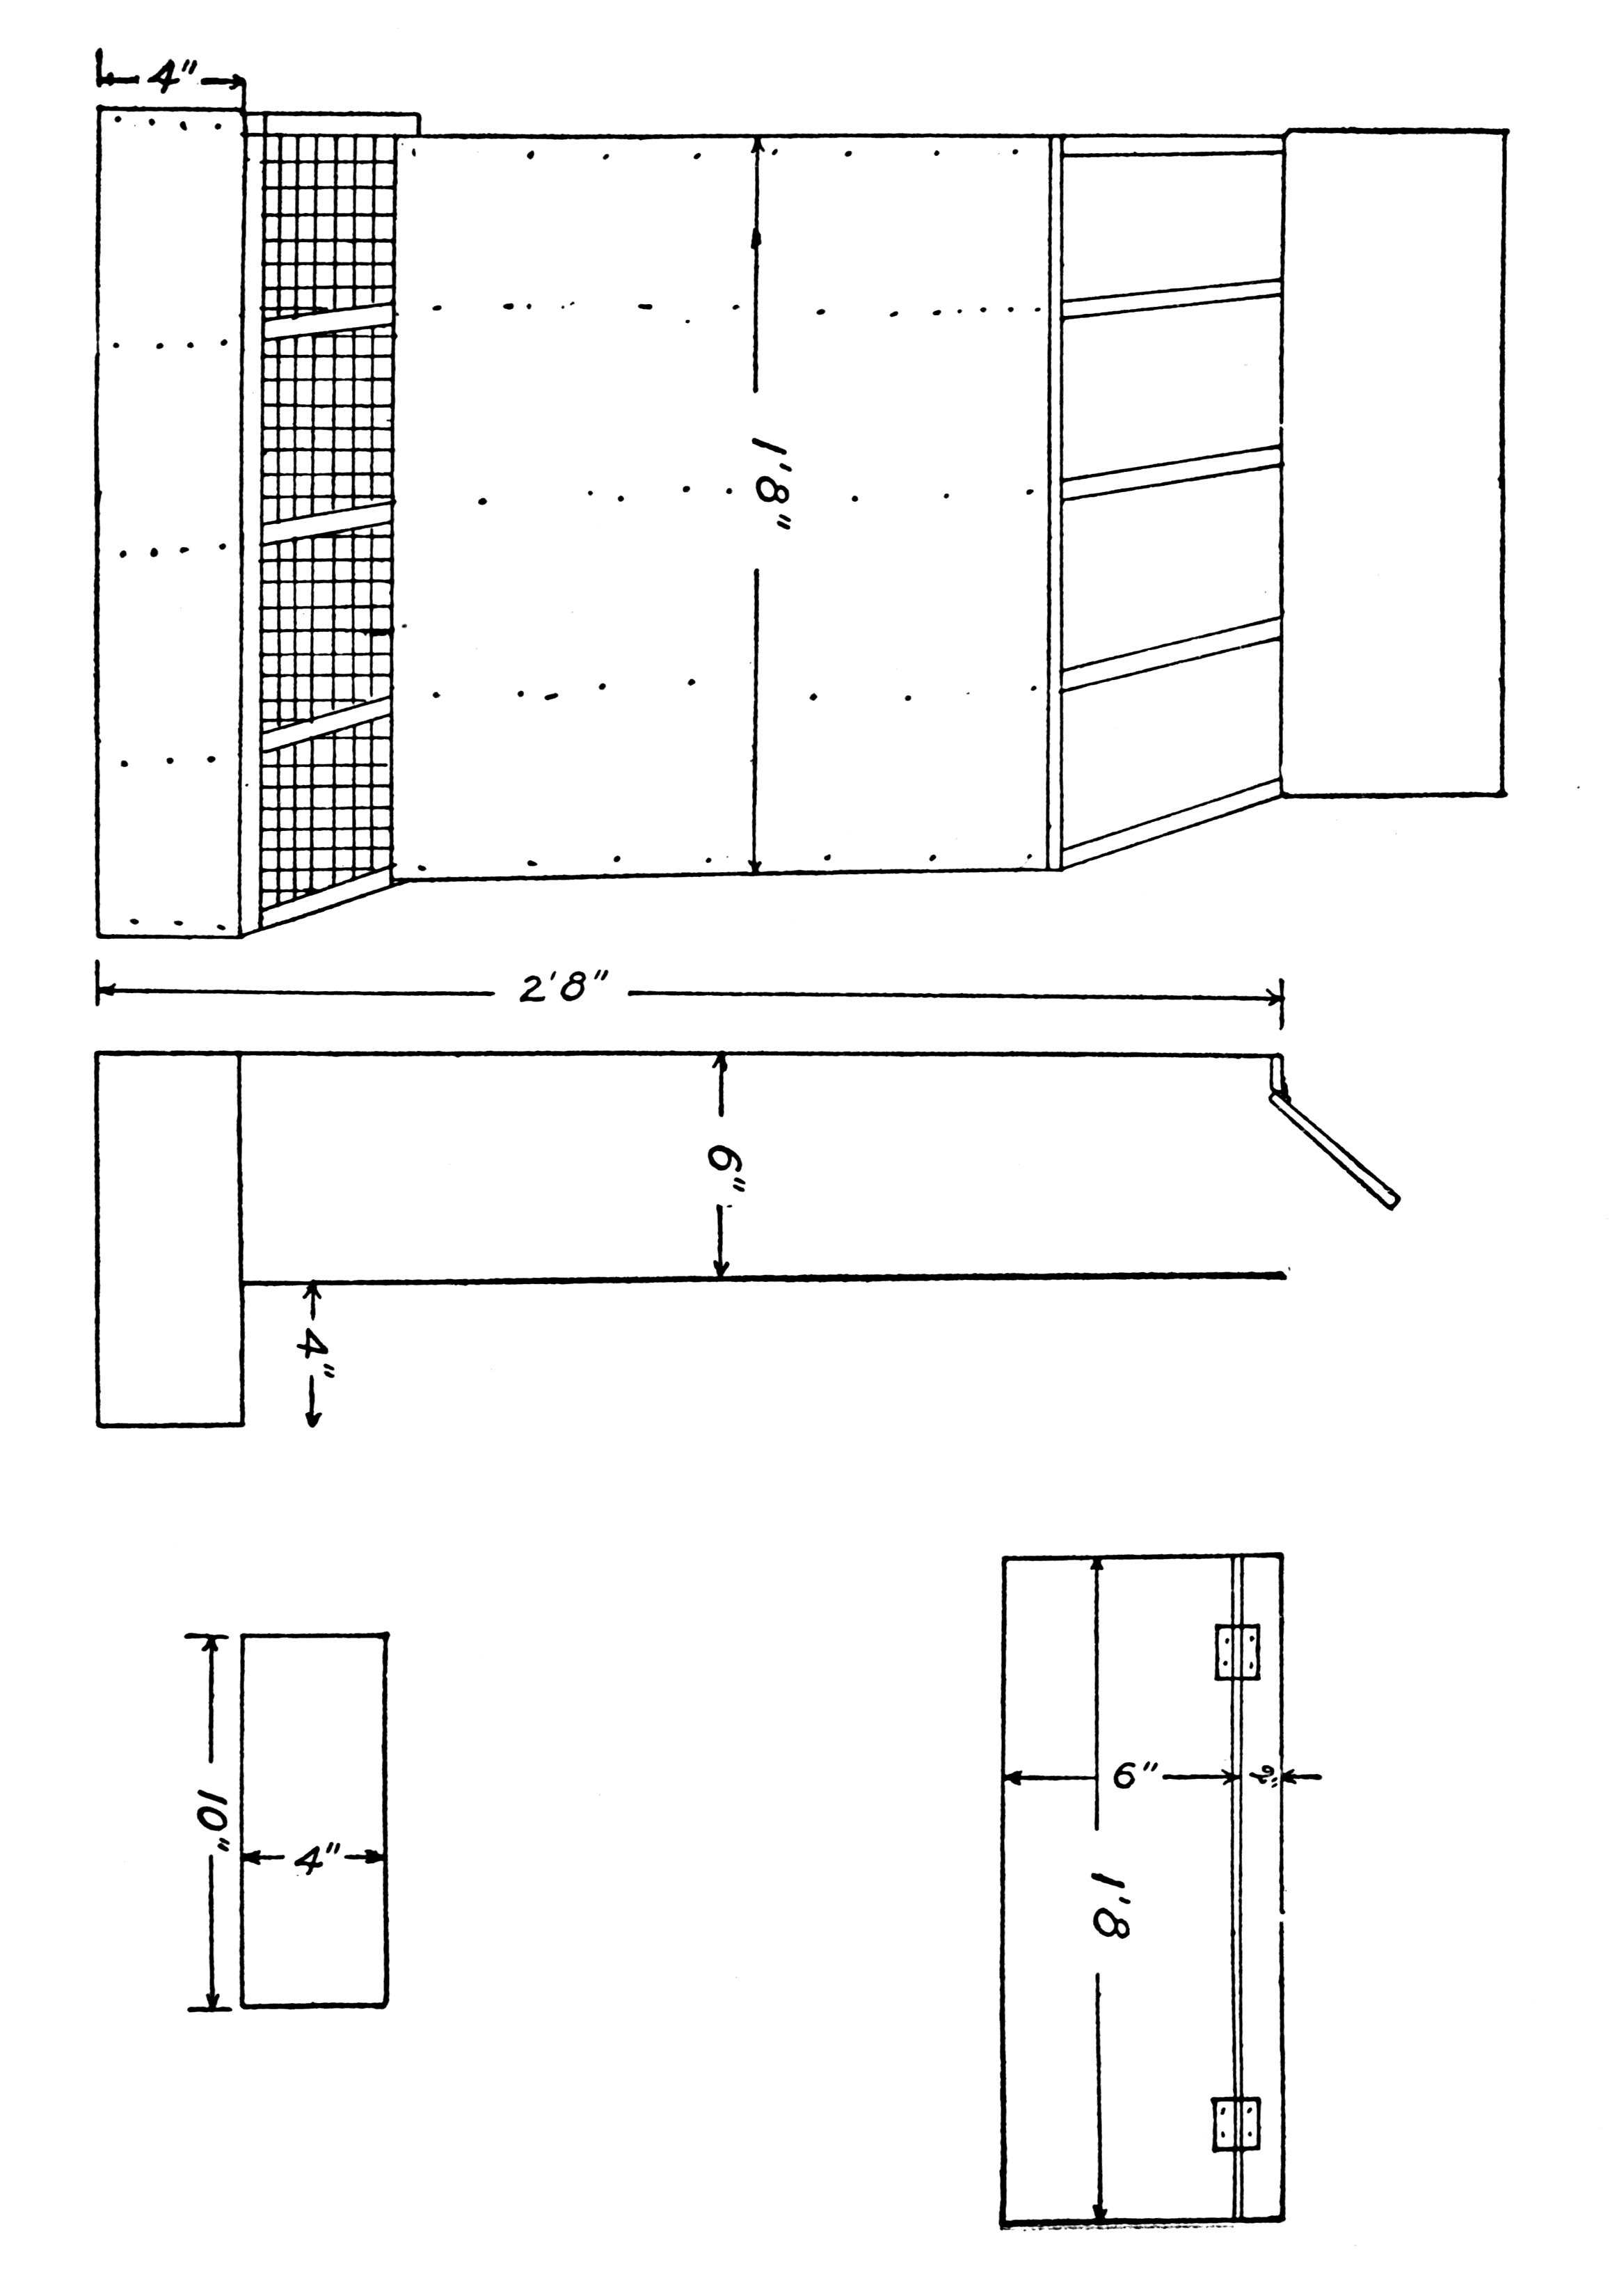
DRY MASH HOPPER NO. 2
This model is constructed very much like the hopper already described with the exception of the four compartments which provide for a balanced ration for the chickens. It is not nailed to the wall but rests on the floor.
Materials:
Dimensions:
Directions:
Nail the two end pieces (1” × 6” × 2’ 8”) to the bottom piece (1” × 6” × 16”). Then nail the back piece (1” × 1’ 8” × 2’ 8”) and the front piece (1” × 1’ 8” × 2’ 4”) to the ends of the hopper. Nail the partitions (1” × 6” × 2’ 6”) to the back and front of the hopper making four equal compartments.
The trough is made by nailing the two end pieces (1” × 4” × 10”) to the side of the hopper. Nail the front (1” × 4” × 1’ 8”) and the back (1” × 4” × 1’ 8”) to the ends of the trough. The partitions (1” × 4” × 10”) are nailed to the front and back of the trough, making four equal compartments. Cover the opening in the front of the trough with 12” of No. 4 mesh wire 36” wide.
[Pg 93] Hinge the two top pieces (1” × 2” × 1’8” and 1” × 6” × 1’8”) together with one pair of 1½” steel (butt) hinges. Then nail this top piece to the back of the hopper with the narrow strip even with the edge of the top end of the back.
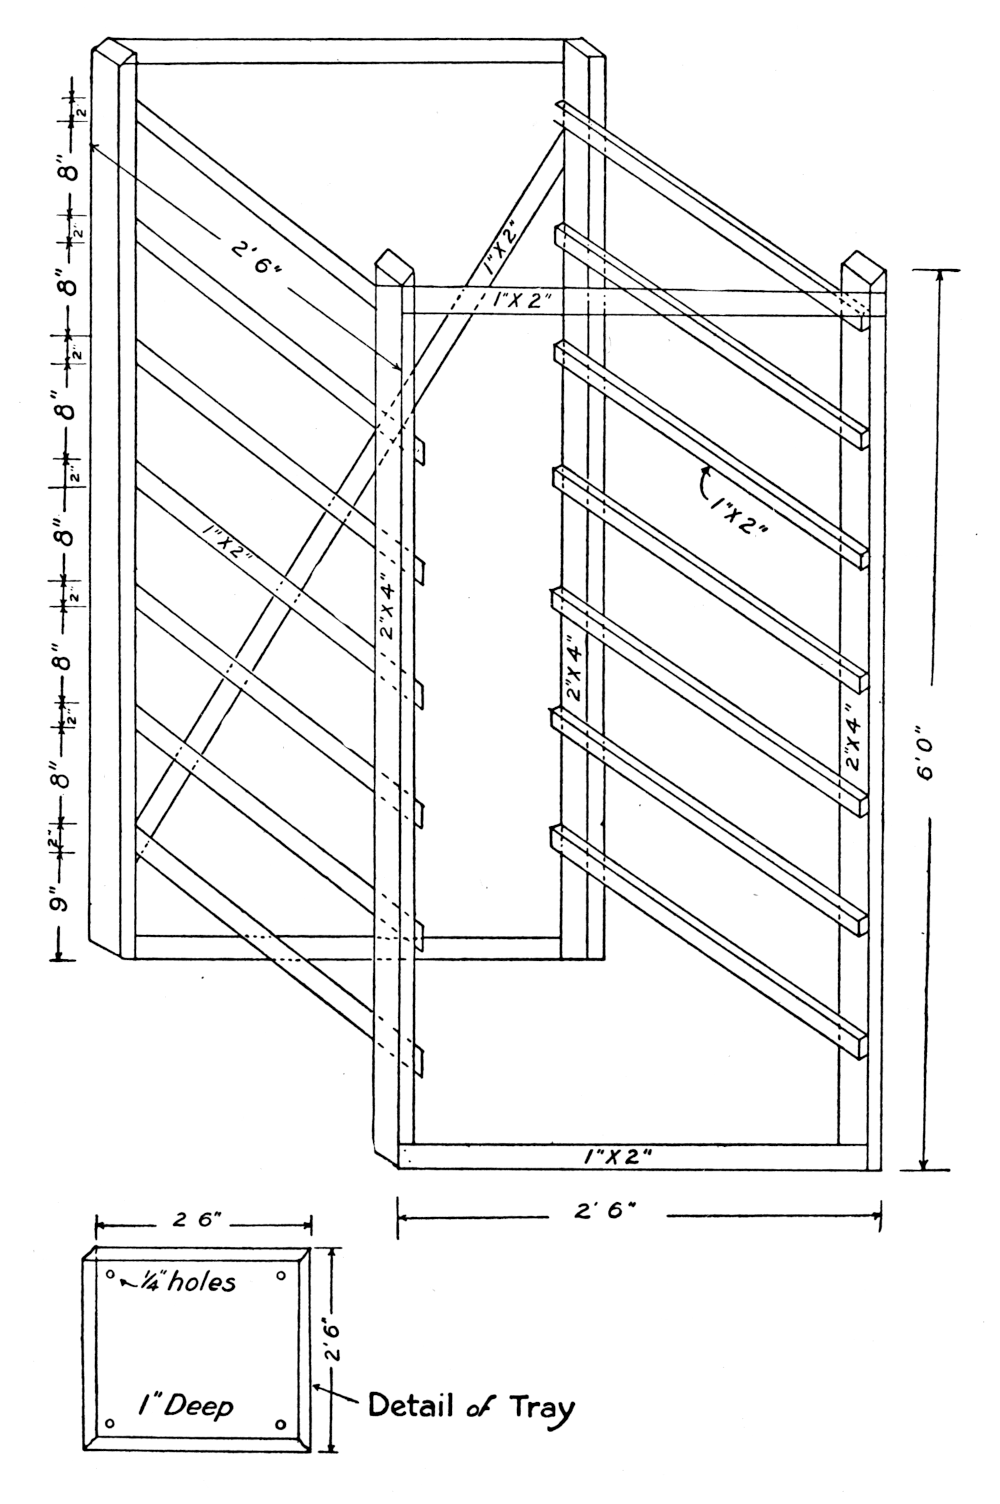
RACK FOR OAT-SPROUTING TRAYS
The importance of giving poultry green feed throughout the year cannot be over-emphasized. This sprouting tray is very convenient in order that this food be furnished the chickens. It is a simple construction, made of yellow pine, and a device that can be made by any farmer at a minimum cost. It is advisable to lay off all the material before beginning to build the rack, to avoid confusion in the measurements.
Materials:
Dimensions:
Directions:
Take 2 upright pieces (2” × 4” × 6”) and nail to bottom (1” × 2” × 2’6”). Measure a distance of two inches from the top and nail on first cleat (1” × 2” × 2’6”). Cleats are nailed on the back of the frame even with the ends of the upright pieces (2” × 4” × 6”). Nail brace (1” × 2” × 6’6”) diagonally from one corner to the other. Nail the first cleat 9 inches from the bottom edge of the upright piece. All the other cleats must be nailed 8 inches apart. In each of the sprouting trays a hole ¼ of an inch in diameter is bored to allow the water to drain out from the tray.
[Pg 96]
[Pg 97] Dust Boxes.—Dust boxes are necessary during the winter months to keep the chickens from wallowing in the dirt, as this is the method used by them to cleanse themselves. A box four feet by four feet will be large enough to accommodate fifty chickens. Fine, light, dry dust should be kept in these boxes, and they should be placed in the sunlight and where they may be easily reached by the chickens.
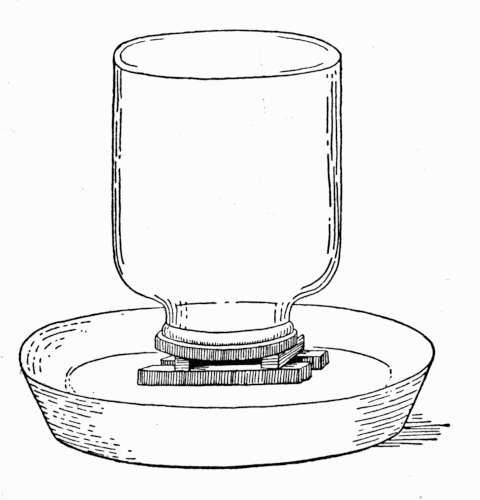
Drinking Vessel.—Should be large enough to hold sufficient water to last twenty-four hours. They must be elevated in some way to keep the dirt from getting into them. A practical drinking vessel is made of a Mason glass jar. Make perforations in the top of the jar with a nail and tack two strips of wood across the top crosswise to raise the jar from the saucer or plate. This allows the water to flow freely from the jar as fast as the chickens can drink it from the saucer, and the covered jar keeps the drinking water clean.
[Pg 98] Brooder.—A simple and convenient chicken brooder may be made of an old wooden tub which is turned upside down on a platform with the bottom of the tub knocked out, and a covering placed over the top. This, with windows cut in the sides of the tub, gives a better ventilation for the chickens. A door through which the chickens enter is cut in the front. Outside of the brooder and on one end of the platform is a simple watering device supplying the chickens with fresh water.
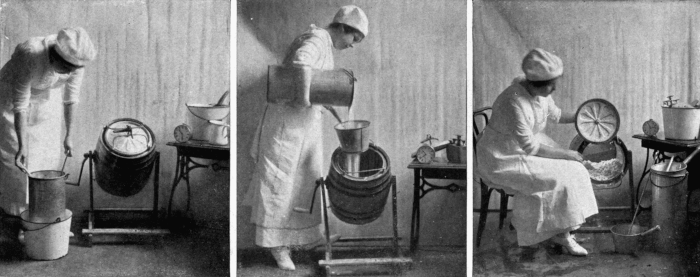
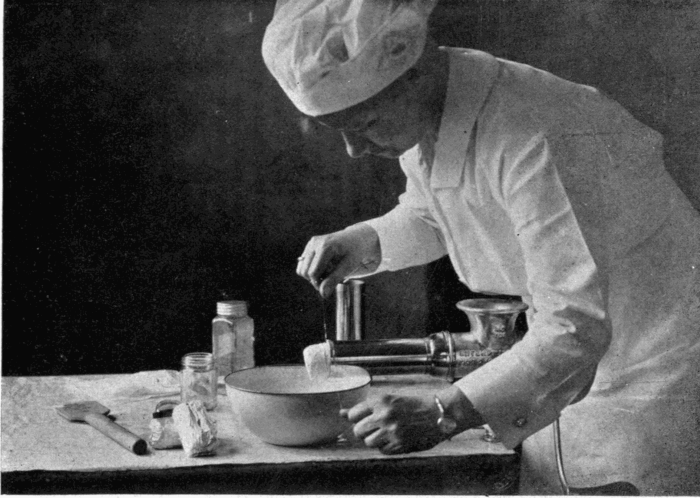
SHOWING USE OF BUTTER-MAKING EQUIPMENT
The economic value of farm butter made from the product of a few cows is of much more importance than is commonly supposed. For this reason the fundamental principles underlying the making of good butter should be practised as much by the farm woman, making butter in small quantities for the market or the consumption in the home, as by the operator of a large creamery establishment. The quality of butter made on the average farm shows that cleanliness and the proper attention to the simplest details in the making of good butter have been neglected.
Quality.—The method used in the handling of milk or cream and in making butter determines its quality. The sanitation of the utensils in which cream or milk is handled and the conditions surrounding it during ripening are of the utmost importance. A common practice among some farm women is to put the milk in shallow, uncovered pans which are exposed to dust, flies, and the odors which frequent the pantry and kitchen. Such pans are allowed to stand until the milk clabbers and a thick leathery sheet of cream is formed on the top. Good butter cannot be made from milk or cream handled in this manner. A deep, narrow vessel known as a shot-gun can is recommended for use in ripening cream or milk because it is easily handled, washed and can be covered. These can be bought at hardware stores or mail order houses.
Utensils.—Convenient equipment for making butter is essential and very inexpensive. It is customary on many farms to churn the cream in an earthen jar with a wooden dasher and stick. Earthenware vessels commonly used are porous and often contain blisters or air bubbles, all of which will absorb milk. The milk sours in these places and gives the vessels a characteristic bad odor. These churns are hard to clean and heavy to handle and [Pg 100] should never be used. A wooden barrel churn is one of the best types to use because it is easily operated, cleaned, and handled. Churns which contain agitators and gearing of different kinds should not be used.
A dairy thermometer, which can be bought at any local hardware or drug store at a small cost, is necessary to determine the temperature of the cream.
When there are at least four cows milked, a small cream separator will be a good investment. Where a separator cannot be had, hand skimming is advisable if the cream is properly handled.
Ripening of Cream.—The ripening of milk or cream is the natural souring which takes place under proper conditions and which gives butter its characteristic flavor. The quality of butter depends, to a large extent, upon proper ripening. Where hand skimming is practised, set separate milkings in cool, well-ventilated places and allow to stand from twelve to eighteen hours for the cream to rise. Skim the cream off with a cup or large spoon, put it into a can which is kept in a cool place at a temperature of 50 degrees Fahrenheit or below. Skimmings from the different milkings are cooled to the same temperature before being added to this stock can. The contents of this can must be stirred each time after adding the cream. When sufficient cream for a churning has been secured in this way the contents of the stock can are warmed to a temperature of 58 to 60 degrees Fahrenheit and in winter 62 degrees Fahrenheit, then allowed to stand in a clean, well-ventilated place for twelve or eighteen hours to ripen. This warming is done by setting the can in a vessel of hot water. Frequent stirring is necessary during the ripening period. Cream properly ripened has a velvety and glossy appearance, with a mild but pleasant sour taste. When hand skimming is not practised the churning will have to be done more frequently to prevent the milk from becoming too sour and giving the butter a bad flavor.
Coloring the Butter.—The natural color of butter when the cows can get plenty of nature’s food is a soft, straw yellow. During the winter, if it is necessary to use dry feed alone, the butter will lack color which can be supplied by the addition of a [Pg 101] harmless coloring matter. The amount of coloring matter necessary to use varies with the season but usually 8 to 12 drops of harmless vegetable coloring to every pound of butter will be sufficient in the winter time. This coloring matter may be bought at most drug stores.
Churning.—When the cream is ready for churning, rinse the churn with scalding water to cleanse it thoroughly and to swell the pores in the wood. Following this, cool the churn with cold water to prevent the raising of the temperature of the cream when put into the churn. The cream should be poured through a strainer into the churn to remove lumps or hard white specks of cream which may have dried to the sides of the can. Gas will form in the churn during the first few minutes of churning which must be let out by removing the cork at the bottom of the churn. It may be necessary to repeat this operation several times. After the churn has been in operation about 20 minutes, the cream becomes thick and shortly after, very small, mealy granules begin to form. At this point the cream begins to break away from the glass in the top of the churn lid. When this stage is reached, after every four or five revolutions the lid should be removed and the size of the granules observed. When these have reached the size of large wheat grains, the churning operation has been completed. At this point the glass in the top appears clear which indicates that the granules slide off instead of sticking to the top. It usually takes at least 25 minutes to churn good butter. If it takes longer, the temperature of the next cream churned should be raised a few degrees.
Washing the Butter.—When churning is completed draw the buttermilk off through a strainer to catch small particles of butter. The butter is washed to remove the buttermilk, to improve the flavor, and to keep better. Buttermilk is washed out of the butter and not worked out. The temperature of the wash water should be the same as that of the buttermilk and is determined by the use of a thermometer. This temperature depends upon the condition of the butter; if the butter is too soft the water must be colder, and vice versa. In washing butter, water is added and the churn given two or three revolutions so as to turn the butter; [Pg 102] after which the water is drawn off and the process repeated several times until the water drawn off is clear.
Salting the Butter.—The butterworker, paddles, and mold or printer are scalded and cooled in the same way as the churn and for the same reasons. The churn is then drawn near the worker and the butter granules removed with paddle or ladle and placed on worker. The hands must never touch butter for sanitary reasons and because they will give the butter a greasy appearance. As soon as the butter is placed on the worker, one ounce of fine, clean salt to a pound of butter is sprinkled uniformly over the butter.
Working the Butter.—Butter should then be worked well to distribute the salt through it and to expel the excess water. Butter is salted to improve the flavor, to serve the market purposes and to some degree to act as a preservative. In working the butter, the pile of granules is pressed flat with the lever, and the flattened mass of butter turned over about 12 or 14 times until the edges of butter, when broken, have a granular appearance similar to a broken half-baked potato. Too much working destroys the grain and the edges when broken apart will have a slightly stringy appearance, while too little working gives a streaked or mottled butter.
Printing and Wrapping the Butter.—The printer is removed from the water as soon as the working has been completed and with both hands it is pressed on the mass of butter until it is packed full. That remaining over the edge is then cut off with a paddle and the print pushed out on a sheet of parchment paper and neatly wrapped. The printing and wrapping of butter cannot be emphasized too strongly, for a good appearance is fundamental to obtaining good markets for the butter. It is very much easier to get a good market for butter packed neatly in parchment paper than it is for that wrapped in a cloth as is the case in so many country homes. It is very important that a good grade of parchment paper should be used for wrapping butter and this can be bought from firms handling dairy supplies or it may be ordered by mail. The brick-shaped mold is used because prints can be handled with convenience and such prints are a standard on [Pg 103] the market. A mold of this kind can be purchased from local hardware stores or mail order houses for from $1.50 to $5.00. The placing of the wrapped print in a pasteboard box or carton not only protects the butter from the finger prints but also from dust and dirt. These cartons may be bought from any firm handling dairy supplies. Butter put up in this manner is convenient to handle, attractive in appearance, and is also an advertisement.
Marketing the Butter.—The appearance of the package determines to a large extent the selling price of butter and every effort should be made to make it as neat, attractive, and convenient to handle as possible. The ultimate end in the making of farm butter is to supply a delicate food for the family and to obtain a profit from the surplus. To do this, it is necessary to create a demand by giving satisfaction to your customers. This can be done by putting up butter superior in quality and attractive in appearance.
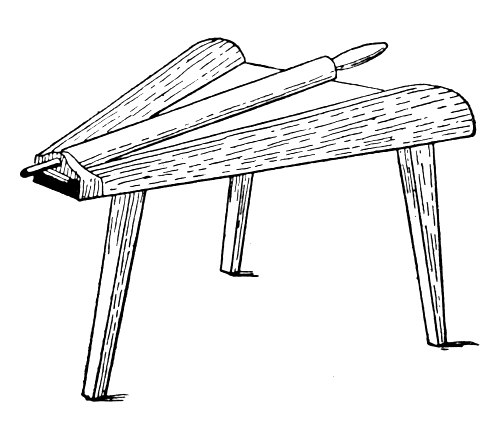
BUTTER WORKER
A very useful appliance, and easily operated, making the butter into a close-grained mass without injuring the texture of it. It is made of poplar, triangular in shape, with a corrugated roller. This roller fits in a hole made in a piece of metal which is put across the smaller end of the worker. This worker may be operated by putting it on the kitchen table, or it may be placed on adjustable legs.
Materials:
Dimensions:
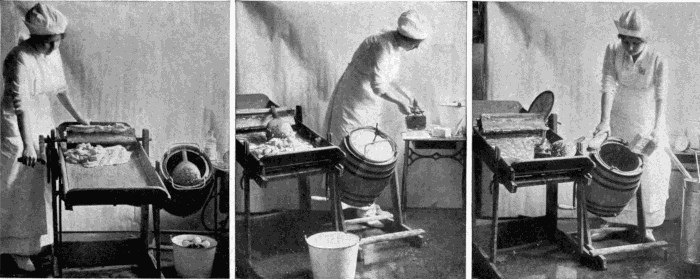
Working the butter Moulding and packing the butter Cleaning up
[Pg 105]Directions:
Taper the bottom piece at one end, using a radius of 31”. Screw the battens (1¼” × 4” × 30”) (1¼” × 2” × 2”) on the bottom, making the holes large enough to fit the heads of the screws. Taper the two sides and nail them to the bottom. The roller is made 36” long and 2” in diameter, measuring ¼” from the end to round the corners. Bore a hole in the end and put the handle on it. Put a small metal pin in the end of roller to hold handle in place. Tack the piece of zinc across narrow end of the worker, making a hole in the centre to fit end of roller. Sandpaper when completed.
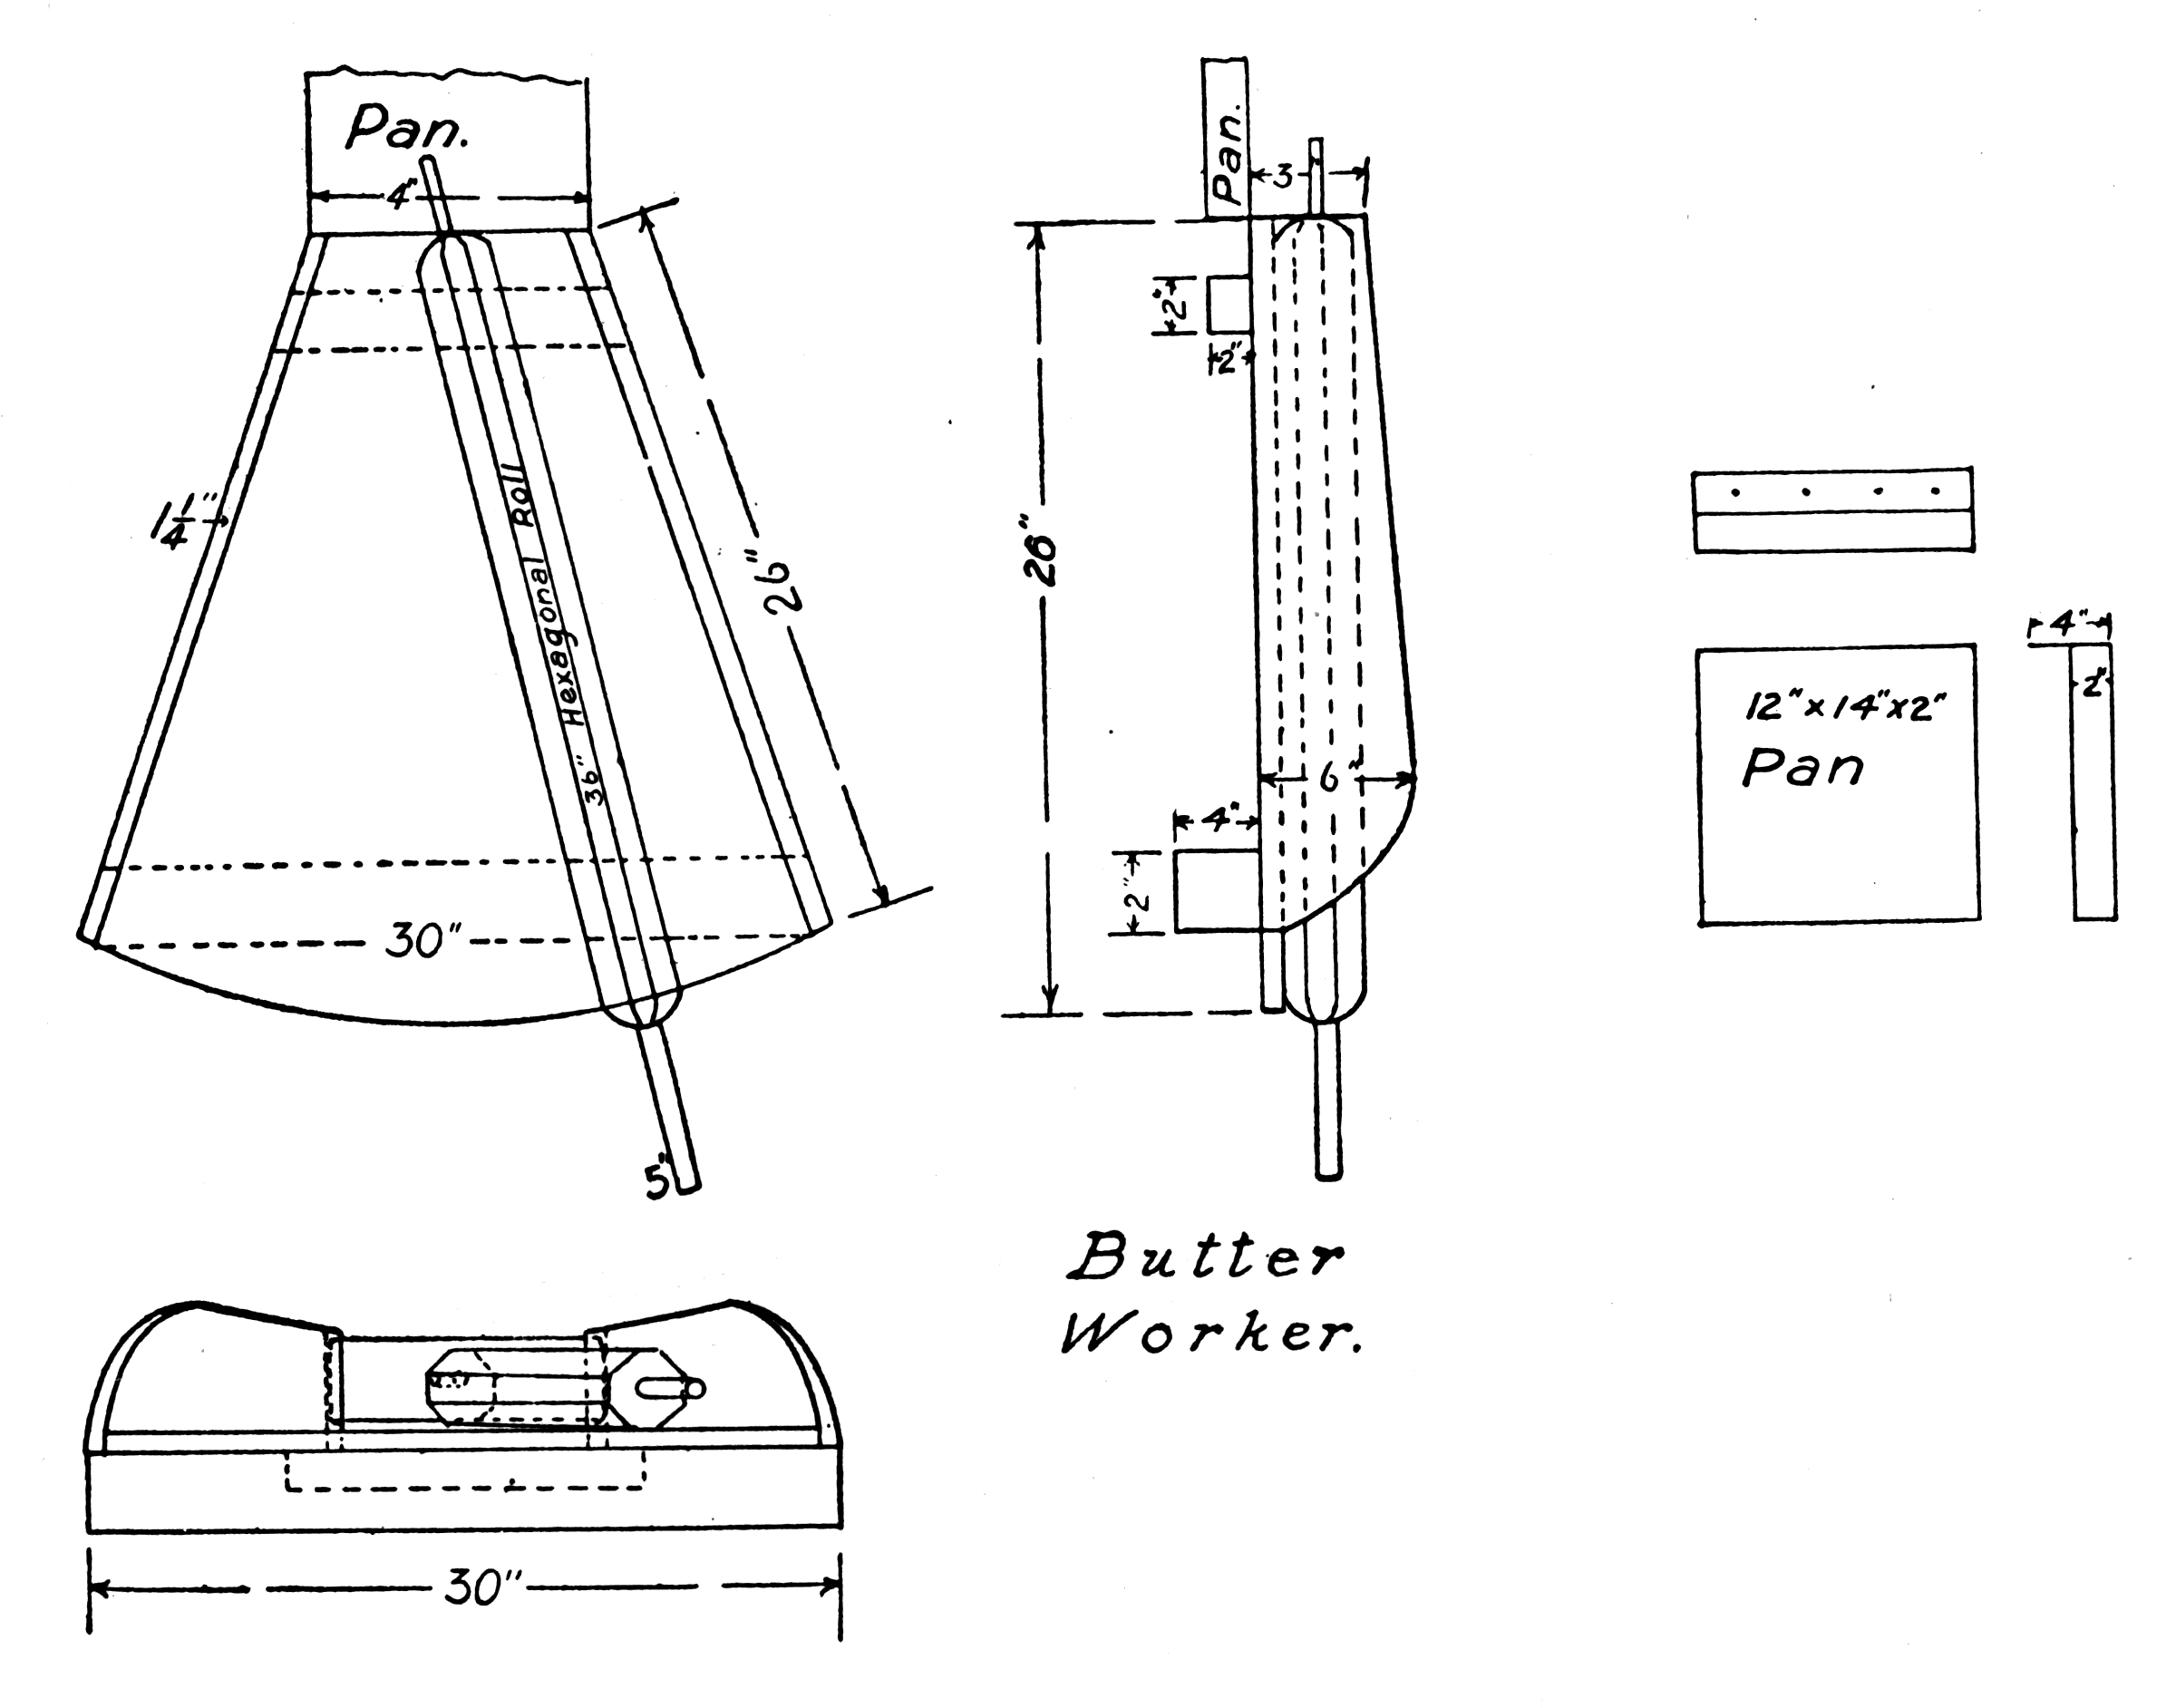
MILKING STOOL
A convenient device used in milking, which not only provides a seat for the one who is milking, but a platform with a hoop to hold the bucket. The bench is light in weight which makes it easy to handle. When not in use it may be hung on the wall.
Materials:
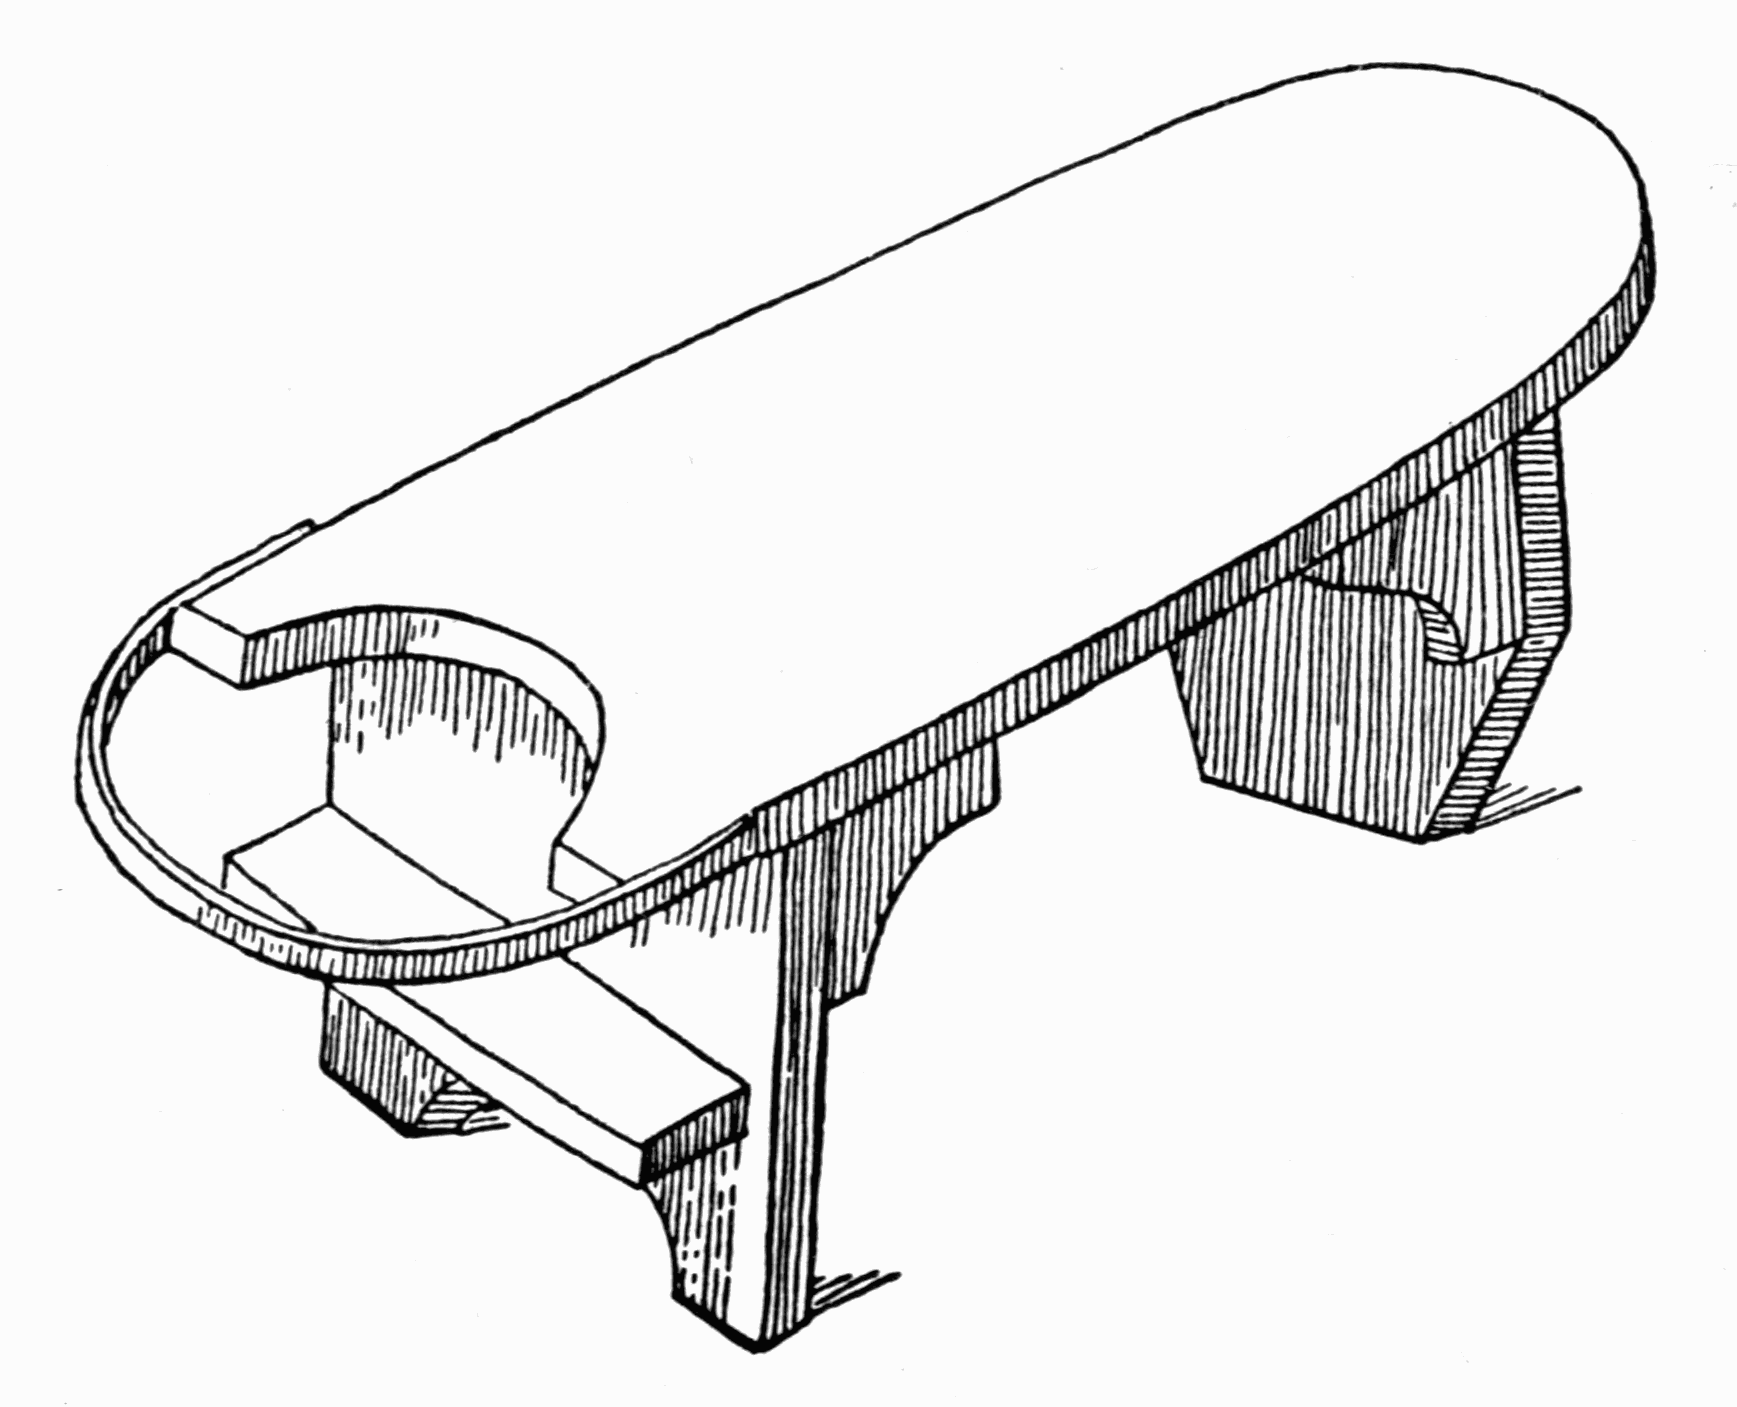
Dimensions:
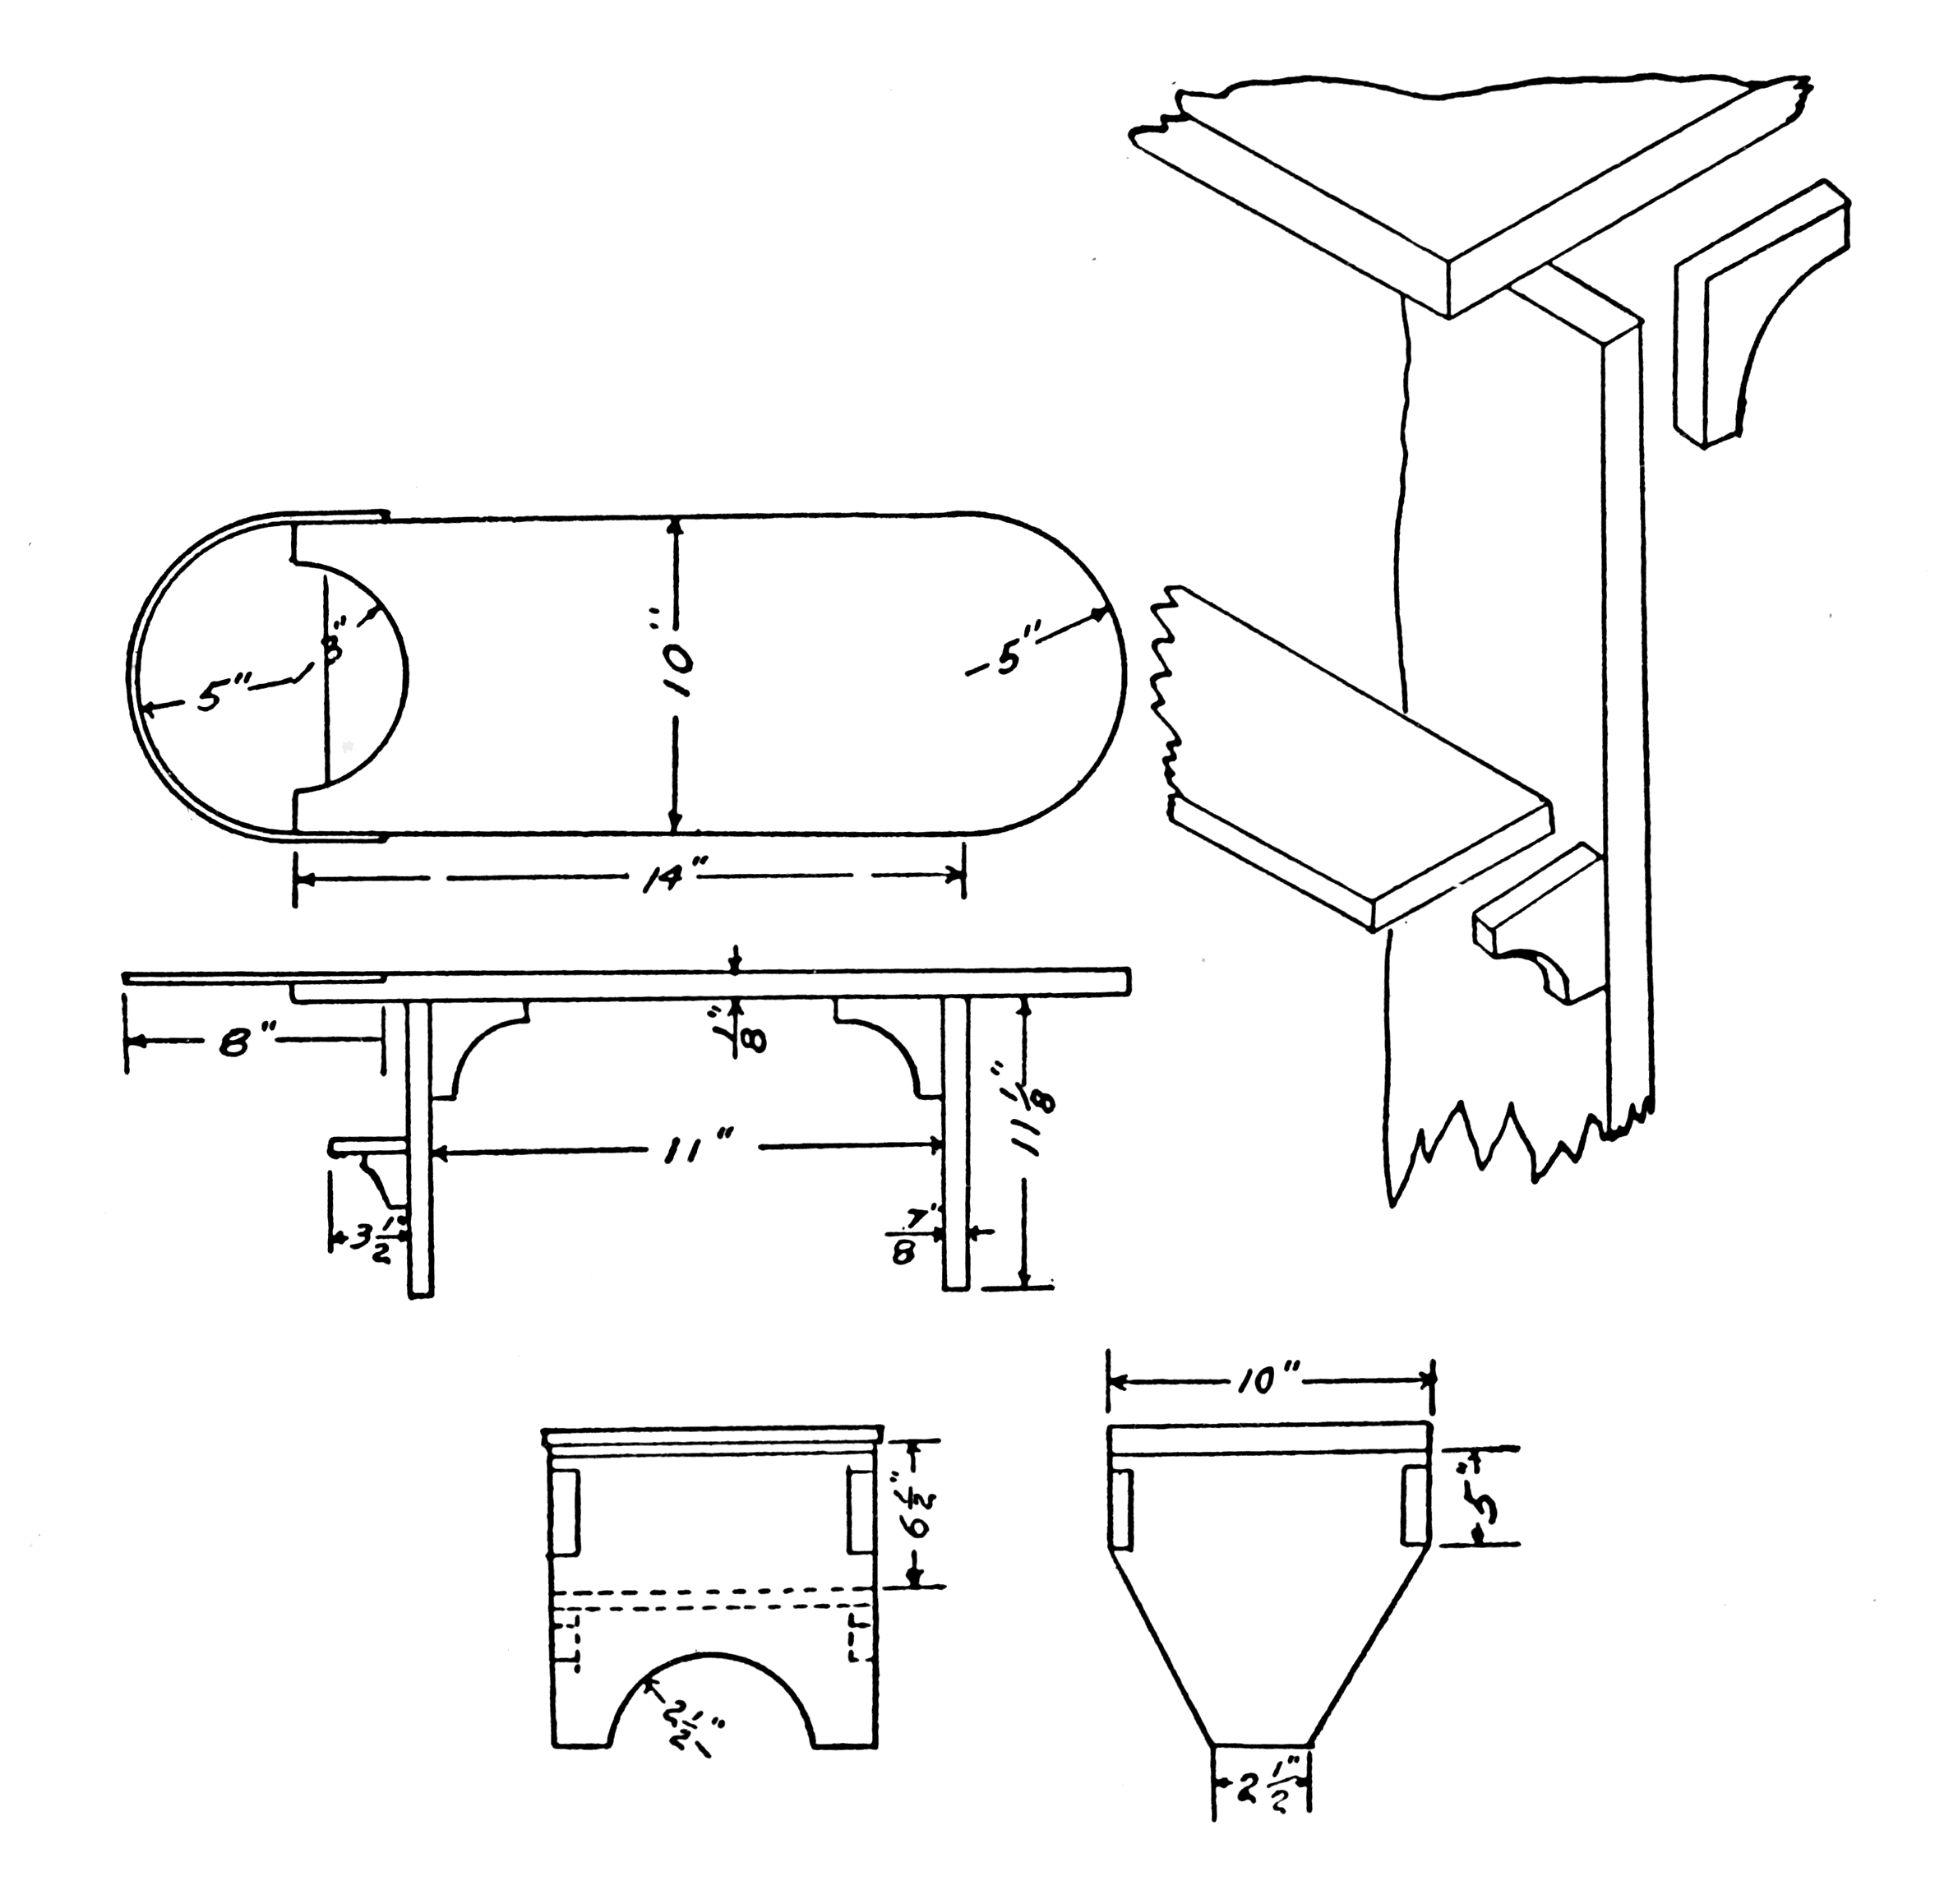
Directions:
Make the top of the stool, using the piece (¾” × 10” × 14”), rounding both ends to a radius of 5”. Make the front and back supports as shown in illustrations 4 and 5. Make the bucket shelf (¾” × 3½” × 10”) next, fastening the two pieces (¾” × 2” × 3”) to the shelf as supports and then nailing the whole to end of stool. Sandpaper the stool and then paint the whole any desired color, preferably white.
CHEESE-MAKING EQUIPMENT
Devices used in the process of making cottage, Neufchatel, and cream cheese are given, accompanied by directions for the use of each of these devices in the making of these cheeses.
Construction of Drainer.—The rack shown in the figure is 13 inches wide, 13 inches long, and 10 inches deep. The corner posts extend 1½ inches above and below the strips at the top and bottom with the tops rounded as shown in the illustration. The bottom slats fit loosely into notches, hence they may be removed when the draining rack is washed. The materials required are four corner posts 1½ × 1½ inches; 15 strips 1 × ⅜ × 13 inches and 2 strips 1 × ⅜ × 13 inches notched to receive the bottom slats. Pine or poplar may be used for the construction of this device.
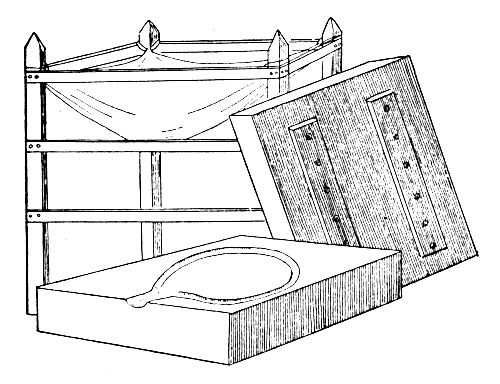
Construction of Press.—3 or 4 inch poplar boards 18 × 18 inches are used for this press. Cleats are placed on the back of these boards to keep them from warping. The lower board of this press has a circular groove which has an outlet in one side to allow the whey to drain off.
[Pg 109] Cottage Cheese.—Cottage cheese has been produced from time immemorial upon the farm. Ordinarily, it is made from milk that has been allowed to stand until it thickens by natural souring. It is then skimmed. After skimming, the rather firm mass of loppered milk is stirred with a large wooden spoon.
Simultaneously with the gentle breaking of the coagulum the temperature of the mixture of whey and curd is gradually raised to about 95 degrees Fahrenheit and maintained at that temperature for five minutes. This mixture should be stirred occasionally but not vigorously. Too much stirring will cause the mass to drain slowly. After this heating process the mixture of whey and curd is poured into the draining cloth; usually muslin or cotton sheeting is stretched over the draining rack, which is especially constructed for this purpose. Such a rack as shown in the illustration can be made very easily and at a small cost. Thirty pounds of milk per rack may be easily handled. Perhaps, in handling the milk in this quantity, it would be advisable to make the rack somewhat longer than the one illustrated. A rack rectangular in shape, 13 inches wide, 36 inches long and 10 inches deep is sufficient. The draining mixture is left undisturbed for half an hour and then the curd is worked toward the center of the cloth by means of a spoon or ladle. The last of the whey is removed by raising and lowering repeatedly the ends of the draining cloth. After draining the curd in this manner the corner of the cloth is folded over to form a sack and the curd is placed between the heavy boards or press. If more pressure is needed weights may be placed on the top board. When the curd has acquired the consistency desired it is salted to suit the taste, and usually a small amount of cream is added. The use of the latter, however, is entirely optional.
The expulsion of the whey by heating hardens the particles of curd, giving a grainy texture to the mass.
Neufchatel Cheese.—Fresh clean milk is required to make a high-grade Neufchatel cheese. In no case should the milk be over twelve hours old. A slow development of a clean acid flavor is demanded. The addition of a commercial lactic starter in small [Pg 110] amounts aids in obtaining curd free from objectionable ferments. Too much starter will produce acid too rapidly and give a rough mealy curd. A very satisfactory product may be secured, if the milk is reasonably clean, without using any starter.
Starter.—The starter is merely soured milk. In making a home-made starter place a clean milk bottle and tumbler in a pan of cold water and bring same to boiling; remove the bottle, allow it to cool and then fill it with the freshest, cleanest milk available. The bottle should now be covered with a sterilized glass tumbler in order to prevent the entrance of dirt. Allow the milk to sour at a temperature of about 75° F. (room temperature).
Two cubic centimeters of active starter for each thirty-pound can of milk will give good results. After adding the starter the milk is vigorously stirred and warmed to a temperature of 80° F. Rennet is now added at the rate of 30 drops per 100 pounds of milk. Upon a small scale junket tablets may be used for curdling purposes. The mixture, after being thoroughly stirred, is left at rest over night at room temperature, or preferably a little higher. The firm curd is now poured upon the draining rack as with the cottage cheese and allowed to drain for about two hours. Toward the end of the draining period the curd is worked toward the center of the cloth by means of a ladle. The cloths containing the curd are now tied together bag fashion and pressed. The hand-made contrivance illustrated may be used, or merely allow weights to rest on bags of curd over night. The more whey that is removed the better will be the flavor and keeping qualities of the cheese. The curd should drain out and not dry out. Mix in the salt to suit the taste by using a butter worker or a pail and potato masher. Ordinarily about one ounce of salt to four pounds of curd is sufficient. The cheese is now ready to be run through the food chopper and molded. Sometimes it is packed tightly into screw top jars or jelly glasses with tight covers, but usually the cheese is molded into shape and wrapped in parchment paper, surrounded by tin foil to exclude the air. Such molds may be formed by hand closely enough to exclude the air. Butter printers are often used. [Pg 111] If the work is done upon a small scale some kind of a hand formed package is probably most economical.
Cream Cheese.—Cream cheese is made in practically the same way as Neufchatel cheese except that the former is made out of cream testing from 6 to 8 per cent. fat.
More detailed information on the subject of making cheese can be obtained from the bulletins and books suggested for reference reading in the list given in the back of this book.
APPENDIX
FUNDAMENTALS IN WOODWORKING
Note.—Some of the terms used in the text are explained in this chapter.
Tenon.—A tenon is a piece of wood shaped like a tongue by dividing the end into three rectangular parts, cutting the sides away and leaving the middle which is shaped to form a tongue.
Mortise.—A mortise is a hollow cut in to receive a corresponding piece of wood. It is made by measuring the required distances on a piece of wood and boring holes. Take out these portions of wood with a chisel until the mortise is of the required size. Mortise and tenon joints put together in one direction, as those made in the back of a chair, are much easier made than those which are joined in two directions, as in the framework of a stool.
Mitred Joint.—There are many modifications of this joint but the one most used is the one made at an angle of 45 degrees. Mitred joints are easily made but they have a tendency to shrink, leaving an opening on the inside of the joint.
Cleat.—A piece of wood nailed down to secure something from slipping. The size of a cleat will be determined by the weight which it is to hold.
Bevel.—A bevel is a finished edge to a piece of wood. The kind of problem must determine the kind of beveled edge to be made. The blade of the square must be set at the correct angle in making a bevel edge. The most popular bevel is made by setting the bevel square at an angle of 45 degrees.
Bracket or Brace.—A supporting piece for a shelf or any other place which needs strengthening.
Panel.—Any area out of level. It may be sunk below or raised above the general face of the surrounding work. They are set in grooves made the proper depth with a plane. Every piece of wood used in panelling must be straight with the face surface of the wood and straight and square with the front edge to make a flat and square panel.
[Pg 113] Groove.—A groove is a furrow or a long hollow. The depth of the furrow depends on the rail it is to hold.
Taper.—A taper is a graduated point. All parts of the surface must have the same amount of taper to make it equally tight at all points when driven into place. Draw lines on the end of the wood and across the center at equal distances from the corners and with the surface straight on both sides. Care must be taken not to split the corners while making a taper.
Plugs.—Plugs are pieces of tapered wood used as a stopper, such as in the illustration of Jelly Strainer No. 2. When plugs are to be used, the holes must be made in the wood before the pieces are put together.
“Penny.”—This term is a corruption of “pound” and used in speaking of different kinds of nails. For example, eight-penny nails means that one thousand of them weigh eight pounds.
Radius Bar.—A bar pivoted at one end, about which it swings, and having its other end attached to a piece which it causes to move in a circular arc as in the corrugated roller made to work the butter.
Finishing.—There are two things to be considered in finishing woodwork; the preservation of the wood, and the artistic finish. Three steps are necessary in putting on the finishing touches. First, the surfaces made smooth by the use of sandpaper; the second, staining or varnishing, and the third, polishing.
Sandpaper.—Sandpaper is not expected to do the work of edged tools. Tool work must be completed before using sandpaper, or particles of dust will get into the pores of the wood which will dull the tools while working with them. Never sandpaper across the grain of the wood. While dressing flat surfaces, use a piece of sandpaper put over a block of wood.
Stains.—Water, oil, and alcoholic stains are used for staining woodwork. All have their advantages and disadvantages, but for general purposes the alcoholic stains are highly recommended, Johnson’s wood dye being one of the best. A good water stain is made by boiling an extract of logwood, the size of a walnut, with four ounces of water. This is applied to the wood while [Pg 114] hot, using a brush or sponge with which to apply it. Repeat the application until the desired color is obtained. Varnish must be used only when a hard, transparent finish is desired.
Polish or Wax.—Satisfactory results cannot be obtained unless the surface is smooth and well prepared by the use of sandpaper and stain. A cheap recipe for making wax is given as follows:
Break up the beeswax and melt it into the consistency of thick cream in a bowl placed in a saucepan of boiling water. Remove bowl from the fire, gradually beating into the wax the turpentine and alcohol. Store it away in covered jars and warm slightly when it is to be used. Spread a thin layer on a soft woollen cloth and apply it to the surface.
SUGGESTED LIST OF TOOLS
| 1 Stanley “Bed Rock” smooth-plane, No. 603 | $1.60 |
| 1 Disston’s Crosscut-saw, No. 9, 22”—10 points | 1.15 |
| 1 Disston’s Back-saw, No. 4, 10” | .95 |
| 1 Buck Bros. firmer chisel, 1” | .35 |
| 1 Buck Bros. firmer chisel, ¼” | .20 |
| 1 Hammond’s Adze-eye hammer, No. 3, 7 oz. | .45 |
| 1 Hardened blade try-square, No. 5½, 6” | .25 |
| 1 Beech Marking-gage, No. 64½, 8” | .20 |
| 1 Sloyd Knife, No. 7, 2½” blade | .30 |
| 1 Boxwood rule, 2’, 4-fold | .12 |
| 1 Barber’s ratchet brace, No. 33, 8” sweep | 1.40 |
| 1 Miter-box, beech, 12” long, No. 00 | .30 |
| 4 Brad awls, handled, 1”, 1¼”, 1½”, ½” | .15 |
| 1 Set Russell Jennings Auger-bits, 4/16”, 5/16”, 6/16”, 7/16”, and 8/16” | 1.40 |
| 1 Quire sandpaper, No. 00 | .30 |
| 1 Quire sandpaper, No. 1 | .30 |
| —— | |
| Total | $9.42 |
Note: Sufficient equipment for constructing all of these devices may be found in average country homes. The work may be successfully done with fewer tools but this list is given as a suggestion for schools.
LIST OF PUBLICATIONS FOR SUPPLEMENTARY READING
Farm Butter-making, Farmers’ Bulletin 541, U. S. Department of Agriculture, Washington, D. C.
Butter-making on the Farm, Georgia State College of Agriculture, Athens, Ga.
Butter-making, Storrs Experiment Station, Storrs, Conn.
Cheese-making, Wisconsin Experiment Station, Madison, Wis., Bulletin 181.
Neufchatel Cheese, Bulletin 78, Storrs Experiment Station, Storrs, Conn.
Cottage or Dutch Cheese and Other Cheese, Oklahoma Agricultural College, Stillwater, Okla.
Conveniences for Handling the Farm Cow and Her Products, Special, U. S. Dept. of Agriculture, Office of the Secretary, Washington, D. C.
The Production and Care of Milk and Cream, Special, U. S. Dept. of Agri., Office of the Secretary, Washington, D. C.
A Plan for a Small Dairy House, Farmers’ Bulletin 689, Department of Agriculture, Washington, D. C.
The Control of Chicken Mites and Lice, Iowa State College of Agriculture, Ames, Iowa.
How to Care for the Little Chick, West Virginia University Agri. Exp. Station, Morgantown, W. Va.
Suggestions on Poultry Raising for the Southern Farmer, Special, U. S. Department of Agriculture, Office of the Secretary, Washington, D. C.
Oregon Station Trap-Nest, Oregon Agricultural College, Corvallis, Oregon.
A Simple Trap-Nest for Poultry, Farmers’ Bulletin 682, U. S. Department of Agriculture, Washington, D. C.
The Organization of Boys’ and Girls’ Poultry Clubs, Farmers’ Bulletin 562, U. S. Department of Agriculture, Washington, D. C.
Running Water for Farm Homes, A. & M. College, Agricultural College, Miss.
Domestic Water Supply, Bulletin 215 by V. M. Cone, Special, Colorado Extension Service, Fort Collins, Colorado.
Simple Water Supplies for the Farm, Extension Bulletin 18, University of Nebraska, Lincoln, Nebr.
INDEX
Final stops missing at the end of sentences and abbreviations were added. The following were changed: